2. Secure SDLC and Application Security
1. Secure SDLC – SSDLC
The Secure Software Development Life Cycle (SSDLC) is a framework that integrates security activities into every phase of software development from the first whiteboard sketch to the final line of code in production.
Unlike the traditional SDLC, where security was a final “gate” before release, SSDLC ensures that security is a continuous thread running through the entire process.
1.1 Why SSDLC Matters?
- Cost Reduction: Fixing a bug during the Design phase costs less. Fixing the same bug in Production it will costs 10 time more.
- Compliance: It provides the “paper trail” (audit logs, scan reports) needed for standards like SOC2, ISO 27001, and HIPAA.
- Speed: Paradoxically, rigorous testing during development prevents the “stop-ship” emergencies that delay releases at the last minute.
1.2 The 7 Stages of SSDLC
Here is how you inject security into each traditional stage:

1. Planning – Requirements Phase
Before a single line of code is written, you must define what needs to be secured.
- Security Requirements: – Explicitly state needs like “Data must be encrypted at rest,” “Users must use MFA,” or “Session timeouts must be 15 minutes.”
- Risk Assessment: – Identify the business value of the data. Is this a public marketing site (Low Risk) or a payment gateway (Critical Risk).
—
2. Design Phase
This is the most critical phase for “Shifting Left.”
- Threat Modeling: – A brainstorming session (using methods like STRIDE) where the team asks, “How would a hacker attack this design?” and “What happens if the database fails?”
- Architecture Review: Ensure the system uses secure patterns (e.g., using a verified identity provider instead of building a custom login system).
—
3. Coding Phase
Developers write the software. Security here focuses on education and real-time feedback.
- Secure Coding Guidelines: Provide developers with a “Golden Standard” for writing code (e.g., “Always use parameterized queries to prevent SQL Injection”).
- IDE Plugins: Use tools (like SonarLint) that act as a spell-checker for security, flagging issues right in the editor as they type.
- No Hardcoded Secrets: – Never put passwords or API keys directly in the code.
—
4. Build Phase – CI/CD
The code is committed and compiled. This is where automation takes over.
- SAST (Static Application Security Testing): – Scans the source code for known vulnerability patterns.
- SCA (Software Composition Analysis): – Scans open-source libraries (like npm or maven packages) to ensure you aren’t using an outdated version with known vulnerabilities.
—
5. Testing Phase
The application is running in a staging environment. Now we test it from the “outside.”
- DAST (Dynamic Application Security Testing): – A tool attacks the running application, trying to inject malicious data to see if it breaks. Preferred not to deploy this in production environment.
- Manual Penetration Testing: – For high-risk releases, human experts try to find logic flaws that automated tools miss.
—
6. Deployment Phase
Moving the code to production.
- IaC Scanning: Scan your Terraform/Kubernetes files to ensure cloud resources are configured correctly.
- Secret Scanning: Ensure no API keys or passwords are being accidentally deployed in configuration files.
—
7. Operations Phase – Maintenance
The software is live. The goal now is visibility and response.
- Continuous Monitoring: Use SIEM tools to detect active attacks (e.g., “Why is one IP address trying 500 passwords in 1 minute?”).
- Incident Response: Have a clear plan for when a breach occurs. Who do you call? How do you patch it?
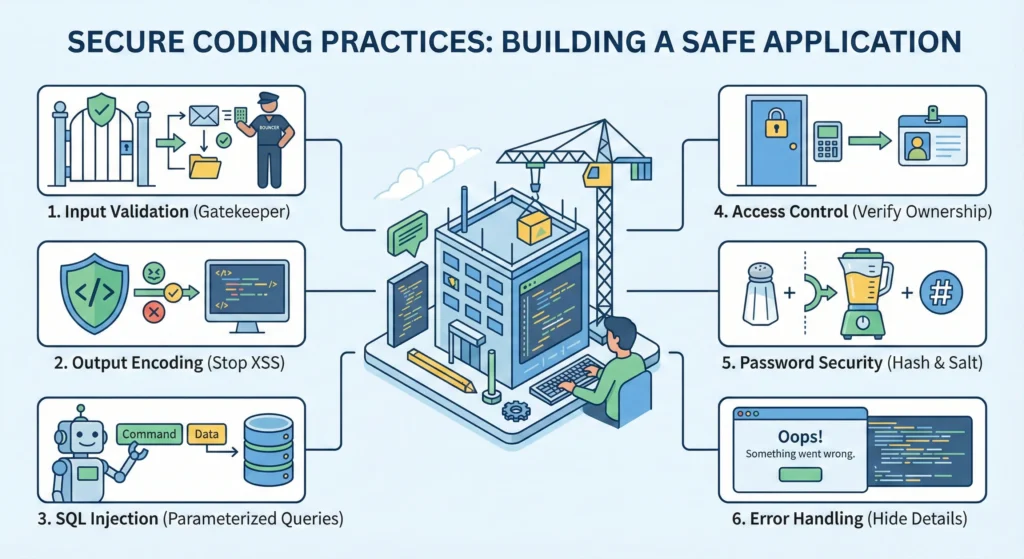
2. Secure Coding Practices
Security is not just about firewalls or antivirus. The biggest holes are usually in the application code itself. If the code is weak, no firewall can save you.
—
1. Input Validation – The Gatekeeper
You are checking if the incoming data is safe before you let it enter your system.
If you don’t validate input, you are leaving the door open for almost every attack SQL Injection, Scripting attacks, and buffer overflows.
The “Client-Side” Trap – Many developers make a classic mistake: “I added required and maxlength in my HTML form, so its safe.”
- The Reality: That is only for User Experience (UI).
- The Hack: A hacker doesn’t use a browser. They use tools like Burp Suite or Postman. They can send a request directly to your server, bypassing your HTML checks completely.
- The Solution: Always write validation logic in your backend code (Java/Python/Node.js).
1.1 Types of Validation
- Syntactic Validation – Format Check: –
- Does the email look like name@domain.com?
- Is the age a number?
- Semantic Validation – Logic Check: –
- Scenario: A user tries to transfer money.
- Check: Does the user actually have that much balance? Is the “Transfer Date” in the future? (Logic matters!)
—
2. Output Encoding – Stopping XSS
When you display user data back on the screen, you must “neutralize” it so the browser treats it as text, not code.
Imagine a blog comment section.
- Hacker writes: Nice post! <script>stealCookies()</script>
- Without Encoding: Everyone who visits that page will have their cookies stolen because the browser thinks <script> is a valid command.
- With Encoding: The browser sees <script>. It displays the text <script> on the screen, but it does not run it.
—
You cannot use the same encoding everywhere.
- HTML Body: If putting data inside a <div>, use HTML entity encoding.
- JavaScript Variables: If putting data inside a <script> var name = “…” </script>, you need to use Unicode escapes. If you just use HTML encoding here, the XSS attack might still work!
—
3. SQL Injection – Protecting Data
Stop hackers from running their own SQL commands on your database.
Why is String Concatenation so dangerous?
- Code: “SELECT * FROM users WHERE name = ‘” + name + “‘”
- When you join strings, the database cannot tell the difference between the Developer’s Command and the User’s Input. It thinks it is all one command.
- If the user enters ‘ OR ‘1’=’1, the query becomes true for everyone, and the database dumps all the data.
The “Parameterized Query” Magic
When you use a Prepared Statement (Parameterized Query):
- You send the SQL skeleton first: SELECT * FROM users WHERE name = ?
- The database compiles this logic.
- Then you send the input separately.
- The database treats the input strictly as a value. Even if the input is DROP TABLE, the database will just look for a user named “DROP TABLE” it won’t actually delete the table.
—
4. Broken Access Control – IDOR
Just because a user is logged in, doesn’t mean they can see everything.
Insecure Direct Object Reference (IDOR) is very common.
- Scenario: You visit a URL to see your profile: mysite.com/profile?id=100.
- The Hack: You simply change the ID in the URL to 101: mysite.com/profile?id=101.
- The Vulnerability: If the code doesn’t check if User A actually owns Profile 101, the server will happily show User B’s profile.
The Fix
- Ownership Check: Every time you fetch a record from the database, check the owner.
- Bad Logic: SELECT * FROM orders WHERE order_id = 55
- Secure Logic: SELECT * FROM orders WHERE order_id = 55 AND user_id = current_logged_in_user
—
5. Password Security – Hashing & Salting
Never store passwords as plain text.
—
Hashing vs. Encryption
- Encryption is two-way (you can lock and unlock). We do not use this for passwords.
- Hashing is one-way (you can turn food into poop, but you can’t turn poop back into food).
—
The “Salt” Concept
If two users have the same password (“password123”), they will have the same Hash. This is bad because hackers can use “Rainbow Tables” (lists of common hashes) to crack them.
- Salting: We add a random string (Salt) to the password before hashing.
- User A: Hash(“password123” + “RandomSaltA”)
- User B: Hash(“password123” + “RandomSaltB”)
- Now, both hashes look completely different, even though the password is the same.
- Pro Tip: Use Argon2 or Bcrypt. They handle salting automatically.
—
6. Error Handling – Don’t Overshare
Information Leakage – When an error happens, developers often print the “Stack Trace” (the full error log) to the screen to help with debugging.
—
The Risk: This log tells the hacker:
- What database you are using.
- What versions of libraries you have.
- Exactly which line of code failed.
- This is a treasure map for a hacker.
—
The Fix
- Development Mode: Show full errors (so you can fix bugs).
- Production Mode: Show a generic message: “Something went wrong. Please contact support.” Log the real error internally on the server but never show it to the user.
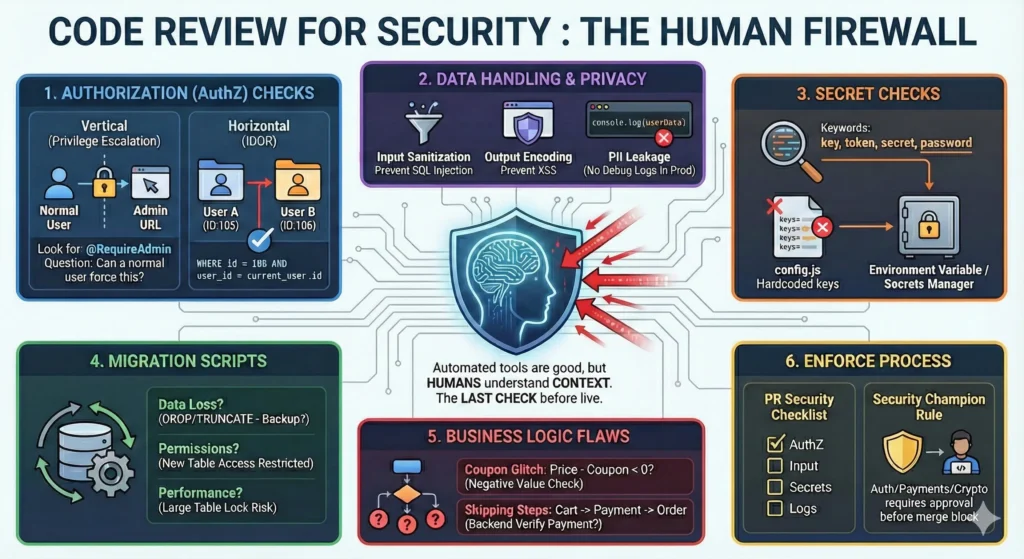
3. Code Review for Security – The Human Firewall
Automated tools (like SonarQube) are good, but they are not smart. They can find a syntax error, but they cannot understand context. They don’t know if a user should be allowed to see a specific file.
That is why Human Code Review is the most important step. It is the last check before your code goes live.
—
1. Authorization (AuthZ) Checks
Most developers check Authentication (Is the user logged in?), but they often forget Authorization (Is this user allowed to perform this specific action?).
The “Vertical” & “Horizontal” Check
- Vertical Privilege Escalation: –
- Scenario: A normal user tries to access an Admin URL.
- Code Check: Look for decorators or middleware like @RequireAdmin or if (user.role != ‘ADMIN’) return error.
- Review Question: “If a normal user forces this URL, does the code block them?”
- Horizontal Privilege Escalation (IDOR): –
- Scenario: User A tries to view User B’s invoice by changing the ID in the URL (/invoice/105 -> /invoice/106).
- Code Check: Ensure the database query includes the user ID.
- Bad: SELECT * FROM invoices WHERE id = 106
- Good: SELECT * FROM invoices WHERE id = 106 AND user_id = current_user.id
2. Data Handling & Privacy
“Treat user data like a ticking bomb.”
When reviewing code that handles data (names, emails, passwords, payments), be extra careful.
- Sanitization (Input): – Is the data being cleaned before it goes into the database? (Preventing SQL Injection).
- Encoding (Output): – Is the data being cleaned before it is shown on the screen? (Preventing XSS).
- PII Leakage (The “Console Log” Mistake): –
- Developers often leave debug logs like console.log(userData) or print(paymentRequest).
- The Risk: In production, these logs might print credit card numbers or passwords into the server logs, which many people can see.
- Review Rule: “Remove all print statements before merging.”
3. Secret Checks
This is the most common mistake. Developers hardcode keys to test something locally and forget to remove them.
- Search for Keywords: – Do a quick Ctrl+F search in the PR for words like:
- key, token, secret, password, auth, private.
- Check Configuration Files: – Look closely at files like config.js, settings.py, or application.yml.
- The Fix: – Tell the developer: “Move this value to an Environment Variable (.env file) or use a Secrets Manager (like AWS Secrets Manager/Vault).”
4. Migration Scripts – Database Changes
“Don’t break the database structure.”
Migration scripts modify your database schema (adding columns, deleting tables). These are high-risk files.
- Data Loss: – Does this script DROP a column or TRUNCATE a table?
- Ask: – “Do we have a backup? Will we lose customer data?”
- Permissions: – If a new table is created, who has access to it?
- Scenario: – You create a salary_details table. Does the default database user have read access? It should be restricted.
- Performance: – Does the script add an index or modify a huge table?
- Risk: – Running a migration on a table with 10 million rows might lock the database and bring the site down for 1 hour.
5. Business Logic Flaws
Tools miss logic. Humans find logic.
A scanner will never find these bugs because the code is technically “correct,” but the logic is flawed.
- The “Coupon” Glitch: –
- Code: – final_price = price – coupon_value
- Review: – “What if the coupon value is bigger than the price? Does the user get money back? Are we checking for negative values?”
- The “Skipping Steps” Bug: –
- Scenario: – A checkout process has 3 steps (Cart -> Address -> Payment).
- Review: – “What if I force the URL to skip the ‘Payment’ step and go straight to ‘Order Confirmation’? Does the backend verify that payment was actually received?”
6. How to Enforce This? – Process Changes
You cannot rely on memory. You must force these checks in the workflow.
6.1. The Security Section in PR Templates
When a developer opens a Pull Request (PR) on GitHub/GitLab, make them fill out a mandatory checklist.
Security Checklist (Required): –
- [ ] AuthZ: I have checked that only the owner can access this data.
- [ ] Input: I have validated all inputs (length/type).
- [ ] Secrets: I have NOT included any hardcoded keys or tokens.
- [ ] Logs: I have removed all debug/console logs.
6.2. The “Security Champion” Rule
- Rule: Any code that touches Authentication, Payments, or Cryptography requires approval from a designated “Security Champion” (a developer trained in security) before it can be merged.
- Block the Merge: Configure GitHub/GitLab to block the merge button until this specific review is done.
4. Threat Modelling
Threat modelling is essentially structured brainstorming. It is a proactive security exercise where you examine your website’s design to find potential security flaws before you write the code.
“Think like an attacker before the attacker does.”
The Goal is to Identify what could go wrong. and fixing a security bug during the design phase is significantly cheaper and easier than fixing it after deploying in production. This is often called “Shifting Left” (moving security earlier in the timeline).
Threat Modelling = Secure design + Lower cost + Fewer incidents
- Why Threat Modelling is Important – Most serious security problems come from bad design.
- Finds security risks before coding starts and prevents expensive redesign later.
- Improves system architecture.
- Makes developers security aware.
- Reduces real production incidents.
- Supports compliance and audits.
- Threat modelling should be done: –
- During design phase.
- Before building a new feature.
- When adding new APIs or integrations.
- When architecture changes (cloud, microservices, auth changes).
- Periodically for critical systems.
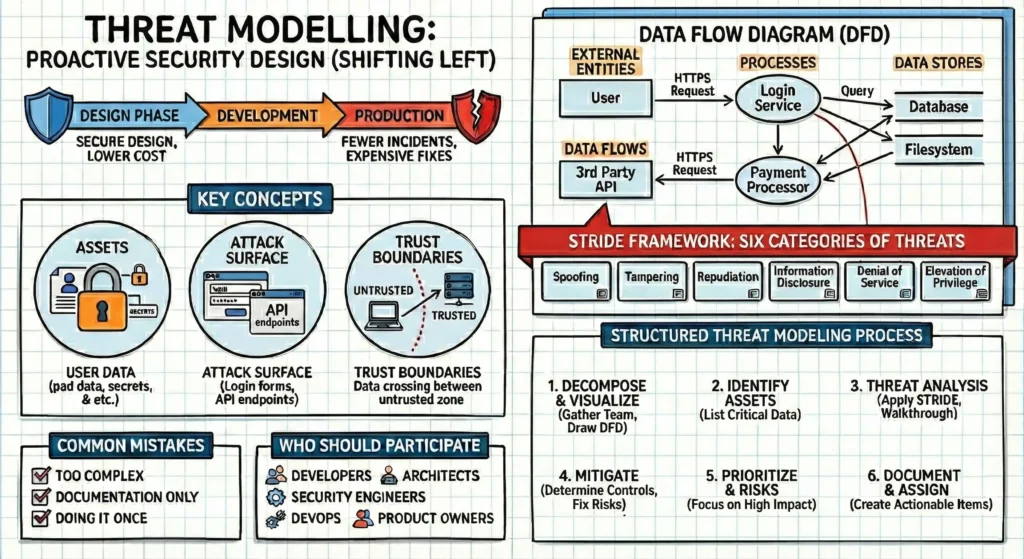
Key Concepts in Threat modelling
- Assets – These are the things you want to protect.
- User passwords, credit card numbers, your proprietary algorithms, the server’s CPU power.
- Attack Surface – This is every point where an attacker could try to enter data or extract data from your system.
- Login forms, API endpoints, contact forms, URL parameters, file upload buttons.
- Trust Boundaries – These are the lines drawn where data changes its level of “trust.”
- When data moves from a user’s browser (untrusted) to your web server (trusted), it crosses a trust boundary. Attacks usually happen where data crosses these boundaries.
1. Data Flow Diagrams (DFDs)
A DFD is a map of how data moves through your system. You cannot secure what you cannot see.
The Key Shapes: –
- External Entities (Rectangles): – People or systems outside your control (e.g., User, Third-party API).
- Processes (Circles/Ovals): – Code that does work (e.g., “Login Service,” “Payment Processor”).
- Data Stores (Parallel Lines): – Where data sits (e.g., SQL Database, Cache, Filesystem).
- Data Flows (Arrows): – The movement of data (e.g., “HTTPS Request,” “Database Query”).
- Trust Boundaries – where trust level changes
2. The Framework: STRIDE
STRIDE is a mnemonic developed by Microsoft to help you remember the six categories of threats. For every element in your DFD, ask: “Is this vulnerable to…?”
| Letter | Threat | Definition | Mitigation / Fix |
| S | Spoofing | Pretending to be someone or something else. | Authentication: – Strong passwords, Multi-Factor Authentication (MFA), HTTPS only. |
| T | Tampering | Modifying data on disk, in memory, or in transit. | Integrity: – Digital signatures, Checksums, Validation on the server-side (never trust the client). |
| R | Repudiation | Claiming you didn’t do something (because there’s no proof). | Non-Repudiation: – comprehensive Logging and Audit Trails. |
| I | Information Disclosure | Exposing information to people who shouldn’t see it. | Confidentiality: – Encryption (at rest and in transit), generic error messages. |
| D | Denial of Service | Making the system unavailable to valid users. | Availability: – Rate limiting, CDNs (like Cloudflare), Filtering. |
| E | Elevation of Privilege | Gaining capabilities one shouldn’t have. | Authorization: – Role-Based Access Control (RBAC), Principle of Least Privilege. |
3. The Structured Threat Modeling Process
The step-by-step framework for identifying security risks in your system design. It combines visual decomposition with structured analysis (STRIDE) to turn abstract risks into actionable engineering tasks.
- st phase – Decompose & Visualize – Create a shared understanding of how the system works and where it interacts with the outside world.
- Gather the Team: – Bring together developers, architects, and security engineers.
- Draw the Data Flow Diagram (DFD): – Sketch the system architecture on a whiteboard.
- Keep it Simple: – Focus on clarity over perfection. Show only the main components (e.g., Web App, API, Database, External Payment Gateway).
- Data Flow: – Draw arrows to show how data moves between these components.
- Mark Trust Boundaries: – Crucially, identify where data crosses from an untrusted zone to a trusted one.
- Visual Tip: – Draw a red dotted line between the Internet and your internal server, or between your application and a third-party API. These are your “attack surfaces.”
- nd phase – Identify Assets – Determine exactly what you are trying to protect to ensure effort is focused on high-value targets.
- List Critical Assets: –
- User Data: – PII, emails, payment info.
- Secrets: – API keys, encryption keys, database credentials.
- Critical APIs: – Login endpoints, payment processing.
- Infrastructure: – Databases, Admin panels/functions.
- Prioritize: – Not all assets are equal; flag high-value assets that would cause the most damage if compromised.
- List Critical Assets: –
- rd phase – Threat Analysis (Apply STRIDE) – Systematically find weaknesses by walking through the diagram and applying the STRIDE model to every component and trust boundary.
- The Walkthrough: Pick a specific flow (e.g., “The Login Process”) and trace it across the diagram.
- Ask the STRIDE Questions:
- Spoofing: Can someone pretend to be another user or admin?
- Tampering: Can data be modified in transit (e.g., changing a transaction amount)?
- Repudiation: Can a user deny they performed an action (lack of logs)?
- Information Disclosure: Can sensitive data leak (e.g., error messages revealing stack traces)?
- Denial of Service: Can the service be flooded or abused to stop working?
- Elevation of Privilege: Can a regular user gain admin rights?
- th phase – Mitigate (Fix the Risks) – For every threat identified, decide on a technical solution.
- Determine Controls:
- Authentication: Is strong identity verification needed?
- Authorization: Are there rules ensuring users only access their own data?
- Encryption: Should data be encrypted at rest and in transit (TLS)?
- Rate Limiting: Is the API protected against brute force?
- Logging: Are we auditing critical actions?
- Risk Reduction: Remember, mitigations reduce risk; they rarely eliminate it completely.
- Threat: “Attackers can guess weak passwords via the login API.”
- Mitigation: “Implement account lockout after 5 failed attempts and enforce password complexity.”
- Determine Controls:
- th phase Prioritize Risks – Avoid alert fatigue by focusing on what matters most.
- Filter the List: – You cannot fix everything at once.
- Prioritization Criteria: –
- High Impact: – Threats that result in total data loss or system compromise.
- Ease of Exploit: – Vulnerabilities that require low skill to execute (e.g., automated scripts).
- Compliance: – Risks that violate GDPR, PCI-DSS, or other regulations.
- th phase – Document & Assign (Execution) – Move from “talking about security” to “building security.” Convert risks into work items.
- Create Actionable Items: – Do not leave the risks on the whiteboard. Convert top risks into: –
- Jira Tickets / Bug Reports
- User Stories
- Architecture/Design Change Requests
- Write Clear Acceptance Criteria: Ensure the developer knows exactly what “done” looks like.
- User Story: “As a security engineer, I want to implement rate-limiting on the login API to prevent Brute Force (DoS) attacks.”
- System Requirement: “As a system, I must validate all API inputs against a strict schema to prevent SQL injection attacks.”
- Create Actionable Items: – Do not leave the risks on the whiteboard. Convert top risks into: –
4. Repeat When Architecture Changes
Threat modelling must be repeated when:
- New services are added
- Authentication changes
- Cloud architecture changes
- External integrations are introduced
Security design must evolve with the system.
5. Common Mistakes to Avoid
- Making it too complex
- Treating it as documentation only
- Doing it once and forgetting
- Leaving developers out
- Not converting findings into tasks
Threat modelling should be collaborative and practical.
6. Who Should Participate?
- Developers
- Architects
- Security engineers
- DevOps / Cloud engineers
- Product owners (for business context)
Best results come from cross-functional discussions.