3. Docker Image Engineering
Advanced Image Engineering is the art of building “Gold Images” containers that are super small, fast, and secure by removing everything except the application.
Think of The Construction Site Imagine you are building a new house. You need heavy cranes, trucks, and 100 workers (Build Environment). Once the house is finished, you don’t leave the crane in the living room! You take only the Finished House (Production Image) and hand over the keys. This keeps the house clean, safe, and efficient.
3.1. Layering & The Union File System: Storage Strategy
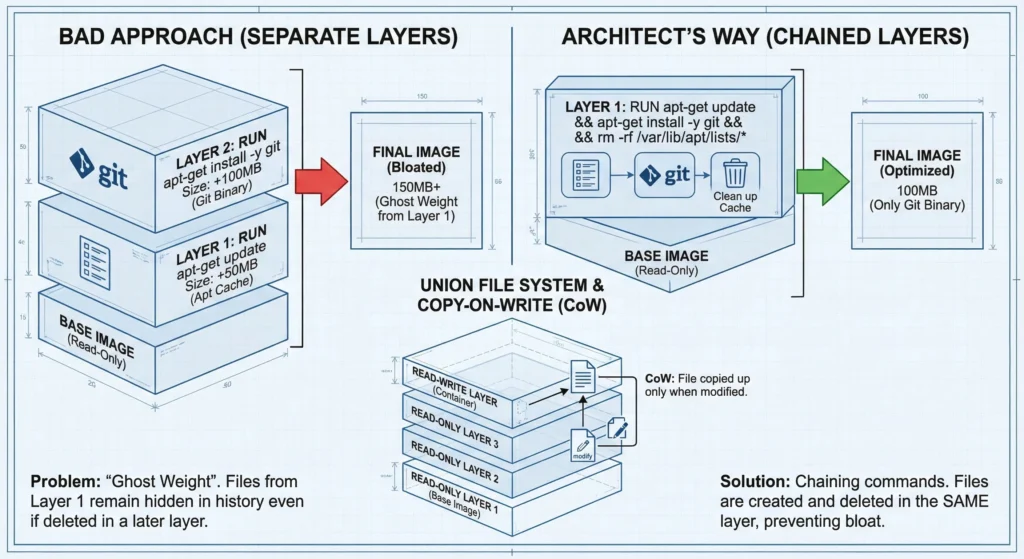
Must understand the Copy-on-Write (CoW) strategy. Docker uses a Union File System where each RUN, COPY, and ADD instruction creates a new read-only layer.
- The “Weight” Problem: If you install a package in one
RUNcommand and delete it in another, the image size does not decrease. The file is simply “hidden” in the top layer but remains in the history of the lower layer. - The Solution (Chaining): Always combine commands that belong together.
- Bad:
- RUN apt-get update
- RUN apt-get install -y git
- Architect’s Way:
RUN apt-get update && apt-get install -y git && rm -rf /var/lib/apt/lists/*
- Bad:
- Architect Note: By cleaning up in the same layer, you prevent “Ghost Weight” from bloating your production images.
Docker uses a storage technology called Union File System (UnionFS). This allows files from separate filesystems (layers) to be transparently overlaid into a single coherent view.
—
3.1.1 How Layers are Created
Every instruction in your Dockerfile that modifies the filesystem creates a new layer.
#Dockerfile
FROM ubuntu:22.04 # Creates the Base Layer (Read-Only).
RUN apt-get install python # Adds a new Layer with Python binaries (Read-Only).
COPY . /app # Adds a new Layer with your source code (Read-Only).
—
3.1.2 The “Read-Write” Container Layer
- Images are Immutable: Once an image is built, its layers are locked as Read-Only. You cannot change them.
- Containers are Mutable: When you run a container (
docker run), Docker adds a thin, empty Read-Write Layer on the very top. - Action: Any file you create, modify, or delete inside a running container happens only in this thin top layer. When you delete the container, this top layer is destroyed, but the underlying image remains untouched.
—
3.1.3. The “Copy-on-Write” (CoW) Strategy
This is the magic that makes Docker fast.
- You want to edit a config file
/etc/nginx/nginx.confthat exists in the Base Image. - The Process:
- Docker sees the file is in a Read-Only layer (locked).
- It Copies the file up to the Read-Write layer.
- It allows you to Write changes to this copy.
- The original file in the bottom layer is hidden but safe.
As an architect, your goal is to minimize image size and maximize build speed (Caching).
—
3.1.4 The “Ghost Weight” Problem
This is the 1st mistake some engineers make.
The Mistake:
#Dockerfile
RUN wget http://big-file.zip # Layer 1: Adds 100MB
RUN unzip big-file.zip # Layer 2: Adds extracted files
RUN rm big-file.zip # Layer 3: Marks 100MB as "deleted"- The Reality: The image size is Still 100MB+. Why? Because Layer 1 is Read-Only. Layer 3 just “hides” the file from view. The data is still physically in the image history and will be downloaded by every server.
- The Fix (Chaining): Do it all in one layer.
#Dockerfile
RUN wget http://big-file.zip && unzip big-file.zip && rm big-file.zip
—
3.1.5. Caching Strategy (Layer Ordering)
Docker caches layers. If Layer 2 hasn’t changed, it reuses the cached version. If Layer 2 changes, all subsequent layers (3, 4, 5…) must be rebuilt.
- Architect’s Rule: Place the least changing instructions at the top and most changing at the bottom.
- Example:Dockerfile
# BAD Architecture COPY . . # Source code changes daily -> Cache breaks here! RUN npm install # Heavy install runs every time code changes. # GOOD Architecture COPY package.json . # Changes rarely. RUN npm install # Cached until dependencies change. COPY . . # Code changes frequently, but installs are skipped!
—
—
Technical Challenges
- Information Leakage: If you accidentally
COPYa file containing passwords (like.env) in Layer 3, and then delete it in Layer 4, a hacker can pull the image, usedocker history, and extract the secret from Layer 3.- Fix: Use
.dockerignorefiles or Multi-Stage Builds.
- Fix: Use
- Inode Exhaustion: Creating thousands of tiny layers (or very small files in one layer) can exhaust the filesystem Inodes on the host, even if disk space is available.
- Storage Drivers: Docker relies on the Host OS storage driver (Overlay2, fuse-overlayfs, btrfs). If your kernel is old or incompatible, performance (Disk I/O) will suffer significantly.
—
- Docker Storage Drivers: docs.docker.com/storage/storagedriver/
- Best Practices for Dockerfiles: docs.docker.com/develop/develop-images/dockerfile_best-practices/
Cheat Sheet: Image Layering
| Concept | Analogy | Technical Function | Architect’s Goal |
| UnionFS | Transparent Sheets. | Merges multiple directories into one view. | Allows massive reuse of base OS layers. |
| Base Image | The Canvas. | The bottom-most Read-Only layer (OS). | Keep it small (Alpine/Distro less). |
| Container Layer | Scratchpad. | The top thin Read-Write layer. | Temporary storage only. Use Volumes for data. |
| Copy-on-Write | Tracing Paper. | Copies file to top layer before editing. | Ensures base images never get corrupted. |
| Chaining | One Drawing. | Joining commands with &&. | Prevents “Ghost Weight” (hidden junk files). |
| Cache Busting | Domino Effect. | Changing a layer invalidates all layers after it. | Order Dockerfile from Stable to Volatile. |
3.2. Multi-Stage Builds: The Architect’s Secret Weapon
Think of a Multi-Stage Build like a Restaurant Kitchen vs. The Customer’s Table.
- Stage 1 (The Kitchen/Builder): This is where the cooking happens. It is messy. There are knives, ovens, vegetable peelings, and raw ingredients (Source Code). You need all these tools (Compilers) to make the food, but you don’t want the customer to see them.
- Stage 2 (The Table/Runner): You take only the finished dish (Compiled Binary) out of the kitchen and serve it on a clean plate.
- The Result: The customer gets a perfect meal. They do not get the dirty pans, the knives, or the vegetable scraps. If a customer or Hacker tries to find a knife to hurt someone, there are none on the table they were left back in the kitchen (which was destroyed).
Before Multi-Stage builds, developers used two Dockerfiles (one for building, one for running) and a shell script to glue them together. Multi-Stage builds allow you to do this in a single file using FROM ... AS ....
—
3.2.1. The “Builder” Stage
- To compile code and handle dependencies.
- Contains heavyweight tools like
gcc(C compiler),mvn(Maven),node_modules,git, and SSH keys. - Once the build is done, this entire environment is discarded. It does not exist in the final image.
—
3.2.2. The “Runner” Stage
- To run the application container required only the compiled binary (artifact) and the minimal Runtime libraries (like
libc). - The
COPY --from=builderinstruction acts like a teleportation device. It grabs a specific file from the Builder stage and pulls it into the Runner stage.
—

—
DevSecOps Architect Perspective
This is your primary tool for Hardening.
- Attack Surface Reduction
- The Threat: Hackers often use “Living off the Land” attacks. They use tools already installed on your server (like
wget,curl,compiler) to download malware or compile exploits. - The Defense: In a multi-stage image, these tools simply don’t exist.
- No
git? They can’t clone malicious code. - No
gcc? They can’t compile a privilege escalation exploit. - No
shell? (If using Distroless) They can’t even run commands.
- No
- The Threat: Hackers often use “Living off the Land” attacks. They use tools already installed on your server (like
- Massive Size Reduction
- Example: Go Application:
- Single Stage: Uses
golang:1.21image → Size: ~850MB. - Multi-Stage: Uses
alpineorscratch→ Size: ~10MB.
- Single Stage: Uses
- Benefit: Smaller images mean faster deployments, faster scaling, and lower storage costs.
- Example: Go Application:
- The “Non-Root” Mandate
- The Risk: By default, Docker runs as
root. If a hacker escapes the app, they have root access to the container. - The Fix: You must manually create a user.
#Dockerfile
RUN adduser -D appuser # Create user
USER appuser # Switch context - Note: Place the
USERinstruction at the very end. If you place it too early, you might lose permission toCOPYfiles or install packages.
- The Risk: By default, Docker runs as
—
Technical Challenges
- Debugging is Hard: The more secure you make the image (e.g., removing the shell), the harder it is to debug. You can’t just
docker exec -it my-container bashbecausebashdoesn’t exist.- Fix: Use “Ephemeral Debug Containers” (Kubernetes allows this) that attach a temporary shell side-car.
- Dynamic Linking: If you compile a C++ app in Stage 1 (Ubuntu) and try to run it in Stage 2 (Alpine), it will crash because Alpine uses
musllibc while Ubuntu usesglibc.- Fix: Compile with
CGO_ENABLED=0(Static Linking) or ensure base OS compatibility.
- Fix: Compile with
- Certificate Roots: If your app talks to HTTPS endpoints (like AWS S3 or Stripe), a “Scratch” (empty) image will fail because it lacks CA Certificates.
- Fix: You must manually copy
/etc/ssl/certs/from the builder stage.
- Fix: You must manually copy
—
- Docker Multi-Stage Builds: docs.docker.com/build/building/multi-stage/
- Google Distroless Images: github.com/GoogleContainerTools/distroless
- OWASP Container Security: cheatsheetseries.owasp.org
—
Cheat Sheet (Multi-Stage Strategy)
| Feature | Single Stage (The “Fat” Image) | Multi-Stage (The “Lean” Image) | Architect’s Verdict |
| Size | Huge (800MB+). Includes source code & tools. | Tiny (10MB-50MB). Binary only. | Lean. Saves money & bandwidth. |
| Tools | Includes git, curl, gcc, make. | Removes ALL build tools. | Secure. “Featureless Desert” for hackers. |
| Secrets | Risk of leaving .env or SSH keys in layers. | Secrets stay in Stage 1; Stage 2 is clean. | Secure. Prevents accidental leaks. |
| Complexity | Simple Dockerfile. | Requires AS alias and COPY --from. | Necessary complexity for production. |
| Debugging | Easy (Has full Shell/Tools). | Hard (Missing Shell/Tools). | Trade-off. Security > Convenience. |
—
Practical Lab: The Perfect Dockerfile
Here is the annotated Architect-level Dockerfile
# --- STAGE 1: The Builder ---
# Naming the stage "builder" allows us to reference it later
FROM golang:1.21-alpine AS builder
# Security: Set working directory so we don't pollute root
WORKDIR /app
# Optimization: Copy dependency files FIRST to leverage Docker Cache
COPY go.mod go.sum ./
RUN go mod download
# Build: Copy source and build the binary
COPY . .
# CGO_ENABLED=0 ensures we create a "Static Binary" (no external library dependency)
RUN CGO_ENABLED=0 go build -o main .
# --- STAGE 2: The Production Runner ---
# Use "Alpine" for a small footprint, or "Scratch" for zero footprint
FROM alpine:3.18
# Security: Install CA Certs for HTTPS calls
RUN apk --no-cache add ca-certificates
# Security: Create a non-root system user
RUN adduser -D appuser
# Security: Switch to the non-root user
USER appuser
# Architecture: Copy ONLY the binary from the "builder" stage
COPY --from=builder /app/main .
# Run the app
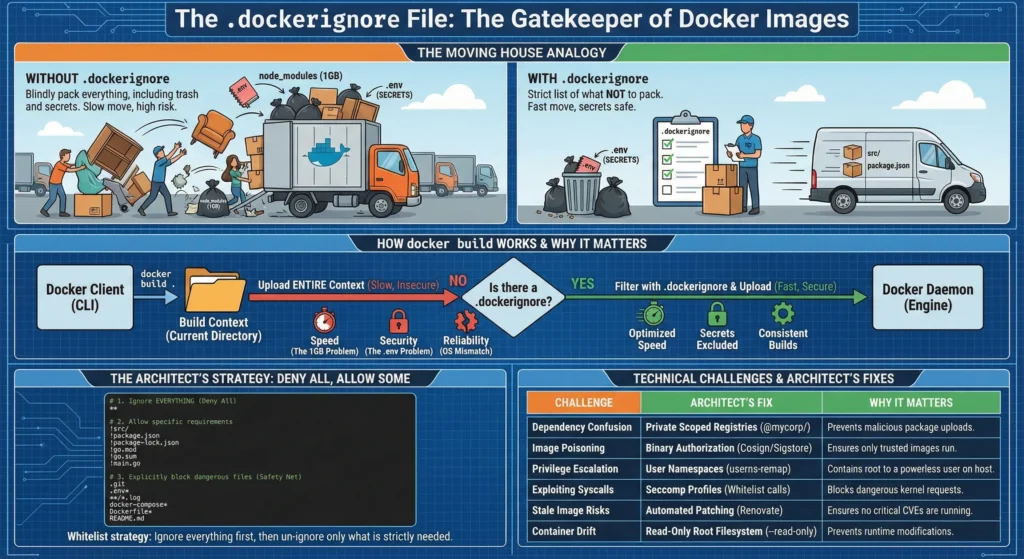
CMD ["./main"]3.4. The .dockerignore File: The Gatekeeper
Imagine you are moving to a new house (Building a Docker Image).
- With
.dockerignore: You make a strict list of things NOT to pack. You leave the trash, the heavy old furniture, etc.- Result: You only need 1 small truck. The move is 10x faster. Your secrets stay safe in the old house.
- Without
.dockerignore: You blindly pack everything in your current house including the trash under the sink, old receipts etc.- Result: It takes 10 trucks to move. The move is slow.
When you run docker build . the Docker CLI (Client) doesn’t just start building. First, it packages the entire current directory (called the Build Context) and uploads it to the Docker Daemon (Engine).
- Speed (The 1GB Problem): If you have a
.gitfolder ornode_modulestotaling 1GB, Docker uploads that 1GB to the daemon before looking at the Dockerfile..dockerignorestops this upload. - Security (The
.envProblem): If you runCOPY . .and you have a.envfile with passwords, that file is baked into the image. Even if yourm .envin the next line, the secret remains in the “Image History” layer forever. - Reliability (The OS Mismatch): If you copy local
node_modules(compiled for Mac/Windows) into a Linux container, the app will crash with cryptic errors likeELF header mismatch.
Most people list what to ignore. An Architect lists what to keep. This is the “Deny All, Allow Some” whitelist strategy.
The Perfect .dockerignore:
#.dockerigore
# 1. First, ignore EVERYTHING (The "Deny All" rule)
**

# 2. Then, "Un-ignore" only what you strictly need (The "Allow" rule)
!src/
!package.json
!package-lock.json
!go.mod
!go.sum
!main.go

# 3. Explicitly block dangerous files (Safety Net)
# Just in case you remove the "**" rule later
.git
.env*
**/*.log
docker-compose*
Dockerfile*
README.md
—
—
Technical Challenges
These are the hidden risks that separate a “Docker User” from a “DevSecOps Architect.”
| Challenge | The Architect’s Fix | Why it Matters |
| Dependency Confusion | Private Scoped Registries. Use scoped names (e.g., @mycorp/auth-lib) and strict lockfiles. | Prevention. Stops hackers from uploading a malicious package with the same name to public npm/pip, tricking your build into pulling it. |
| Image Poisoning | Binary Authorization (Cosign/Sigstore). Sign images in CI/CD. Production rejects unsigned images. | Trust. Ensures that only images built by your trusted pipeline can run. If a hacker pushes a fake image, K8s blocks it. |
| Privilege Escalation | User Namespaces (userns-remap).Map “Root” inside the container to “Nobody” on the Host. | Containment. Even if a hacker becomes root inside the container, the Host kernel sees them as a powerless user. |
| Exploiting Syscalls | Seccomp Profiles. Whitelist only necessary kernel calls (e.g., block ptrace, reboot). | Hardening. Stops malware from making dangerous requests to the Host Kernel. |
| Stale Image Risks | Automated Patching (Renovate/Dependabot). Daily scans for base image updates. | Hygiene. Ensures you never run an image with a “Critical” CVE discovered after deployment. |
| Container Drift | Read-Only Root Filesystem. Run with --read-only. | Immutability. Prevents hackers (or devs) from installing tools (apt install) or modifying files at runtime. |
—
- The Gold Standard: Dockerfile Best Practices (Official)
- Security Tooling: Hadolint (Dockerfile Linter) – Every Architect should enforce this in CI/CD.
3.5 Docker Security Commands Cheat Sheet.
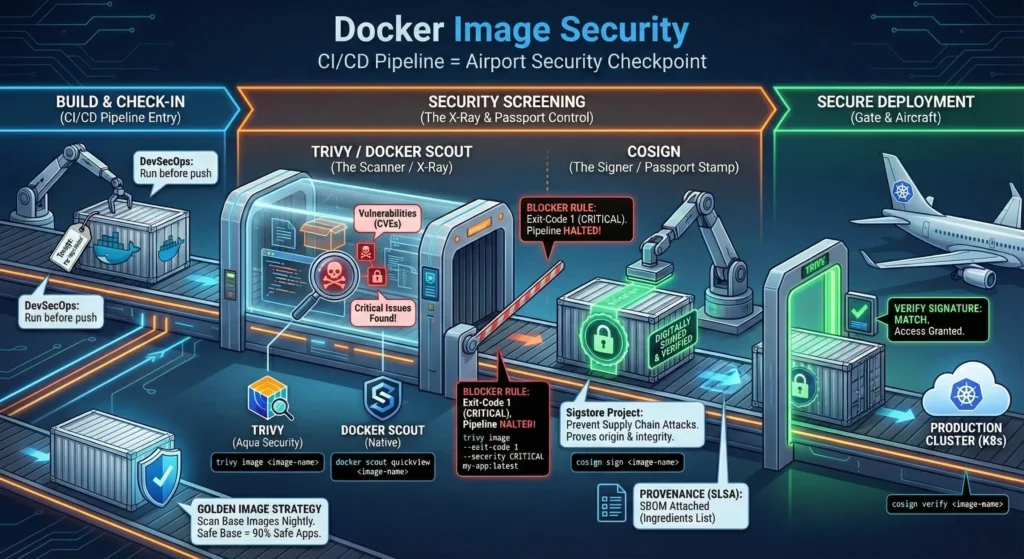
Think of your CI/CD Pipeline like an Airport Security Checkpoint.
- Trivy/Docker Scout: This is the X-Ray Machine. It looks inside your luggage (Image) to find dangerous items like guns or knives (Vulnerabilities/CVEs).
- Cosign: This is the Passport Stamp. It proves who you are and that your luggage hasn’t been opened or tampered with since you checked it in.
- Trivy (The Scanner)
- The most popular open-source scanner by Aqua Security. It is fast, comprehensive, and scans OS packages (Alpine/RedHat) and language dependencies (Node/Python).
- The Command:
trivy image <image-name> - DevSecOps Usage: You run this before pushing to the registry. If it finds “Critical” issues, you fail the build.
- Docker Scout (The Native / Legacy “Scan”)
docker scan(based on Snyk) is deprecated. The new standard is Docker Scout.- Docker’s native tool to analyze image contents. It gives you a “Health Score” and remediation advice.
- Command:
docker scout quickview <image-name>
- Cosign (The Signer)
- A tool from the “Sigstore” project. It allows you to digitally sign your container images.
- Use this to prevent “Supply Chain Attacks.” Even if a hacker steals your credentials, they can’t sign a malicious image with your private key.
- The Process:
- Sign: You sign the image after building.
- Verify: Your Kubernetes cluster verifies the signature before running it.
—
DevSecOps Architect Perspective
As an Architect, your job is Automated Policy Enforcement.
- The “Blocker” Rule: Do not just “report” vulnerabilities. Block the pipeline.
- Command:
trivy image --exit-code 1 --severity CRITICAL my-app:latest - Result: If a critical bug is found, the script exits with error
1, stopping Jenkins/GitHub Actions instantly.
- Command:
- The “Golden Image” Strategy: Do not scan every single build from scratch. Scan your Base Images (e.g., your corporate Java base) nightly. If the base is safe, the apps built on top are 90% safe.
- Provenance (SLSA): Use Cosign not just to sign, but to attach an “SBOM” (Software Bill of Materials). It’s like an ingredients list for your software.
—
Technical Challenges
- False Positives (The Noise): Scanners often report bugs that don’t affect you (e.g., a bug in a kernel module you deleted).
- Fix: Use a
.trivyignorefile to acknowledge and suppress known non-issues so your dashboard stays green.
- Fix: Use a
- Zero-Day Lag: A vulnerability is announced today (Log4j). It takes hours for the scanner database to update. During this window, you are blind.
- Rate Limiting: If you scan 1000 times an hour against Docker Hub, you will get blocked. Use a local caching proxy or Harbor Registry (which has Trivy built-in).
—
- Trivy Docs: aquasecurity.github.io/trivy
- Cosign (Sigstore): docs.sigstore.dev/cosign/overview/
- Docker Scout: docs.docker.com/scout/
—
Cheat Sheet (Security Commands)
| Tool | Command | What it does | When to use |
| Trivy | trivy image myapp:v1 | Basic Scan. Lists all vulnerabilities. | Local development. |
| Trivy | trivy image --severity CRITICAL --exit-code 1 myapp | Gatekeeper. Fails build if critical bugs found. | CI/CD Pipeline (Must Have). |
| Trivy | trivy fs . | Filesystem Scan. Scans code/config before building. | Pre-commit hook. |
| Scout | docker scout cves myapp | Deep Dive. detailed CVE list by Docker. | Debugging specific Docker layers. |
| Cosign | cosign generate-key-pair | Setup. Creates cosign.key and cosign.pub. | One-time setup. |
| Cosign | cosign sign --key cosign.key myrepo/myapp:v1 | Sign. Attaches digital signature to registry. | After Build & Scan pass. |
| Cosign | cosign verify --key cosign.pub myrepo/myapp:v1 | Verify. Checks if image is trusted. | Before Deployment ubernetes). |