5. Multi-Container Orchestration – Docker Compose
Docker Compose is a tool that allows you to define and run entire “stacks” (like a web app + its database) using a single YAML configuration file.
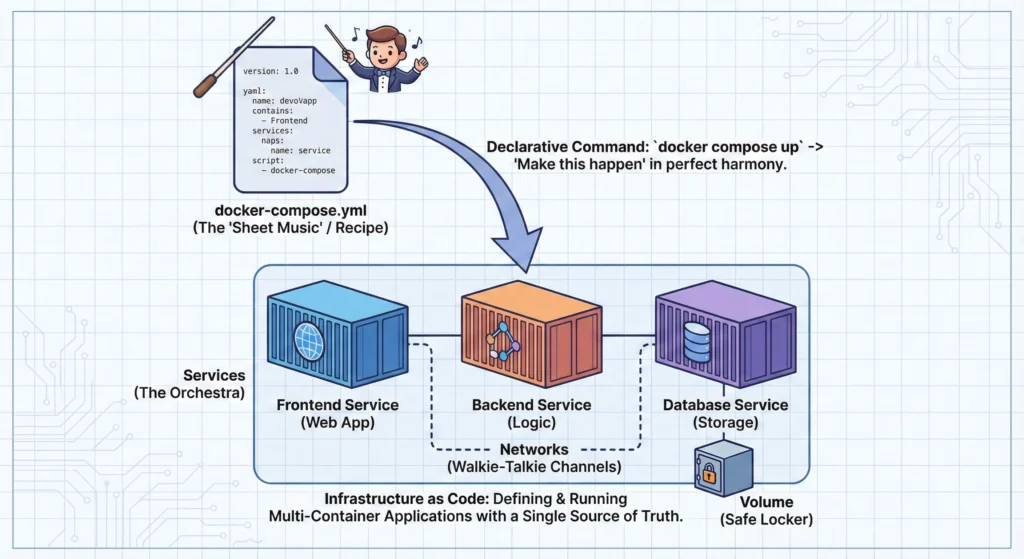
The Orchestra Conductor Imagine an orchestra. Without a Conductor (Docker Compose), the violinist, drummer, and pianist would all start playing at different times, creating noise. The Conductor gives them all the Sheet Music (The YAML File). They look at the sheet music (Declarative) and play together in perfect harmony to create a symphony (The Application).
—
5.1. Docker Compose – “Infrastructure as Code”
Think as: A Music Conductor (The Compose file) and an Orchestra (Your Containers).
Imagine you are managing a big music band.
- Without Docker Compose (Imperative): You run to the drummer, then the guitarist, then the pianist, telling them individually when to start and what to play. It is chaotic and tiring.
- With Docker Compose (Declarative): You simply give them all the Sheet Music (The YAML File). You stand back. They read the sheet music and play together in perfect harmony.
In tech terms: You don’t type 10 different commands to start your database, backend, and frontend. You write one file (the recipe) and run one command. The computer does the rest.
Docker Compose is a tool that allows you to define and run multi-container Docker applications. It uses a YAML file (which looks like a simple list) to configure your application’s services.
The Magic File: docker-compose.yml
Think of this file as your “Application Recipe.” It has three main ingredients:
- Services: The actual applications. (e.g., “I need a Python Web App” and “I need a PostgreSQL Database”).
- Networks: The “Walkie-Talkie” channels. This ensures your Web App can talk to the Database securely, but outsiders cannot interrupt.
- Volumes: The “Safe Locker.” If you restart the container, the data inside is lost. Volumes keep your data (like customer details) safe on the host machine even if the container crashes.
Imperative vs. Declarative (The difference)
- Imperative (Old way): You say how to do it. “Step 1: Download Java. Step 2: Install. Step 3: Run.” If Step 2 fails, you are stuck.
- Declarative (Compose way): You say what you want. “I want a Database running.” Docker figures out the steps to make it happen.
Useful Tools for Beginners:
- Docker Desktop: Comes with Compose pre-installed.
- VS Code (with Docker Extension): Helps you write YAML files without spelling mistakes.
—
DevSecOps Architect Level Notes
For an architect, Docker Compose is not just about starting apps; it is about Governance, Security, and Consistency. It represents the concept of Infrastructure as Code (IaC) on a local/single-host scale.
Key Architectural Strategies:
- Environment Parity: The biggest benefit is killing the “It works on my machine” bug. The
docker-compose.ymlused by a junior developer is the exact same structure used in the Staging environment. This guarantees consistency. - Immutability: We do not patch running containers. If a vulnerability is found in the database image, we update the version in the YAML file and redeploy. This prevents “Configuration Drift” (where servers slowly become different and broken over time).
- Hardening the Supply Chain:
- Network Isolation: define distinct networks (e.g.,
frontend-net,backend-net). The Database should strictly be onbackend-netso the public internet cannot touch it. - Resource Limiting: Define
cpusandmemorylimits in the YAML. This prevents one buggy container from eating up 100% of the server’s RAM (preventing Denial of Service).
- Network Isolation: define distinct networks (e.g.,
Architectural Tools:
- Trivy: Scans the images listed in your Compose file for CVEs (vulnerabilities).
- Checkov: Scans the
docker-compose.ymlfile itself for misconfigurations (like running containers as ‘root’ user). - Infisical / HashiCorp Vault: For managing secrets instead of hardcoding passwords.
—
Use Case: – Scenario: A standard E-Commerce Website.
You need three things running at the same time:
- Frontend: The website customers see (React/Angular).
- Backend: The logic processing orders (Node.js/Python).
- Database: Storing product info and prices (MongoDB/MySQL).
Without Compose: You open 3 terminal windows. You manually start the DB. Then you start the Backend (hoping the DB is ready). Then the Frontend. If the DB crashes, the Backend errors out.
With Compose: You type docker compose up -d. Docker starts the DB, waits for it to be ready (using healthcheck), starts the Backend, and then the Frontend. All automatically.
—
—
Technical Challenges
| Challenge | Description | Solution |
| Configuration Drift | Someone manually changes a setting inside a running container using CLI. The YAML file is now outdated. | Always use docker compose up --force-recreate to reset the state to match the “Source of Truth” (the YAML file). |
| Secret Sprawl | Developers putting PASSWORD=admin123 directly in the YAML file. This is a security risk if pushed to GitHub. | Use .env files (and add .env to .gitignore) or use Docker Secrets for sensitive data. |
| Race Conditions | The Web App starts before the Database is fully loaded, causing the app to crash immediately. | Use the depends_on keyword combined with service_healthy conditions in the YAML file to enforce startup order. |
—
- Docker Compose Overview: https://docs.docker.com/compose/
- Compose File Specification (The Rules): https://docs.docker.com/compose/compose-file/
- Networking in Compose: https://docs.docker.com/compose/networking/
—
Practical Lab (Try it yourself)
Create a file named docker-compose.yml on your computer and paste this code. This creates a ready-to-use WordPress website.
# docker-compose.yml
version: '3.8'

services:
  db:
    image: mysql:5.7
    volumes:
      - db_data:/var/lib/mysql
    restart: always
    environment:
      MYSQL_ROOT_PASSWORD: somewordpresspassword
      MYSQL_DATABASE: wordpress
      MYSQL_USER: wordpress
      MYSQL_PASSWORD: wordpress
    networks:
      - backend-only

  wordpress:
    depends_on:
      - db
    image: wordpress:latest
    ports:
      - "8000:80"
    restart: always
    environment:
      WORDPRESS_DB_HOST: db:3306
      WORDPRESS_DB_USER: wordpress
      WORDPRESS_DB_PASSWORD: wordpress
      WORDPRESS_DB_NAME: wordpress
    networks:
      - backend-only
      - public-access

volumes:
  db_data:

networks:
  backend-only:
    internal: true
  public-access:
Steps:
- Save the file.
- Open terminal in that folder.
- Run:
docker compose up -d - Open your browser and go to
http://localhost:8000. You will see the WordPress setup screen!
—
Cheat Sheet (Easy Remember Table)
| Command | What it does (Simple English) |
docker compose up | Starts the orchestra. (Builds, creates, starts containers). |
docker compose up -d | Starts everything in “Detached” mode (runs in the background, so your terminal is free). |
docker compose down | Stops the music and packs up the instruments (Stops and removes containers/networks). |
docker compose ps | Shows who is currently playing (Lists running services). |
docker compose logs -f | Shows the output/errors from all services in real-time. |
docker compose config | Validates your YAML file to check for spelling errors before running. |
5.2. Service Discovery DNS: The “Internal Phonebook”
Think of it as: Your Mobile Phone’s Contact List.
Imagine you want to call your friend, “Raju.” You don’t memorize Raju’s 10-digit mobile number because he might change his SIM card or number tomorrow. Instead, you just search for “Raju” in your contacts and call. Your phone automatically connects to whatever number is currently saved for him.
In Docker, Service Discovery works the exact same way:
- The Contact Name: The service name you defined in
docker-compose.yml(e.g.,db,backend). - The Phone Number: The IP Address of the container (e.g.,
172.18.0.5). - The Magic: You just tell your code “Connect to
db,” and Docker automatically finds the correct IP address, even if thedbcontainer restarts and gets a new IP.
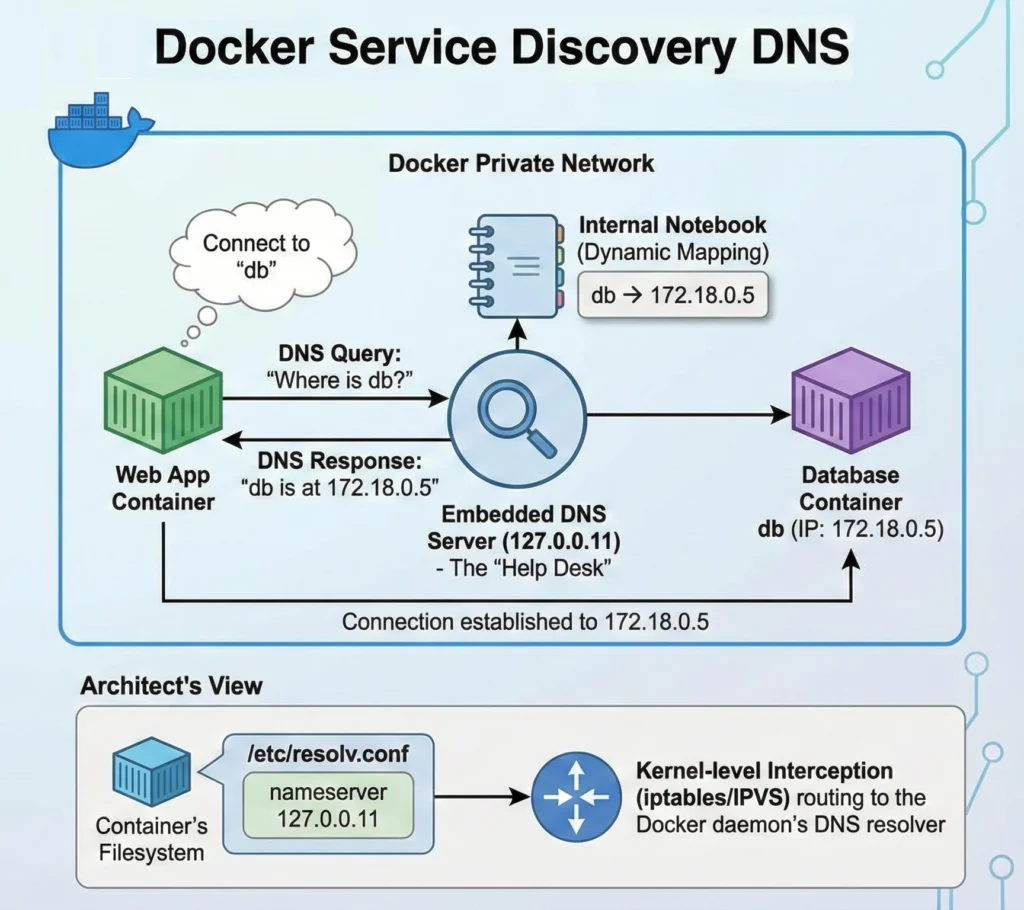
When you use Docker Compose, you are creating a small, private community of computers (containers). For these computers to talk to each other without confusion, Docker provides a built-in “Help Desk” (DNS Server).
- Automatic Setup: As soon as you run
docker compose up, Docker assigns a name to every container based on your configuration. - The “Internal Notebook”: Docker maintains a dynamic notebook. If a container crashes and restarts with a new IP address, Docker immediately erases the old IP in the notebook and writes the new one.
- No Hardcoding Needed: This is the biggest benefit. In your code (like Python, Node.js, or Java), you never write IP addresses like
192.168.x.x. You simply write:postgres://db:5432(Connect to the container nameddb)http://frontend:3000(Connect to the container namedfrontend)
Key Tools:
- Docker Compose: The tool that automatically sets up this network and naming system for you.
—
As an Architect, you need to look under the hood. It’s not magic; it’s Kernel-level networking and DNS masquerading.
- The 127.0.0.11 Resolver Mechanism
- Embedded DNS: Docker runs a lightweight embedded DNS server within the Docker daemon.
- Container Configuration: When a container starts, Docker injects the file
/etc/resolv.confwith a specificnameserver 127.0.0.11. - Traffic Interception: This isn’t a “real” file on the disk in the traditional sense; requests sent to
127.0.0.11are intercepted by iptables rules (or IPVS) and routed to the Docker daemon’s internal DNS resolver.
- Virtual IP (VIP) & Load Balancing (Swarm Mode/Scaling) – When you run docker compose up –scale web=3, you have three containers for one service. How does DNS handle this?
- Round Robin DNS: Docker returns the IPs of all 3 containers in a rotating list.
- IPVS (IP Virtual Server): In more advanced setups (like Swarm), Docker assigns a single Virtual IP (VIP) to the service
web. The Linux Kernel (using IPVS) acts as a Layer 4 Load Balancer, distributing traffic destined for that VIP across the three actual container IPs.
- Security Boundaries (Network Isolation) – Service discovery is Network-Scoped. This is a critical security feature.
- The DMZ Strategy: You should create tiered networks.
- Public Net: Only for the Load Balancer/Frontend.
- Private Net: For the Backend and Database.
- The Rule: A container on
Private Netcannot resolve the name of a container onPublic Netunless they share a common bridge network. This prevents an attacker who compromises the frontend from easily “mapping” your entire internal infrastructure just by guessing hostnames.
- The DMZ Strategy: You should create tiered networks.
—
Key Tools:
- CoreDNS: Often used in Kubernetes, but Docker’s internal DNS works similarly.
- Wireshark: To capture and analyze DNS packets between containers.
—
Use Case: The Microservices “Hotel”
Imagine a Hotel Application built with Microservices:
- Booking Service (Container A)
- Payment Service (Container B)
- Notification Service (Container C)
- Scenario: A user books a room.
- Action: The Booking Service needs to tell the Payment Service to charge the card.
- Without Service Discovery: The Booking Service would need to know exactly which server IP the Payment Service is running on. If the Payment Service moves to a new server, the Booking Service fails.
- With Service Discovery: The Booking Service just sends a request to
http://payment-service. Docker resolves the location instantly, ensuring the payment is processed regardless of where the container is running.
—
—
Technical Challenges & Solutions
| Challenge | Architect’s Fix | Why It Matters |
| DNS Caching (The Java Problem) | Use specific JVM flags (e.g., -Dsun.net.inetaddr.ttl=0) or application-level retries. | Java applications (and some OS configs) cache DNS lookups forever by default. If a container IP changes, Java keeps trying the old dead IP. |
| Circular Dependencies | Use depends_on with condition: service_healthy or handle retries in code. | If Service A asks for Service B’s IP before Service B is fully awake, the startup fails. The app must be robust enough to retry the lookup. |
| External Name Conflicts | Avoid naming local services google.com or localhost. | Internal DNS takes priority. If you name a database service google, your app will never be able to reach the real Google.com. |
| Split-Brain DNS | Ensure /etc/resolv.conf on the host machine is clean. | Sometimes, containers inherit “bad” DNS settings (like corporate VPN DNS) from the host, causing external resolution to fail. |
- Docker Networking Overview – Official Guide.
- Networking in Compose – How services link up.
- Docker Embedded DNS Server – Technical details on packet flow.
—
Practical Lab: “Seeing the Phonebook”
Step 1: Create a simple network
Save this as docker-compose.yml:
version: '3.8'
services:
  my-web-server:
    image: nginx

  # A utility container to run network commands
  network-tool:
    image: alpine
    command: sleep infinity
Step 2: Start the lab
docker compose up -dStep 3: Check the Internal Phonebook
We will log into the network-tool and ask it to find my-web-server.
# Install DNS tools (dig/nslookup) inside the alpine container
docker compose exec network-tool apk add --no-cache bind-tools

# Ask the internal DNS (127.0.0.11) where 'my-web-server' is
docker compose exec network-tool nslookup my-web-server
Output: – You will see something like:
Server:     127.0.0.11
Address:    127.0.0.11#53

Name:       my-web-server
Address:    172.18.0.2  <-- Docker resolved the name to this IP!
Cheat Sheet
| Component | Function | The “Simple” Meaning |
| 127.0.0.11 | Docker’s Embedded DNS IP | The “Help Desk” phone number inside every container. |
| Service Name | The hostname (e.g., db) | The name of your friend in the contact list. |
| Bridge Network | Private Network | The private room where these containers can talk. |
| Internal Resolution | Resolving db to 172.x.x.x | Looking up the contact name to dial the number. |
| External Resolution | Resolving google.com | Forwarding the call to the outside world (Public Internet). |
- Core Question: Why do we need Service Discovery?
- Deconstruction:
- Computers talk via IP addresses.
- In dynamic environments (containers), IP addresses change constantly (ephemeral nature).
- Humans and code cannot track changing numbers manually.
- Conclusion: We need a dynamic mapping layer (DNS) that updates automatically in real-time to bridge the gap between static names and dynamic IPs.
- The System: The Docker Network.
- Interconnection: The DNS isn’t an isolated tool; it connects the Application Code (which uses names) to the Network Layer (which uses IPs). If the DNS fails, the entire system breaks, even if the application and the database are both perfectly healthy. It is the critical “glue” of the system.
5.4. Docker Compose YAML Example – The “Security-First Blueprint”
Think of it as: Designing a Secure House Plan.
Imagine you are an architect drawing the blueprint for a high-security bank.
- The Blueprint (docker-compose.yml): This single sheet of paper tells the builders exactly where to put the walls, doors, and furniture.
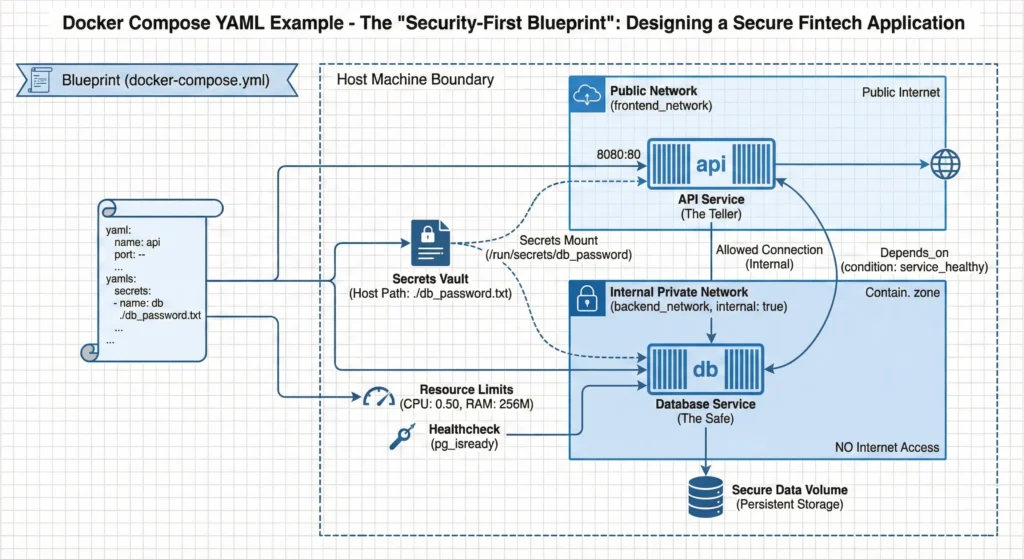
- The Safe (db Service): This is where the gold (data) is kept. You don’t put the safe in the lobby! You put it in a back room (Private Network) with no windows to the street.
- The Teller (api Service): The teller sits at the counter. They talk to customers (Public Network) and also have a key to the safe room (Private Network).
- The Key (secrets): You don’t tape the key to the safe door. You keep it in a secure locker that only the Teller can access.
In Docker Compose, we write this plan in a file called docker-compose.yml so we can build the exact same house anywhere, anytime, with one command.
The docker-compose.yml file is the heart of your project. Instead of running long, confusing commands manually every time, you define everything here.
Key Parts of the File:
- Version: Tells Docker which grammar rules to use (e.g., “3.9”).
- Services: These are your application parts. In our example, we have a Database (db) and an Application (api).
- Networks: These are the “rooms.” We create a front room for the public and a back room for the database.
- Volumes: This is your storage. Even if the container (the computer) is destroyed, the data in the volume (the hard drive) is saved.
- Secrets: A secure way to handle passwords. Instead of writing “password123” directly in the file where everyone can see it, we point to a protected file.
Why use it?
It saves time and reduces mistakes. “Write once, run anywhere.“
—
DevSecOps Architect Prospective
As an Architect, your focus is Security, Stability, and Resource Management. This YAML file is not just a script; it is your infrastructure policy.
- Secret Management (secrets)
- The Problem: Using environment: POSTGRES_PASSWORD=password is insecure. It leaves passwords visible in docker inspect commands and version control history.
- The Fix: We use secrets. Docker mounts the secret file (e.g., db_password.txt) into the container at /run/secrets/db_password. It is handled as an in-memory file, never written to the container’s disk layer.
- The “Internal” Network (internal: true)
- Security Boundary: Notice the backend_network. We add internal: true. This completely cuts off internet access for the database. The DB cannot download updates or reach Google, and hackers from the outside cannot reach it directly. It can only talk to the API.
- Healthchecks & Dependencies (depends_on)
- Startup vs. Readiness: Just because a container “starts” doesn’t mean the Database is ready to accept connections. It might be loading indexes.
- The Solution: We use healthcheck to physically test the DB (pg_isready). Then, in the API service, we use depends_on: condition: service_healthy. The API won’t even try to start until the DB says, “I am ready.”
- Resource Limits (deploy.resources)
- Noisy Neighbor Problem: Without limits, one buggy container can eat up 100% of the host’s CPU, crashing everything else.
- The Fix: We set strict limits (e.g., cpus: ‘0.50’). If the DB tries to use more, the Linux Kernel (cgroups) throttles it.
—
Key Tools:
- Linter for Docker: To check your Dockerfiles and Compose files for best practices.
- Vault: For enterprise-grade secret management.
Use Case: Secure Fintech Application
Scenario: You are building a payment gateway where user transaction data must be strictly isolated.
- The Database (PostgreSQL): Holds sensitive credit card tokens. It is placed on the backend_network (Internal). Even if the host server has internet, this container is blocked from accessing it.
- The API (Node.js/Python): Processes requests. It sits on the frontend_network to talk to users and the backend_network to store data.
- The Result: If a hacker compromises the API, they cannot easily dump the database to an external server because the database network has no outbound internet route.
—
—
Technical Challenges & Solutions
| Challenge | Impact | Architect’s Strategic Solution |
| Secret Leakage | Passwords visible in GitHub/Logs if written in plain text. | Use Docker Secrets: Mount passwords as files in /run/secrets/ rather than environment variables. |
| Race Conditions | API crashes because it tries to connect before DB is ready. | Healthchecks: Use depends_on with condition: service_healthy to enforce strict startup order. |
| Resource Exhaustion | One service eats 100% CPU, freezing the server. | Resource Limits: Use deploy.resources.limits to cap CPU and Memory usage for every service. |
| Network Exposure | DB port (5432) accidentally left open to the public internet. | Internal Networks: Use internal: true for backend networks and never map DB ports (- “5432:5432”) to the host unless necessary. |
—
- Compose Specification – The full reference guide.
- Networking in Compose – How to set up internal/external networks.
- Healthcheck Reference – How to write good health probes.
—
7. Practical Lab: “Building the Fortress”
Step 1: Create the Secret
First, create a simple text file for your password.
echo "SuperSecretPassword123!" > db_password.txt
Step 2: Create the Compose File
Save the YAML content below as docker-compose.yml.
version: "3.9"

services:
  db:
    image: postgres:15-alpine
    container_name: production_db
    environment:
      POSTGRES_DB: myapp
      POSTGRES_USER: admin
      POSTGRES_PASSWORD_FILE: /run/secrets/db_password
    secrets:
      - db_password
    networks:
      - backend_network
    healthcheck:
      test: ["CMD-SHELL", "pg_isready -U admin -d myapp"]
      interval: 5s
      timeout: 5s
      retries: 5
    deploy:
      resources:
        limits:
          cpus: '0.50'
          memory: 256M

  api:
    image: nginx:alpine # Using Nginx as a dummy API for demo
    container_name: production_api
    depends_on:
      db:
        condition: service_healthy
    ports:
      - "8080:80"
    networks:
      - frontend_network
      - backend_network

networks:
  frontend_network:
  backend_network:
    internal: true

secrets:
  db_password:
    file: ./db_password.txt
Step 3: Run and Verify
docker compose up -d- Watch the logs: docker compose logs -f. You will see the API waits until the DB is healthy.
- Check the limits: docker stats. You will see the CPU/Memory limits applied.
—
Cheat Sheet
| Keyword | Function | Easy Meaning |
| version | File Format | “Grammar Rules” (e.g., 3.9). |
| services | Containers | The workers (DB, API, Web). |
| image | Software | The blueprint for the worker (e.g., Postgres). |
| networks | Connectivity | The rooms they sit in. |
| internal: true | Isolation | A room with no windows (Secure). |
| volumes | Storage | The safe where data is kept permanently. |
| secrets | Security | The key locker for passwords. |
| healthcheck | Status Check | Asking “Are you ready?” before connecting. |
- Remember: Memorize that services define containers and networks define communication.
- Understand: Explain why secrets are safer than plain text passwords.
- Apply: Write a compose file for a simple Python web app.
- Analyze: Look at an existing file and identify security risks (e.g., missing resource limits, open ports).
- Evaluate: Judge whether a setup is suitable for production or just testing.
- Create: Design a complex multi-service architecture for a microservices e-commerce app.
Explanation: “Imagine docker-compose.yml is a recipe card. It lists all the ingredients (services like DB and API) and the cooking steps (networks and volumes). Instead of guessing how much salt to add every time you cook (running manual commands), you just give this card to the chef (Docker), and he cooks the exact same meal perfectly every single time.”
5.5. Docker Compose Commands
Commands are how you talk to Docker Compose. Instead of clicking buttons, you type these short instructions to manage your entire application stack.
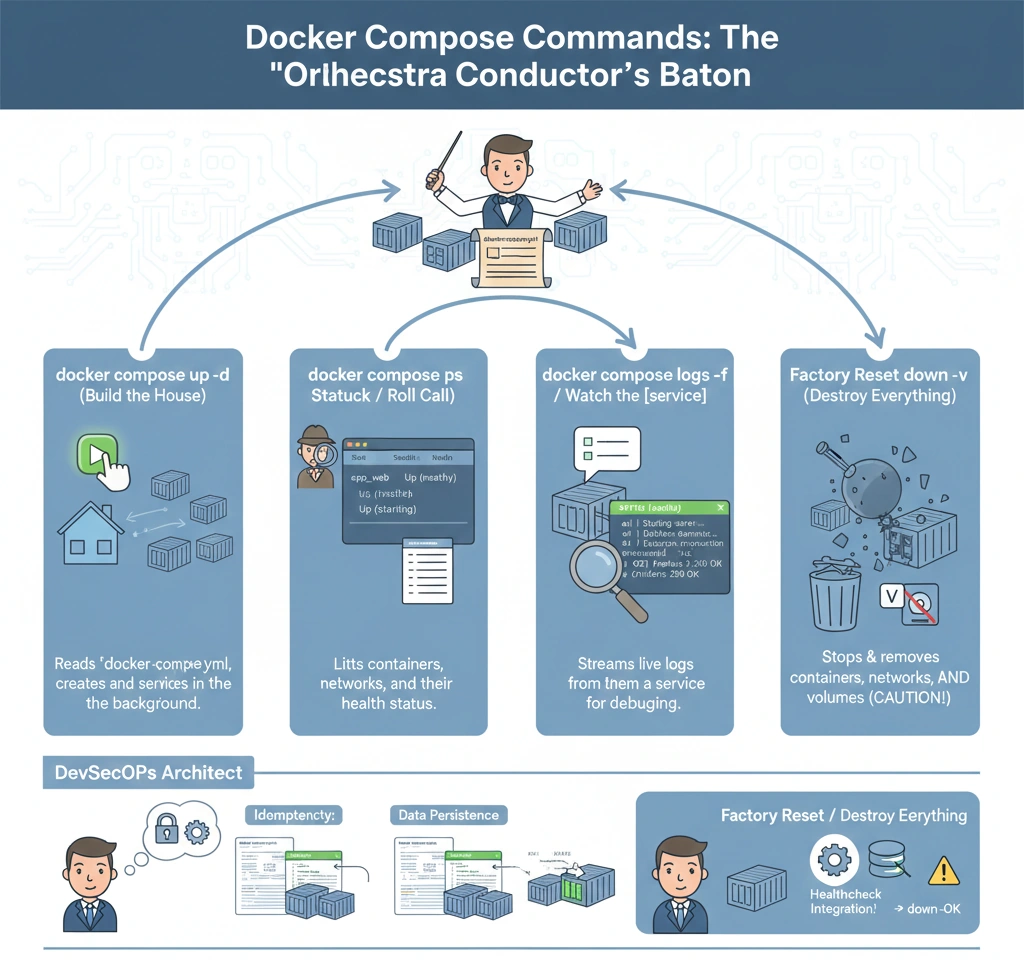
- Start Everything up -d This command reads your blueprint and builds the house. The -d (Detached) part is important it means “do this in the background” so your terminal doesn’t get stuck. You can keep working while the app runs behind the scenes.
- Check Status ps This is like a roll call. You ask, “Is everyone present and healthy?” It lists all your containers and tells you if they are running (Up) or crashed (Exited).
- Watch Action logs -f: Sometimes things break. This command lets you watch the live diary (logs) of a specific service (like the API) to see exactly what errors are popping up in real-time.
- Clean Up down -v When you are done, this command destroys the entire setup. The -v is the “nuclear option” it removes the storage volumes too, giving you a completely clean slate for next time.
DevSecOps Architect
As an Architect, you need to understand the lifecycle management and state handling of these commands.
- docker compose up -d (Idempotency & Re-creation)
- Smart Convergence: Compose is intelligent. It doesn’t just restart everything blindly. It compares the current running container configuration with the docker-compose.yml file. If nothing has changed, it does nothing. If only the DB config changed, it recreates only the DB container.
- Orphaned Containers: If you remove a service from the YAML file and run up, Docker will warn you about “orphaned containers” (leftovers from the previous run). You can clean them with –remove-orphans.
- docker compose ps (Health Status Integration)
- Process vs. Health: A container can be “Up” (PID exists) but the application inside might be dead (Deadlock/500 Error).
- Architect’s View: Always look for the STATUS column. If you defined a healthcheck in your YAML, this command will show (healthy), (unhealthy), or (starting). This is critical for CI/CD pipelines to know when to proceed.
- docker compose down -v (Data Persistence Lifecycle)
- The Danger Zone: Running docker compose down removes containers and networks but keeps volumes (data safety). Adding the -v flag removes the named volumes too.
- Use Case: Use -v strictly for local development or CI/CD cleanups. Never run -v in production unless you intend to wipe the database.
- docker compose logs -f (Debugging Streams)
- StdOut/StdErr: Docker captures everything the process writes to Standard Output and Standard Error.
- Log Drivers: In production, you might configure the “logging driver” to send these logs to ELK Stack or Splunk instead of just keeping them in JSON files on the host.
—
—
4. Use Case: A Developer’s Morning Routine
Scenario: A Full Stack Developer starts their day working on the “FinTech App.”
- 8:00 AM: Pull latest code changes.
- 8:05 AM: Run docker compose up -d. Docker notices the api code changed but the db didn’t. It recreates the API container instantly but leaves the Database running (saving time).
- 10:00 AM: The app throws an error. The developer runs docker compose logs -f api to see the error trace in real-time while triggering the bug.
- 10:15 AM: The database is messed up with test data. The developer runs docker compose down -v to wipe everything and start fresh.
—
5. Technical Challenges & Solutions
| Challenge | Impact | Architect’s Fix |
| Zombie Containers | Old containers that weren’t cleaned up properly conflict with new ones. | Run docker compose down –remove-orphans to ensure a strict cleanup of services not defined in the current YAML. |
| Log Explosion | docker compose logs shows gigabytes of text, crashing the terminal. | Use the –tail flag (e.g., docker compose logs -f –tail=100 api) to see only the last 100 lines. |
| Slow Startup | up command times out because the DB takes too long. | Increase the timeout setting or ensure proper healthcheck logic is in place so dependent services wait patiently. |
| Port Conflicts | “Bind for 0.0.0.0:80 failed: port is already allocated.” | Check docker compose ps to see if an old stack is running, or use lsof -i :80 to find what is blocking the port. |
—
- Docker Compose CLI Reference – The full dictionary of commands.
- Compose Specification – How the file and commands work together.
- Overview of Docker Compose – Official introduction.
Practical Lab: “Conducting the Orchestra”
Step 1: Setup
Create a folder and a simple docker-compose.yml:
version: '3.8'
services:
  web:
    image: nginx:alpine
    ports:
      - "8080:80"
  redis:
    image: redis:alpine
Step 2: Start the Music (up)
docker compose up -d
# Output: Creating network "lab_default"... Created
Step 3: Check the Musicians (ps)
docker compose ps
# Output: You will see 'web' and 'redis' with Status 'Up'
Step 4: Listen to the Music (logs)
docker compose logs -f web
# Go to browser localhost:8080, refresh the page.
# You will see access logs appearing in your terminal instantly.
Step 5: Stop the Show (down)
docker compose down
# Output: Stopping... Removing... Network Removed.
Cheat Sheet
| Command | Shortcut Meaning | What it does |
| docker compose up -d | “Power On” | Builds, creates, and starts containers in background. |
| docker compose ps | “Status Check” | Lists running containers and their health. |
| docker compose logs -f | “Live CCTV” | Follows the log output in real-time. |
| docker compose stop | “Pause” | Stops containers but keeps them existing. |
| docker compose down | “Destroy” | Stops and removes containers and networks. |
| docker compose down -v | “Factory Reset” | Destroys everything INCLUDING volume data. |
- Remember: Memorize that -d means “Detached” (Background).
- Understand: Explain why down -v is dangerous for production databases.
- Apply: Use docker compose logs to debug why a specific container failed to start.
- Analyze: Differentiate between docker compose stop (pause) and docker compose down (remove).
Explanation: “Okay, listen. docker compose up is like turning the ignition key in your car everything starts humming. docker compose ps is looking at your dashboard to see if the engine light is on. docker compose down is like taking the car apart piece by piece until the garage is empty.”