Git
Everything you need to know before you type your first command.
1. Git – The Time Machine for the Code
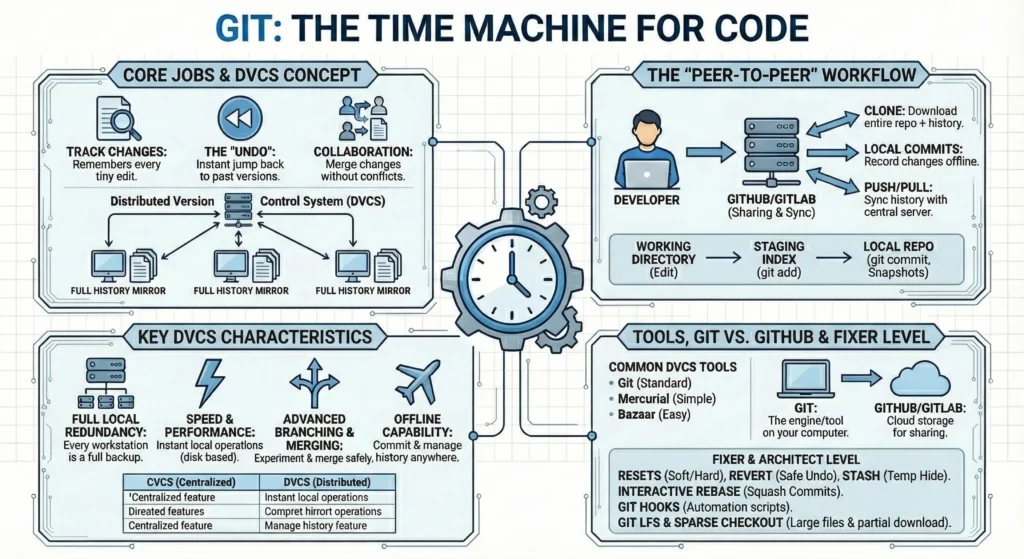
Git is like a time machine for source code files. It is a “Distributed Version Control System” (DVCS) that keeps track of every change make to the project so you can look back, undo mistakes, or work with others without messing up each other’s work.
1. 1. The Three Core Jobs of Git
- Tracking Changes: Instead of saving files as is Git remembers every tiny edit you make to a single file.
- The “Undo”: If code breaks, instantly jump back to exactly how it looked yesterday (or three months ago).
- Collaboration: It allows multiple people to work on the same file at the same time. Git helps “merge” everyone’s changes together into one finished piece.
1.2. Git is a Distributed Version Control System.
- In the world of software development, a Distributed Version Control System (DVCS) is a type of version control where the complete codebase history including every change, branch, and commit is mirrored on every developer’s local computer.Unlike older Version Control Systems where you had to “check out” a file from a central server to work on it, a DVCS turns every workstation into a full-fledged backup of the project.
1.3. How it Works: The “Peer-to-Peer” Model
In a DVCS, there is typically a central server (like GitHub, GitLab, or Bitbucket), but its role is primarily for sharing and synchronization, not for storage of the “master” copy.
- Cloning: When a developer starts working, they “clone” the entire repository. This downloads the latest code plus the entire history of every version ever made.
- Local Commits: Developers record their changes (commits) locally. They don’t need an internet connection to save their progress, create new branches, or view past history.
- Pushing & Pulling: When ready to share, the developer “pushes” their local history to the central server (like GitHub, GitLab, or Bitbucket), or “pulls” the latest history from their teammates.
1.4. Key Characteristics of a DVCS
- Full Local Redundancy – Every developer has a full backup. If the main server crashes or the data is corrupted, any developer’s local repository can be used to restore the entire server with zero loss of history.
- Speed and Performance – Because most operations (commit, diff, log, branch) happen on your local hard drive rather than over a network, they are nearly instantaneous. You only experience network latency when pushing or pulling.
- Advanced Branching and Merging – DVCS tools like Git were built with branching as a core feature. Developers can create “feature branches” to experiment safely, merge them back, or delete them without ever bothering the rest of the team or the central server.
- Offline Capability – You can work in a flight, in a remote area, or during an ISP outage. You can commit your work and manage your project history entirely offline, then sync everything once you are back online.
1.5. DVCS vs. Centralized VCS (CVCS)
| Feature | Centralized (e.g., SVN, Perforce) | Distributed (e.g., Git, Mercurial) |
| History Storage | Only on the central server. | On the server AND every local machine. |
| Working Offline | Impossible to commit or view history. | Fully functional offline. |
| Speed | Slower (network-dependent). | Extremely fast (local disk). |
| Risk | Single point of failure (server). | High redundancy (many backups). |
1.6. Common DVCS Tools
- Git: The industry standard (used by Linux, Google, Microsoft, and most startups).
- Mercurial: Known for its simplicity and efficiency (formerly used by Facebook and Google).
- Bazaar: A project by Canonical (Ubuntu) focused on being easy to use.
1.7. Git vs. GitHub
- Git: The engine/tool on your computer.
- GitHub/GitLab: The cloud storage (Google Drive for code) where you share your work.
1.8. Essential Configuration
Before you start, sign your work so the team knows who wrote what:
git config --global user.name "Name"
git config --global user.email "username@domain.com"
git config --global core.autocrlf true  # Fixes Windows/Linux line ending mess
1.9 The .gitignore File
A .gitignore file as a “Do Not Enter” list. It tells Git which files are trash (like temporary logs) or private (like passwords) and should never be tracked or uploaded.
- Without this it will accidentally upload huge folders like
node_modules, compiled code (.exe,.pyc), or sensitive.envfiles containing API keys. - A plain text file named
.gitignorein your project root and list file patterns inside it. - Common Patterns:
*.log– Ignores all log files.node_modules/– Ignores the entire folder..env– Ignores environment variables (Security!).
- Global Gitignore: You can set a global list for your whole computer (e.g., to ignore Mac
.DS_Storefiles everywhere).
1.10. SSH vs. HTTPS – Secure Connection
To talk to GitHub or GitLab, need a “door pass.” HTTPS uses your username/password, but SSH uses a digital “key pair” (Public and Private) which is much more secure and convenient for DevOps automation.
- HTTPS: Easier to set up but asks for a “Personal Access Token” frequently.
- SSH (Secure Shell):
- You generate a key on your laptop (
ssh-keygen). - You give the Public Key to GitHub.
- You keep the Private Key safe on your machine.
- DevOps Benefit: SSH is essential for Jenkins, GitLab CI, or GitHub Actions to pull code automatically without a human typing a password.
- You generate a key on your laptop (
1.11. Git Internal Structure .git Folder
For an “Architect,” you should know what’s inside that hidden .git folder. It is basically a simple database.
HEAD: A file that points to the branch you are currently on.config: Your project-specific settings.objects/: This is the heart. It stores all your code as “Blobs,” your folder structure as “Trees,” and your history as “Commits.”refs/: Stores the pointers for your branches and tags.
Here is your Step-by-Step Practical Lab for getting started with Git. Follow these instructions exactly to see how Git manages your files in real-time.
Core Foundations Lab
Lab 1.1: The Identity & First Snapshot
In this lab, you will introduce yourself to Git and take your first “Snapshot” (Commit) of a project.
Git – Install from this link before starting this lab.
Step 1: Introduction (Global Config)
Open your terminal (Command Prompt, Terminal, or Git Bash) and tell Git who you are. This information will be attached to every piece of code you write.
# Open command prompt and create one directory
mkdir git-lab
cd git-lab
# Run below commands to set your user details.(As of now does not require any remote repo for this)
# Set your name
git config --global user.name "Your Name"

# Set your email
git config --global user.email "yourname@example.com"

# Verify the settings
git config --list
Step 2: Initialize the “Time Machine”
Turn this normal folder into a Git Repository.
# Initialize git repo locally
git init- Observation: You will see a message saying “Initialized empty Git repository.” A hidden folder named
.gitis created here. This is where Git stores all its data.
Step 3: Create a File
Create a simple text file.
# Create txt file
echo "Hello Git - This is my first version" > hello.txt
Step 4: Check the Status (The Red Stage)
Ask Git what is happening in the folder.
git status- Observation: You will see
hello.txtin Red. Git says it is “Untracked.” This means Git sees the file but isn’t watching it yet.
Step 5: Stage the File (The Green Stage)
Tell Git you want this file to be part of your next “Snapshot.”
git add hello.txt
git status- Observation: The file name turns Green. Git says “Changes to be committed.” It is now in the Staging Area.
Step 6: The Permanent Snapshot (The Commit)
Save the version forever in the local database.
git commit -m "Initial commit: Add hello.txt"- Observation: Git gives you a “Hash” (a unique ID like
a1b2c3d) for this version. You have successfully created your first point in history!
Lab 1.2: The .gitignore “Do Not Enter” List
In this lab, you will learn how to keep your repository clean by hiding junk files from Git.
Step 1: Create “Junk” Files
In real coding, we often have temporary logs or huge folders that we don’t want to upload. Let’s create some.
# Create a dummy log file
echo "log data" > logs.txt

# Create a dummy folder (like node_modules in JavaScript)
mkdir node_modules
echo "heavy-data" > node_modules/library.js
Step 2: See the Mess
Check the status again.
git status- Observation: Git shows
logs.txtandnode_modules/in Red. It wants to track them.
Step 3: Create the .gitignore File
We will tell Git to ignore these patterns forever.
# Create the .gitignore file
touch .gitignore

# Open it in your editor and add these lines:
# logs.txt
# node_modules/
(Alternative for terminal users: echo "logs.txt" >> .gitignore and echo "node_modules/" >> .gitignore)
Step 4: Verify the Filter
Check the status again.
git status- Observation:
logs.txtandnode_modules/have disappeared from the status! Only.gitignoreitself is visible because Git needs to track the list of rules.
Step 5: Save the Rules
git add .gitignore
git commit -m "Admin: Add gitignore to filter junk files"
2. The Core Workflow – The local lifecycle.
2.1 The Three Stages of Git
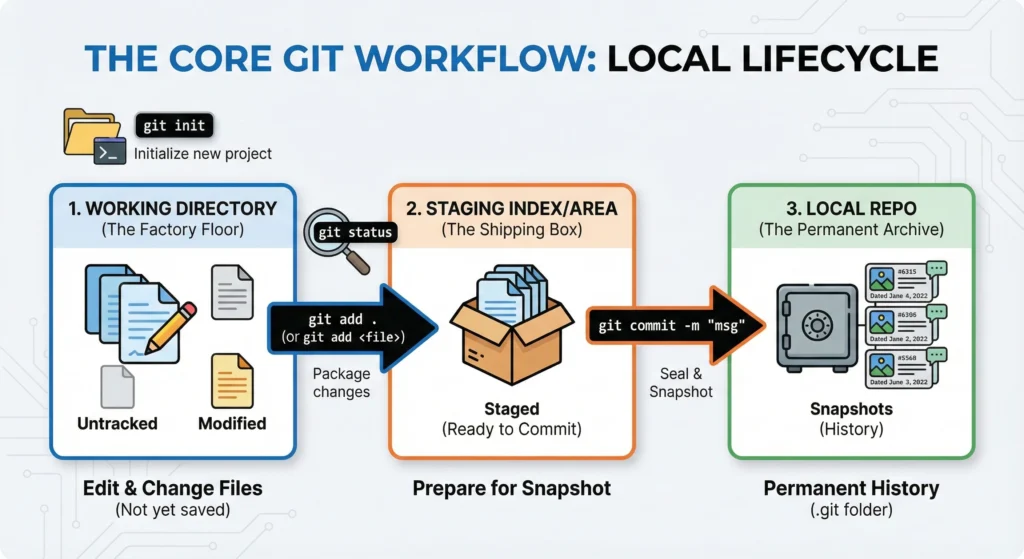
- Working Directory: Where you edit your files.
- Changes here are “untracked” or “modified.” They are not yet part of Git’s permanent memory.
- Staging / Index Area: Where changes for the next commit.
- This is a middle layer (a draft space) where you prepare for your next commit.
- Local Repo: Where your “snapshots” are stored forever.
- Git takes a “snapshot” of the staged files and stores them forever in the
.gitfolder as a part of the project’s history.
- Git takes a “snapshot” of the staged files and stores them forever in the
2.2 The Big Four Commands
| Command | Action | Deep Detail |
git init | Initialize | Transforms a normal folder into a Git repository by creating a hidden .git folder. This is where all your project’s “time travel” data lives. |
git status | Inspect | The most important command. It tells you exactly which stage your files are in. It shows modified files (Working Dir) and staged files (Staging Area). |
git add . | Stage | Moves your changes from the Working Directory to the Staging Area. The . means “add everything,” but you can also use git add <filename> for specific files. |
git commit -m "msg" | Snapshot | Moves staged changes into the Local Repo. The -m flag allows you to add a mandatory message describing what changed and why. |
3. Branching & Merging
How multiple developers work on the same code without fighting.
3.1. The Git Branch
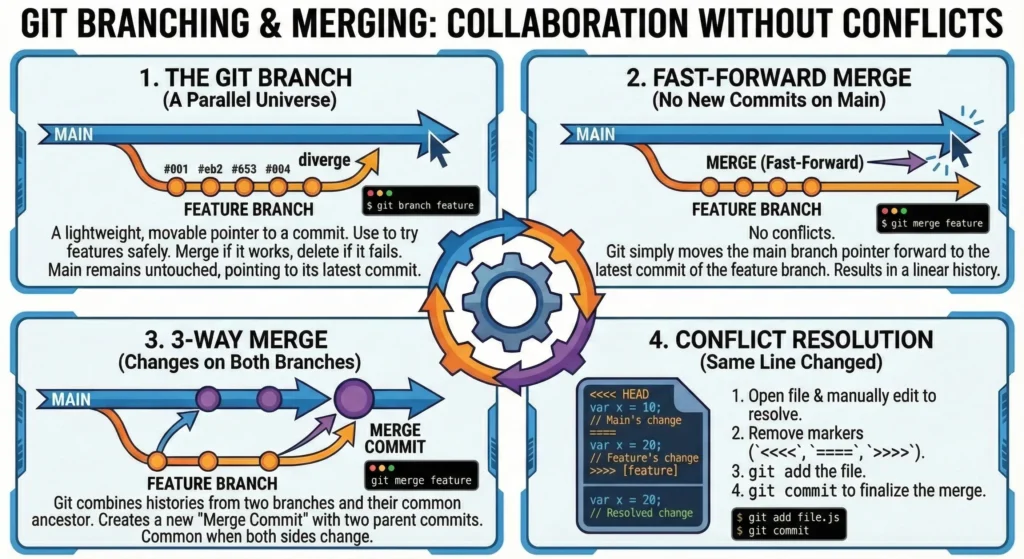
In Git, a branch is not a copy of your files; it is simply a lightweight, movable pointer to a specific commit.
- The Default Branch: By default, every Git repository starts with a branch named
main(formerlymaster). - The Purpose: Use branches to isolate your work. You can create a branch for a new feature, a bug fix, or an experiment.
- The Safety Net: While you work on a separate branch, the
mainbranch remains untouched and stable. If your experiment fails, you can simply delete the branch, and your production-ready code stays safe.
3.2 Merging Logic
Once work on a branch is complete, you “merge” it back into your main branch. Git uses different logic depending on the history of the branches.
1. Fast-Forward Merge
This happens when the branch you are merging into (e.g., main) has not had any new commits since you created your feature branch.
- Git doesn’t need to combine anything. It simply moves the
mainpointer forward to the latest commit on your feature branch. - A clean, straight line of history with no extra “merge commits”.
2. 3-Way Merge
This happens when both branches have changed since they diverged. For example, you were working on feature-A while a teammate pushed a fix to main.
- Git looks at the two branch snapshots and their common ancestor (the point where they split).
- Git automatically creates a new “Merge Commit” that ties the two histories together.
3. Conflict Resolution
Sometimes, automated merging fails. This happens when two people change the exact same line of the exact same file in different branches.
The Markers: Git will pause the merge and place markers in the affected file:
<<<< HEAD: Your local changes.====: The separator.>>>> [branch-name]: The incoming changes from the other branch.
The Fix:
- Open the file and manually decide which code to keep.
- Remove the
<<<<,====, and>>>>markers. - Save the file, then run
git addandgit committo finalize the merge.
Lab 3.1: The Parallel Universe – Branching
Create a separate branch to build a feature while keeping your main branch safe.
Step 1: Check your current location
# Clone practice repo ready with main branch
# Clone remote repo
git clone https://github.com/Rajkumar-Aute/git-practices.git
# Change directory
cd git-practices
# check branches and active branch will be marked with *
git branch- Observation: You will see * main. The asterisk (*) tells you which branch you are currently on.
Step 2: Create and switch to a new branch
git checkout -b feature-login- Observation: This command does two things: creates a branch called feature-login and switches you to it.
Step 3: Make changes in the feature branch
Open hello.txt and change the text to: “Login Feature – Work in Progress”. Save the file.
# create hello.txt file
echo "Login Feature - Work in Progress" > hello.txt
# Adding hello.txt file to staging area
git add hello.txt
# committing hello.txt file to local repo
git commit -m "Feature: Start working on login logic"
Step 4: The Time Travel (Switch back to Main)
Watch your folder closely.
git checkout main- Observation: Open hello.txt. The text has reverted to your very first version! This is because the “Login” changes only exist in the other branch.
Step 5: The Merge (Combining Work)
Now, bring that login feature into your main code.
# Merging / Moving hello.txt file from feature branch to main branch (Locally)
git merge feature-login- Observation: Git performs a Fast-Forward merge. Now, main and feature-login are identical.
4. Git Strategy
A Git Strategy defines how a team protects their code, works together without fighting, and releases software safely to production.
1. The Mindset & Solo Strategy
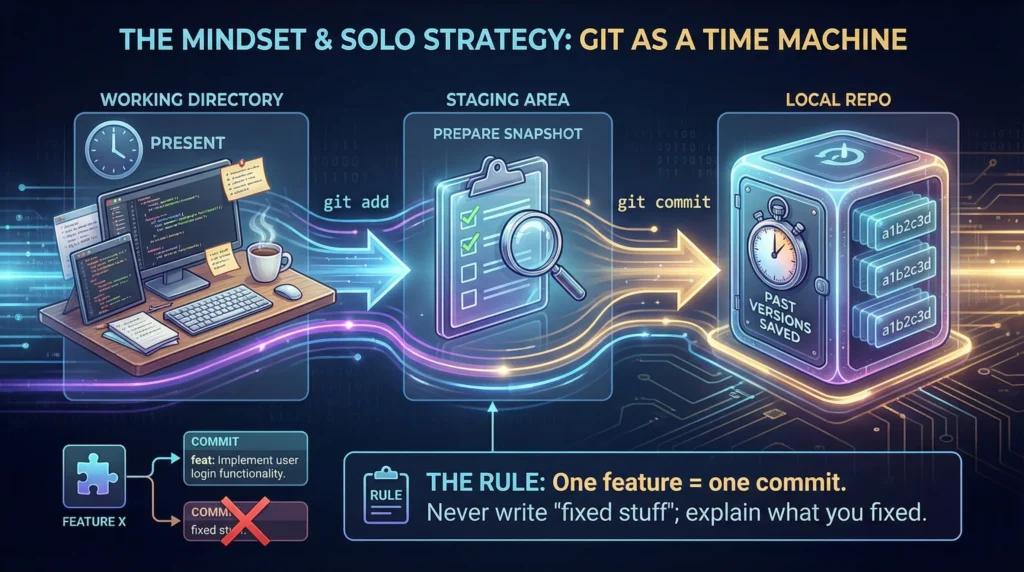
Before you type a single command, understand that Git is a “Time Machine”. Its goal is to enable teamwork and protect the “Source of Truth”.
- Solo Strategy: When working alone on personal projects, the workflow is a straight line: Working Directory → Staging Area → Local Repo.
- The Rule: One feature = one commit. Never write “fixed stuff” as a message; explain what you fixed.
2. Team Collaboration – The Feature Branch
In small teams (2–5 people) or Agile sprints.
- The Strategy: Every new task gets its own Feature Branch.
- The Flow: 1. Create feature/login-page from main. 2. Work and commit locally. 3. Push to the server and open a Pull Request (PR). 4. Code Review: A teammate checks the code for bugs or security leaks. 5. Merge into main only after approval.
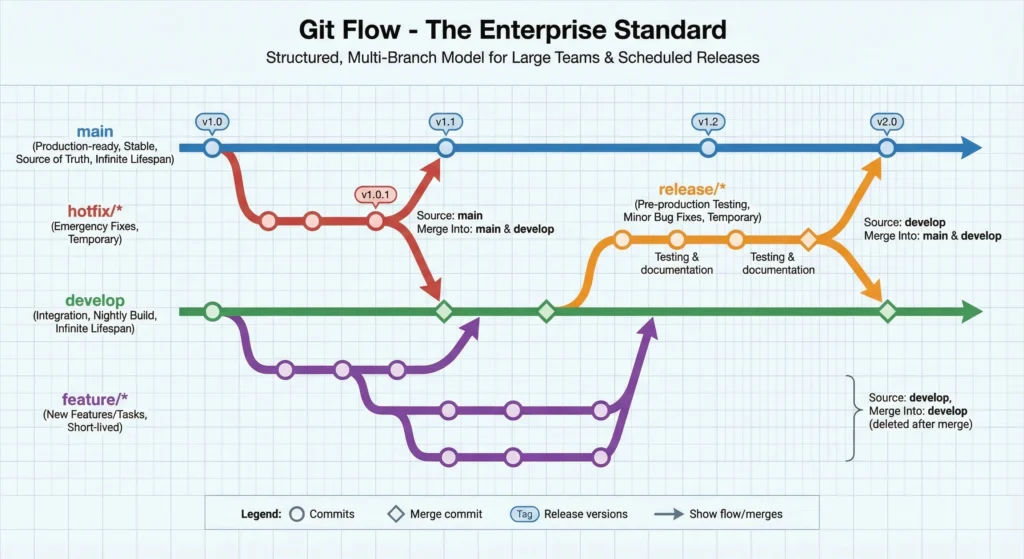
3. Git Flow – The Enterprise Standard
Large teams with scheduled releases (e.g., v1.0, v2.0).
This is a structured, multi-branch model:
| Branch Type | Purpose | Source Branch | Merge Into | Life Span |
main | The “Source of Truth.” Contains only stable, production-ready code. | N/A | N/A | Infinite |
develop | Integration branch for features. Represents the “Nightly Build.” | main | main (via release) | Infinite |
feature/* | Used to develop new features or tasks. | develop | develop | Short-lived (deleted after merge) |
release/* | Pre-production phase for testing, documentation, and minor bug fixes. | develop | main & develop | Temporary (until release) |
hotfix/* | Emergency fixes for critical bugs found in production. | main | main & develop | Temporary (until fix) |
4. GitHub Flow
GitHub Flow was created by GitHub to simplify the development process for web applications and SaaS. It follows a “Deploy-First” mindset.
- Main is Always Deployable: The
mainbranch must always contain code that is stable and ready to go live at any second. - No “Develop” Branch: There is no intermediate branch. You go straight from Feature → Main.
- PR-Centric: No code enters
mainwithout a Pull Request and a discussion.
1. The 6-Step Workflow
This is the standard cycle every developer follows in GitHub Flow:
- Create a Branch: Start from
mainand give your branch a descriptive name (e.g.,feature/add-login-buttonorbugfix/header-style). - Add Commits: Work on your code locally. Make small, frequent commits with clear messages.
- Open a Pull Request (PR): As soon as you have a basic idea or some code (even if unfinished), open a PR. This starts the conversation.
- Discuss & Review: Teammates look at your code, leave comments, suggest improvements, and ask questions. You can push more commits to the branch to address feedback.
- Test & Deploy (Optional): Many teams deploy the feature branch to a “Staging” or “Preview” environment to see it live before merging.
- Merge & Delete: Once approved, merge the PR into
main. The code is deployed to production immediately. Then, delete the branch to keep the repo clean.
2. GitHub Flow Benefits
- Simplicity: Very easy for new developers to learn. Only one rule: “Don’t break main.”
- Continuous Delivery: Perfectly suited for CI/CD pipelines.
- High Quality: Forced code reviews ensure that at least two pairs of eyes see every line of code before it reaches the user.
- Agility: You can fix a bug and ship it in 15 minutes without waiting for a “Release Window.”
3. Comparison: GitHub Flow vs. Git Flow
| Feature | GitHub Flow | Git Flow |
| Branching Complexity | Simple (Main + Feature) | Complex (Main, Develop, Feature, Release, Hotfix) |
| Best For | Web Apps, SaaS, CI/CD | Mobile Apps, Embedded Systems, Legacy Software |
| Deployment | Continuous (Multiple times a day) | Scheduled (Once a month/sprint) |
| Main Branch | Production-ready always | Production-ready always |
4. Best Practices for GitHub Flow
- Keep Branches Short: A branch should ideally live for 1-3 days. If it’s longer, your feature is too big break it down!
- Write Good PR Descriptions: Explain why you made the change, not just what you changed. Use screenshots for UI updates.
- Automated Checks: Set up GitHub Actions to run tests automatically on every PR. If tests fail, the “Merge” button should be locked.
- Protected Branches: Use GitHub settings to prevent anyone (even the boss) from pushing directly to
main. Force everyone to go through a PR.
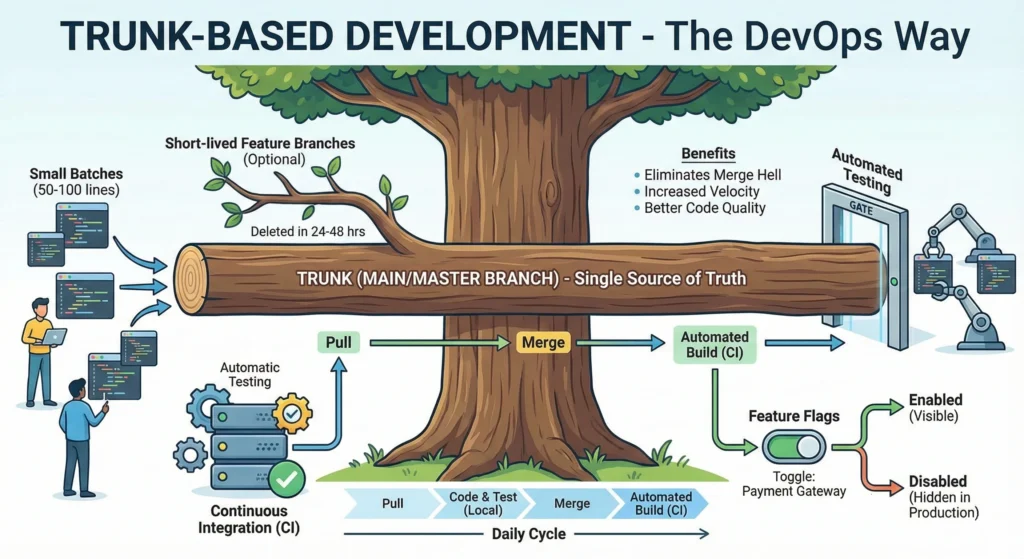
5. Trunk-Based Development – The DevOps Way
Trunk-Based Development is a version control strategy where developers merge small, frequent updates to a single central branch, typically called main or master. This is the opposite of “Git Flow,” where features live in separate branches for a long time.
- Continuous Integration (CI): Since everyone merges daily, the code is integrated constantly.
- Small Batches: Instead of a 1000-line “Mega-Commit,” developers push 50-100 lines of code multiple times a day.
- Single Source of Truth: There is only one version of the code that matters: the Trunk.
2. How it Works – The Workflow
- Pull: Sync your local machine with the main branch.
- Code & Test: Make a small change and run local automated tests.
- Short-lived Branches (Optional): If you use branches, they must be deleted within 24–48 hours.
- Merge: Push the code to main.
- Automated Build: The CI server automatically builds the code and runs all tests to ensure nothing broke.
3. Key Technical Requirements
To make TBD work without breaking the entire application, two things are non-negotiable:
- Automated Testing: You must have a robust suite of unit and integration tests. Since there is no “QA Week,” the code must be verified by the system automatically.
- Feature Flags (Feature Toggles): This is a “switch” in the code.
- Scenario: You are building a new Payment Gateway, but it will take 5 days.
- Action: You merge the code daily, but wrap it in an if statement: if (payment_flag_enabled) { … }.
- Result: The code is in Production, but the users can’t see it until you flip the switch.
4. Benefits of Trunk-Based Development
- Eliminates Merge Hell: When many people work on the same file in different branches for weeks, merging them becomes a nightmare. TBD solves this by merging every few hours.
- Increased Velocity: No waiting for “Release Managers” to approve branch merges. You code, you test, you ship.
- Better Code Quality: Because the “Trunk” must always be in a deployable state, developers are more disciplined about not breaking things.
5. Challenges to Consider
- High Seniority/Skill Required: Junior developers might find it scary to push directly to main.
- Culture Shift: It requires a “You build it, you run it” mindset.
- Infrastructure Cost: You need a very fast CI/CD pipeline to handle the constant merging and testing.
6. Release & Emergency – Hotfix
1. Tag-Based Releases – The Labeling System
In Git, a Tag is a permanent pointer to a specific point in your history. While branches move, tags stay put.
- Why use Tags? Without tags, “Production” is just a vague term. With tags, you can say, “Production is running exactly v1.4.2.” This makes it easy to roll back if something breaks.
- Semantic Versioning (SemVer): This is the industry standard for naming tags. It uses a three-part number: MAJOR.MINOR.PATCH (e.g., v2.3.1).
- MAJOR: Big changes that might break old code (e.g., a total UI redesign).
- MINOR: New features added, but everything still works as before.
- PATCH: Only bug fixes (no new features).
2. The Hotfix Strategy
A Hotfix is a special type of branch used to quickly address a critical bug in the live production environment.
Step-by-Step Hotfix Process -When an emergency happens, you follow this specific path to ensure the fix is safe and doesn’t get lost:
- Branch Out: Create a new branch named hotfix/v1.0.1 directly from the Main/Master branch (or the tag that is currently live).
- Fix & Test: Apply the fix only for that specific bug. Do not add new features here. Run tests to make sure the fix works.
- Merge to Main: Merge the hotfix branch back into main so the live site is fixed immediately.
- Tag It: Create a new tag (e.g., v1.0.1) so you have a record of the fix.
- Merge to Develop: Crucial Step! Merge the fix back into the develop branch. If you forget this, the bug will reappear in the next big release because the development code still has the old bug.
4. Best Practices for Emergency Fixes
- Keep it Tiny: A hotfix should only contain the code required to fix the emergency.
- Don’t skip QA: Even in an emergency, at least one other person should review the code (Peer Review).
- Automate Deployment: Use a CI/CD tool to push the hotfix to production instantly once the merge is approved.
- Delete the Branch: Once the hotfix is merged and tagged, delete the hotfix/ branch to keep the repository clean.
Comparison: Regular Release vs. Hotfix
| Feature | Regular Release | Hotfix |
| Origin | Comes from develop branch | Comes from main (Production) |
| Urgency | Planned (End of Sprint/Month) | Immediate (ASAP) |
| Content | New features + Bug fixes | Only one critical bug fix |
| Version Change | Minor or Major (v1.1.0 or v2.0.0) | Patch only (v1.0.1) |
Note: If you are using Trunk-Based Development, you usually don’t need a separate hotfix branch. You just fix it on the main trunk and deploy immediately. Hotfixes are most common in Git Flow or GitHub Flow environments.

Lab 4.1: The Enterprise Standard (Git Flow)
You are working on a massive project. You need to maintain a stable main branch, an integration develop branch, and specific branches for features and hotfixes.
Step 1: Initialize the Develop Branch
In Git Flow, main only stores production-ready code. All daily work happens in develop.
Note – fork practice Fork Rajkumar-Aute/git-practices repo to your github account
# Clone practice repo ready with main branch
# Clone remote repo or create a fork of this below repo and user your own github repo.
git clone https://github.com/Rajkumar-Aute/git-practices.git
# Change directory
cd git-practices
# check branches and active branch will be marked with *
git branch

# Ensure you are on main and up to date
git checkout main
git pull origin main

# Create and push the develop branch. Your need your own github repo.
git checkout -b develop
git push origin develop # this will throw error as you are working on readonly repo.
Step 2: Create a Feature Branch
# Switch to develop and create a new feature
git checkout develop
git checkout -b feature/login-module

# Create a file and commit
echo "Login logic v1" > login.txt
git add login.txt
git commit -m "Feature: Initial login logic"
Step 3: Simulate an Emergency (Hotfix)
While working on the feature, a critical bug is found in main. You must fix it without including unfinished develop code.
# 1. Switch to main (Production)
git checkout main

# 2. Create hotfix branch
git checkout -b hotfix/v1.0.1

# 3. Apply the fix
echo "FIX: Security patch applied" >> hello.txt
git add hello.txt
git commit -m "Hotfix: Resolve security vulnerability"

# 4. Merge back to main and Tag it
git checkout main
git merge hotfix/v1.0.1
git tag -a v1.0.1 -m "Urgent patch v1.0.1"
git push origin main --tags

# 5. CRITICAL: Merge the fix back into develop so future versions are safe
git checkout develop
git merge hotfix/v1.0.1

# Cleanup
git branch -d hotfix/v1.0.1
Lab 4.2: The Agile Standard (GitHub Flow)
Scenario: You are working in a modern SaaS team. You want to push a small feature, get it reviewed, and deploy it immediately.
Step 1: Create a Short-lived Feature Branch
git checkout main
git checkout -b feature/dark-mode
Step 2: Commit and Push
echo "body { background: #000; }" > styles.css
git add styles.css
git commit -m "UI: Add basic dark mode styles"
git push origin feature/dark-mode
Step 3: The Pull Request (PR) – Manual Step
- Go to https://github.com/Rajkumar-Aute/git-practices.
- Click the “Compare & pull request” button that appears.
- Write a description and click “Create pull request”.
- On the GitHub UI, click “Merge pull request” then “Confirm merge”.
Step 4: Cleanup
git checkout main
git pull origin main
git branch -d feature/dark-mode
Lab 4.3: The DevOps Way (Trunk-Based Development)
Scenario: You want to avoid “Merge Hell.” You push small, tested changes directly to main multiple times a day using Feature Flags.
Step 1: Code a Feature Flag
Instead of a long-lived branch, we wrap unfinished code in a “switch” so it can be safely pushed to main.
git checkout main

# Create a simple python script with a feature flag
cat <<EOF > app.py
# Feature Flag Configuration
NEW_PAYMENT_ENABLED = False

def process_payment():
    if NEW_PAYMENT_ENABLED:
        print("Executing New Crypto Payment Gateway...")
    else:
        print("Executing Standard Credit Card Gateway...")

process_payment()
EOF

git add app.py
git commit -m "DevOps: Add Crypto Gateway behind feature flag"
git push origin main
Step 2: Flip the Switch
When the team decides the code is ready for users, you don’t merge a branch; you just change the config.
# Change False to True in app.py
sed -i 's/NEW_PAYMENT_ENABLED = False/NEW_PAYMENT_ENABLED = True/' app.py

git add app.py
git commit -m "Release: Enable Crypto Payment Gateway"
git push origin main
5. The “Fixer” Level – Handling Mistakes & Emergencies
In simple words, the Fixer Level is your “Undo” button and safety net in Git. Sometimes we make mistakes, commit the wrong code, or get interrupted by an urgent task.
- Resets are for going back in time (one is gentle, one is destructive).
- Reverts are the polite way to undo mistakes in a team project without messing up others’ work.
- Stash is like a temporary drawer where you hide your current messy work so you can deal with a “fire” (bug) and come back to it later.
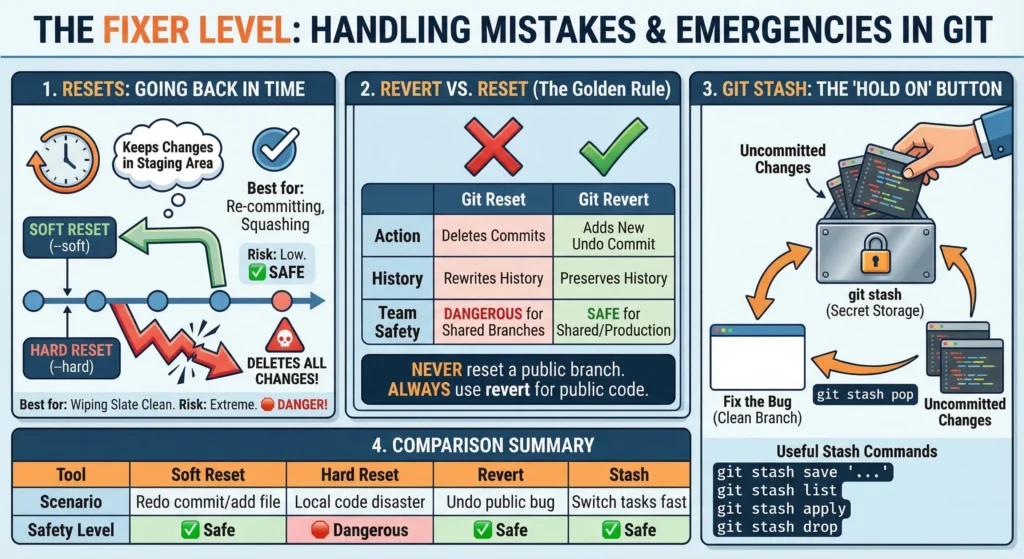
1. Resets: Going Back in Time
When you want to move the “head” of your branch back to a previous commit, you use git reset. There are two main flavors:
1. Soft Reset –soft
- It moves the history back but keeps your changes in the staging area.
- Best for: When you realized you committed too early or want to combine (squash) multiple small commits into one clean one.
- Risk: Low. No code is lost.
2. Hard Reset –hard
- It moves the history back and completely deletes all changes made after that point.
- Best for: When you’ve made a total mess and want to “wipe the slate clean” to exactly how the code was before.
- Risk: Extreme. Use with caution! You cannot easily get deleted code back.
2. Revert vs. Reset
Choosing between these two depends on whether you are working alone or in a team.
| Feature | Git Reset | Git Revert |
| Action | Deletes commits from history. | Adds a new commit that undoes the old one. |
| History | Rewrites history (makes it look like the mistake never happened). | Preserves history (shows the mistake and the fix). |
| Team Safety | Dangerous for shared branches. It confuses other developers’ Git. | Safe for shared/production branches. |
| Visual | Line goes backward. | Line keeps moving forward. |
Never reset a branch that has already been pushed to the server (GitHub/GitLab). Always use revert for public code.
3. Git Stash: The “Hold On” Button
Imagine halfway through a complex feature. Suddenly, In “Production is down! Fix it now!” You can’t commit your half-finished, broken code.
- git stash: Takes all your current uncommitted changes and puts them into a “secret storage.” Your working directory becomes clean (matching the last commit).
- Fix the Bug: switch branches, fix the bug, and deploy.
- git stash pop: Once the bug is fixed, back to feature branch and “pop” the stash. half-finished work reappears exactly where left it.
Useful Stash Commands:
- git stash save “Working on UI”: Gives your stash a name.
- git stash list: See all the things you have hidden away.
- git stash apply: Brings work back but keeps a copy in the stash.
- git stash drop: Permanently deletes the latest stashed work.
| Tool | Scenario | Safety Level |
| Soft Reset | I want to redo my last commit message or add one more file. | Safe |
| Hard Reset | My local code is a disaster; I want to start over from the last saved point. | Dangerous |
| Revert | I pushed a bug to the main branch and need to undo it without breaking the team’s sync. | Safe |
| Stash | I’m busy, but I need to switch tasks immediately without losing my progress. | Safe |
Lab 5.1: The Time Machine (Git Reset)
You made a commit too early and want to fix it (Soft Reset), and then you made a complete mess that you want to wipe away (Hard Reset).
Step 1: Soft Reset (The Gentle Undo)
- Add a line “Feature Part 1” to hello.txt.
- Commit it: git add . && git commit -m “Work in progress”.
- Now, realize you wanted to add “Feature Part 2” in the same commit.
- Run:
git reset --soft HEAD~1 - Observation: Run git status. You’ll see your changes are still there in the Staging Area. Git just “undid” the commit.
- Action: Add “Feature Part 2” to the file, then commit again with a better message.
Step 2: Hard Reset (The Destructive Undo)
- Add a lot of “trash” text to your files.
- Commit it: git add . && git commit -m “Total mess”.
- You decide this work is garbage and want to go back to the clean state.
- Run:
git reset --hard HEAD~1
Observation: Check your files. The “trash” text is completely gone. The history is rewritten. Warning: Never do this if you have already pushed the “mess” to GitHub.
Lab 5.2: The Professional Undo (Git Revert)
You pushed a commit to GitHub, but it has a bug. Since it’s on a shared remote, you must use the “polite” way to undo it.
Step 1: Create and Push a “Bug”
- Add “This line causes a crash” to hello.txt.
- Commit and Push:
git add . git commit -m "Add: New feature logic" git push origin main
Step 2: Revert the Bug Instead of deleting the commit (which would break your teammates’ history), we will add a “fix-it” commit.
- Run:
git revert HEAD - Observation: A text editor will open for a commit message (usually “Revert ‘Add: New feature logic'”). Save and close it.
- Action: Push the fix to GitHub.
git push origin main
Conclusion: If you check git log, you will see the original commit AND the revert commit. This is the correct industry standard for public repositories.
Lab 5.3: The Temporary Drawer (Git Stash)
You are mid-way through a task, and your boss calls: “The production site is down! Switch to the main branch and fix it NOW!”
Step 1: Start a Messy Task
- Switch to a new branch: git checkout -b big-feature.
- Edit hello.txt with “Half-finished code…”. Do not commit.
Step 2: The Emergency Call You try to switch back to main, but Git might complain about uncommitted changes.
- Run:
git stash save "Work on big feature" - Observation: Run git status. Your working directory is perfectly clean! The “Half-finished code” is hidden in the stash.
Step 3: Fix the Emergency
- git checkout main
- (Imagine you fixed a bug here)
- git checkout big-feature
Step 4: Retrieve Your Work
- Run:
git stash list # See your hidden work git stash pop
Observation: Your “Half-finished code” is back in the file. You can now continue your work.
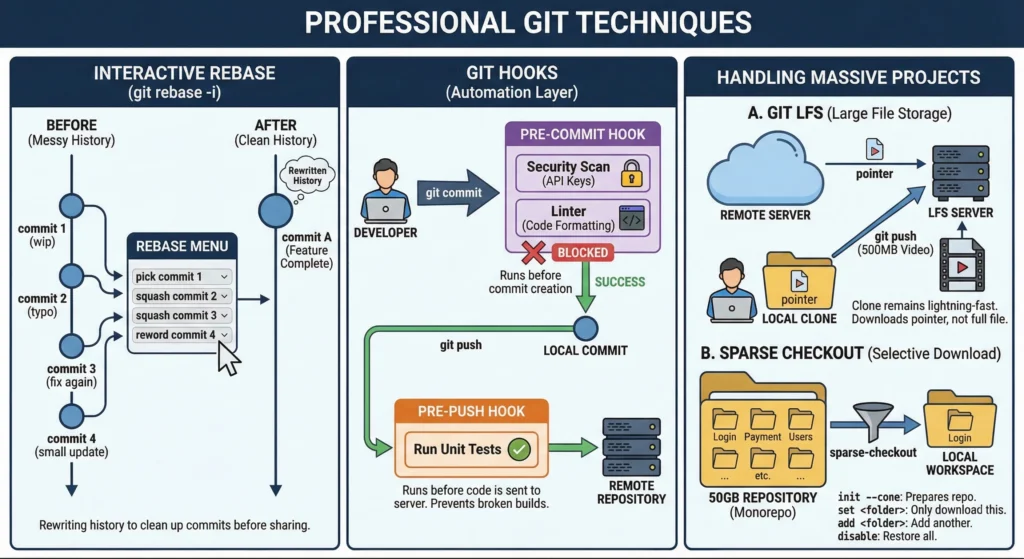
6. Professional Git Techniques
1. Interactive Rebase git rebase -i
Interactive Rebase is the tool used to “rewrite history.” It allows you to clean up your commit history before sharing it with the team.
- The Problem: While working, you might make many small, messy commits like “wip,” “typo,” or “fix again.”
- The Solution: Use git rebase -i HEAD~n (where n is the number of commits). This opens a menu where you can:
- Pick: Keep the commit as is.
- Squash: Combine a commit into the previous one. This is the most popular use case.
- Reword: Change a commit message.
- Drop: Completely remove a commit.
2. Git Hooks: The Automation Layer
Hooks are scripts that Git executes before or after events like commit, push, or receive. They live in the .git/hooks folder.
- Pre-commit Hook:
- Runs before the commit is actually created.
- Automatically running a “Linter” (to fix code formatting) or a security scan (to ensure you didn’t accidentally type your AWS password in the code). If the scan fails, the commit is blocked.
- Pre-push Hook:
- Runs before code is sent to the server.
- Running all unit tests. If any test fails, the push is cancelled to prevent breaking the build for everyone else.
3. Handling Massive Projects
Standard Git struggles with very large files or giant “Monorepos” (where 100+ projects live in one repository).
1. Git LFS – Large File Storage
Git is great for text code but slow for heavy files (videos, 3D models, Photoshop files).
- Instead of storing the 500MB video in the Git history, LFS replaces it with a tiny “pointer” file. The actual heavy file is stored on a separate LFS server.
- Your git clone remains lightning-fast because you aren’t downloading every version of a 1GB file.
2. Sparse Checkout – The Selective Download
To work at a huge company with a 50GB repository, but only need to fix a bug in the “Login” folder, downloading the whole 50GB is a waste of time.
init --cone: Prepares the repository to handle selective folders efficiently.set <folder>: Tells Git, “I only want to see this folder.” Everything else disappears from your disk (but remains safe on the server).add <folder>: Adds another specific folder to your view.disable: Returns the repository to a normal state where you see everything.
7. Git Commands
1. Setup & Configuration
Getting started and defining who you are.
| Command | Description | Best Practice / Note |
| git init | Initialize a new Git repository locally. | Run inside the root folder of your project. |
| git clone <url> | Download a repository from a remote server. | Automatically sets up the origin remote. |
| git config –global user.name “Name” | Set your username globally. | Matches your GitHub/GitLab profile name. |
| git config –global user.email “mail” | Set your email globally. | Crucial for contribution tracking and blame. |
| git config –list | List all currently set configuration values. | Use to verify your user settings. |
| git config –global alias.co checkout | Create shortcuts for long commands. | Makes git co work instead of git checkout. |
| git help <command> | Open the manual page for a specific command. | E.g., git help commit for details on flags. |
2. The Core Local Workflow
The cycle of changing files and saving snapshots.
| Command | Description | Best Practice / Note |
| git status | Show the state of working directory and staging. | Run this constantly before other commands. |
| git add <file> | Add file(s) to the Staging Area (Index). | Prepares the file for the next commit. |
| git add . | Add all changed/new files to Staging. | Be careful not to add accidental files. |
| git commit -m “message” | Create a new commit from staged files. | Use imperative verbs: “Fix bug”, not “Fixed bug”. |
| git commit -am “message” | Combine add (tracked files only) and commit. | Skip staging for files Git already knows about. |
| git rm <file> | Remove a file from Git and the disk. | Stages the deletion automatically. |
| git mv <old> <new> | Move or rename a file. | Git tracks this as a rename, not delete/create. |
3. Inspecting History & Code
Understanding what happened in the past.
| Command | Description | Best Practice / Note |
| git log | Show a chronological list of commits. | Press q to exit the log view. |
| git log –oneline –graph | Show a condensed, visual graph of history. | Excellent for visualizing branching/merging. |
| git show <commit-hash> | Show changes and metadata of a specific commit. | Use to inspect what changed in one specific save. |
| git diff | Show changes in Working Dir vs. Staging. | What have I changed but not staged yet? |
| git diff –staged | Show changes in Staging vs. Last Commit. | What am I about to commit? |
| git blame <file> | Show who changed each line of a file and when. | Used for finding who introduced a bug (or feature). |
4. Branching & Tagging
Working in parallel universes and marking milestones.
| Command | Description | Best Practice / Note |
| git branch | List all local branches. | Current branch is marked with *. |
| git branch <name> | Create a new branch (but remain on current). | |
| git switch <name> | Switch to an existing branch. | Modern replacement for git checkout <name>. |
| git checkout -b <name> | Create and switch to a new branch instantly. | Most common way to start new work. |
| git branch -d <name> | Delete a fully merged branch. | Use -D to force-delete unmerged work. |
| git branch -m <new-name> | Rename the current branch. | |
| git tag | List all tags. | Tags are meant for permanent releases (v1.0). |
| git tag -a v1.0 -m “Msg” | Create an annotated tag. | Best for official releases (stores who tagged it). |
5. Remote Synchronization
Sending and receiving code from the cloud.
| Command | Description | Best Practice / Note |
| git remote -v | List remote servers and URLs. | Verify where you are pushing/pulling. |
| git fetch | Download information from remote, but don’t merge. | Safest way to review incoming changes. |
| git pull | Fetch remote changes and immediately merge into current branch. | Can result in merge conflicts. |
| git push origin <branch> | Upload local branch commits to the remote. | |
| git push -u origin <branch> | Push and set “upstream tracking”. | Allows future use of just git push or git pull. |
| git push –tags | Upload local tags to remote. | Tags are not pushed by default. |
6. Merging & Rebasing
Integrating changes from different branches.
| Command | Description | Best Practice / Note |
| git merge <branch> | Merge the specified branch into the current one. | Usually run while on main to bring in features. |
| git merge –abort | Stop a merge that has conflicts and return to safety. | Use if conflict resolution gets too confusing. |
| git rebase <base-branch> | Reapply current branch commits on top of base. | Keeps history linear and clean. |
| git rebase -i HEAD~N | Interactive rebase for N number of commits. | Used to squash, edit, or reorder local commits. |
| git cherry-pick <hash> | Apply the changes of a single commit from elsewhere. | Useful for porting hotfixes between branches. |
7. Undoing & Recovery
Fixing mistakes at various stages.
| Command | Description | Best Practice / Note |
| git commit –amend | Combine staged changes with the previous commit. | Great for fixing typos in the last commit message. |
| git restore <file> | Discard changes in working directory. | Dangerous: Irreversibly loses unsaved work in that file. |
| git restore –staged <file> | Unstage a file (move from Staging back to Working). | Does not lose file contents, just un-stages it. |
| git reset –soft HEAD~1 | Undo the last commit, keep changes staged. | “I didn’t mean to commit yet.” |
| git reset –hard HEAD~1 | Undo last commit, destroy all changes. | Very Dangerous. Nukes work. |
| git revert <hash> | Create a new commit that undoes changes of an old one. | Safe for shared/production branches. |
| git reflog | Show a log of every movement of the HEAD pointer. | The ultimate recovery tool for “lost” commits. |
8. Stashing & Advanced Tools
Temporary storage and specialized workflows.
| Command | Description | Best Practice / Note |
| git stash | Temporarily shelve (hide) uncommitted changes. | Use when you need to switch branches quickly. |
| git stash pop | Re-apply stashed changes and delete them from stash. | |
| git stash list | Show all currently stashed changesets. | |
| git bisect start | Start binary search debugging mode. | Helps find the exact commit that broke something. |
| git submodule add <url> | Add another repository as a folder inside this one. | Complex feature, use with care. |
| git lfs track “*.psd” | Tell Git LFS to manage large Photoshop files. | Requires Git LFS extension installation. |
Git Interview Question and Answers
- Don’t just say the command, explain the impact. (e.g., “Rebase makes history linear, which makes auditing easier.”)
- Mention “Best Practices”: Always talk about .gitignore, clear commit messages, and atomic commits.
- DevSecOps Mindset: Mention that “Git is the source of truth for Infrastructure-as-Code (IaC).”
The Core Foundations
Focus: Internalizing the Git mindset and the local lifecycle.
- What is Git and why is it “Distributed”?
- Git is a DVCS. Unlike Centralized systems (SVN) where the server is the single source of truth, Git mirrors the entire history on every machine.
- DevOps Benefit: If the central server (GitHub) goes down, any developer can restore the full repository, including all branches and tags, from their local copy.
- Explain the Git Three-Stage Architecture.
- Working Directory: Your actual file system.
- Staging Area (Index): A virtual “loading dock.” This allows you to perform Atomic Commits you might have changed 10 files but only “stage” 2 that belong to a specific bug fix.
- Local Repository: The .git directory where snapshots are cryptographically hashed and stored.
- What is a “Commit” and why are messages important?
- A commit is a Snapshot, not a “diff” (it stores the whole file, not just the changes). Messages follow the Imperative Mood (e.g., “Fix bug” instead of “Fixed bug”) to act as instructions for the codebase’s future.
- Difference between git pull and git fetch?
- fetch updates the origin/main pointer on your machine but doesn’t change your main branch. pull is a macro that runs fetch and then immediately tries to merge (or rebase) those changes into your current code.
- What is the purpose of .gitignore?
- It prevents Repository Bloat. It stops binary files (like .exe), dependencies (node_modules), and secrets (.env) from being tracked. Once a file is committed, adding it to .gitignore won’t remove it; you must git rm –cached it first.
Good to Know
Focus: Solving collaboration friction and fixing common errors.
- git merge vs. git rebase: When to use which?
- Merge: Creates a “Merge Commit.” It preserves the context of when a feature branch existed.
- Rebase: Rewrites history by moving your commits to the top of the target branch.
- Pro Tip: Use Merge for shared branches to keep history accurate; use Rebase for local feature branches to keep history clean.
- What is git stash?
- It takes your untracked and modified changes and pushes them onto an internal stack. It’s a “clean slate” button. Use git stash pop to bring changes back or git stash apply to keep them in the stack for multiple branches.
- git reset vs. git revert?
- Reset: Moves the branch pointer backward. It effectively “deletes” commits from the timeline.
- Revert: Creates a New Commit that is the exact inverse of a previous commit.
- Rule: If the code is already on GitHub, always Revert. Resetting public history causes “Merge Hell” for teammates.
- What is git reflog?
- It stands for Reference Logs. Git tracks every time HEAD changes (switching branches, committing, rebasing). Even if you delete a branch, the commits stay in the database for 30–90 days, and reflog is the map to find their hashes.
- What is “Trunk-Based Development”?
- A strategy where everyone merges to main at least once a day. It requires Feature Flags (toggles in the code) so that unfinished features can be merged into production without being visible to users.
Architect Advance Level
Focus: Plumbing, performance tuning, and automation.
- What are Git Hooks?
- These are scripts located in .git/hooks.
- Client-side: pre-commit (runs linters/unit tests).
- Server-side: pre-receive (enforces commit message formats or blocks large files on the server).
- How do you handle large binary files?
- Git is terrible at storing binaries (images/videos) because it can’t “diff” them. Git LFS replaces the binary with a text pointer in the repo, while the actual file lives on a separate LFS server. This keeps the .git folder small and cloning fast.
- What are the 3 internal Git objects?
- Blob: The content of a file (hashed).
- Tree: A directory listing (hashes of blobs and sub-trees).
- Commit: A pointer to a Tree, a parent Commit, and metadata (author/date).
- What is “Sparse Checkout”?
- Standard Git downloads everything. Sparse checkout allows you to define a cone (a specific folder path). Git then only populates those files in your working directory. Essential for Monorepos where the total project size might be hundreds of gigabytes.
- What is “rerere”?
- REuse REcorded REsolution. If you resolve a complex conflict and then rebase later, you might have to resolve it again. If rerere is enabled, Git remembers your previous fix and applies it automatically.
- What is the “Index” file?
- It is a binary file (.git/index) that serves as the bridge between your Working Directory and the Repository. It contains a list of every file path in the project and the SHA-1 hash it should have.
- How does Git ensure data integrity?
- Through Merkle Trees. Since every commit hash depends on its parent’s hash, you cannot change a commit from 2 years ago without changing every single hash that came after it. This makes Git a Block-chained history of code.
- Explain “Plumbing” vs. “Porcelain” commands.
- Porcelain: Commands made for humans (e.g., git status, git branch).
- Plumbing: Low-level commands for scripting (e.g., git cat-file, git hash-object). In DevOps, we use plumbing to automate repository audits and cleanup.
- What is git bisect?
- A debugging tool that uses Binary Search. You mark a “Good” commit and a “Bad” commit. Git then checks out the middle commit for you to test. It repeats this until it finds the exact commit that introduced a bug.
- What is a “Bare Repository”?
- Created via git init –bare. It contains only the .git data and no working directory. You cannot edit files in a bare repo. This is what sits on servers like GitHub/GitLab to receive push events.