Kubernetes Resource Controllers
In Kubernetes, a controller is a control loop that watches the state of your cluster through the API server and makes (or requests) changes to move the current state toward the desired state.
Most of these reside within the kube-controller-manager, a single binary that runs many individual controller processes to reduce complexity. Because these controllers are compiled into a single binary, they can share local in-memory caches (called Shared Informers). This prevents 30+ individual controllers from simultaneously hammering the kube-apiserver with duplicate requests, drastically improving cluster performance.
How to “Check” a Controller: Because these controllers are embedded in a single binary, you cannot run kubectl get <controller-name>.
How to Enable or Disable Controllers (The --controllers Flag)
By default, Kubernetes enables a standard set of controllers automatically. However, you can explicitly turn specific controllers on or off using the --controllers flag passed to the kube-controller-manager binary.
If you used kubeadm to build your cluster, you configure this by editing the static pod manifest located at /etc/kubernetes/manifests/kube-controller-manager.yaml on your control plane nodes.
Syntax Rules:
*enables all default-enabled controllers.fooexplicitly enables the controller named “foo”.-fooexplicitly disables the controller named “foo”.
Examples:
--controllers=*: Enables all default controllers (This is standard behavior).--controllers=*,-cronjob: Enables all defaults, but explicitly disables thecronjobcontroller.--controllers=*,bootstrapsigner,-podgc: Enables all defaults, enables the disabled-by-defaultbootstrapsigner, and disables thepodgccontroller.
Comprehensive List of Kube-Controller Manager Loops
At a high level, every controller operates on a continuous reconciliation loop: it observes the current state of the cluster, compares it to the desired state you declared in your YAML files, and takes action to fix any differences.
Here is exactly how each one executes that loop:
1. Workload & Pod Lifecycle
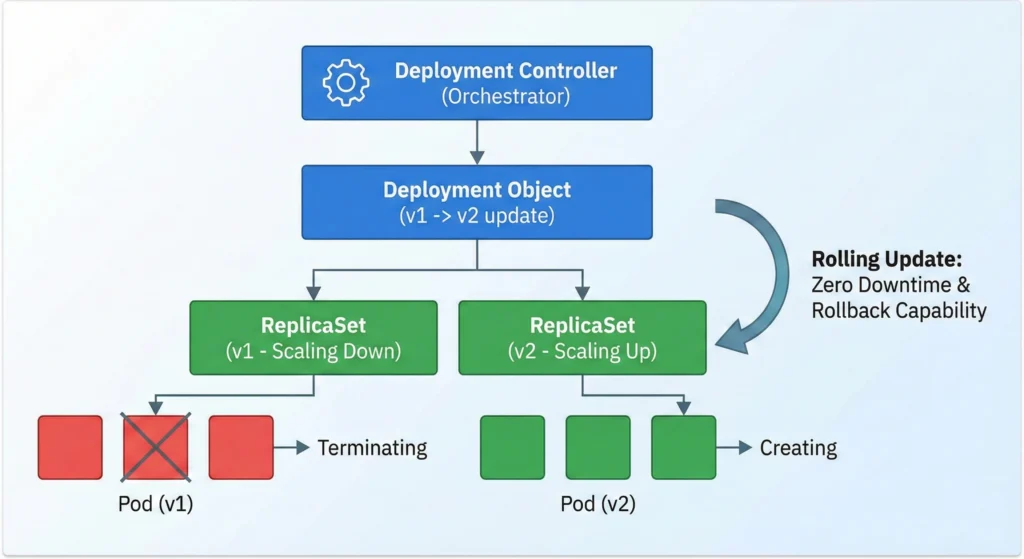
Deployment Controller: deployment
- Role: Manages application rollouts and rollbacks.
- How it works: It does not manage Pods directly. Instead, it orchestrates ReplicaSets. During an update, it creates a new ReplicaSet, scales it up incrementally, and scales down the old one, enabling zero-downtime rolling updates and easy version rollbacks.
- Command:
kubectl logs -n kube-system -l component=kube-controller-manager | grep -i "deployment"
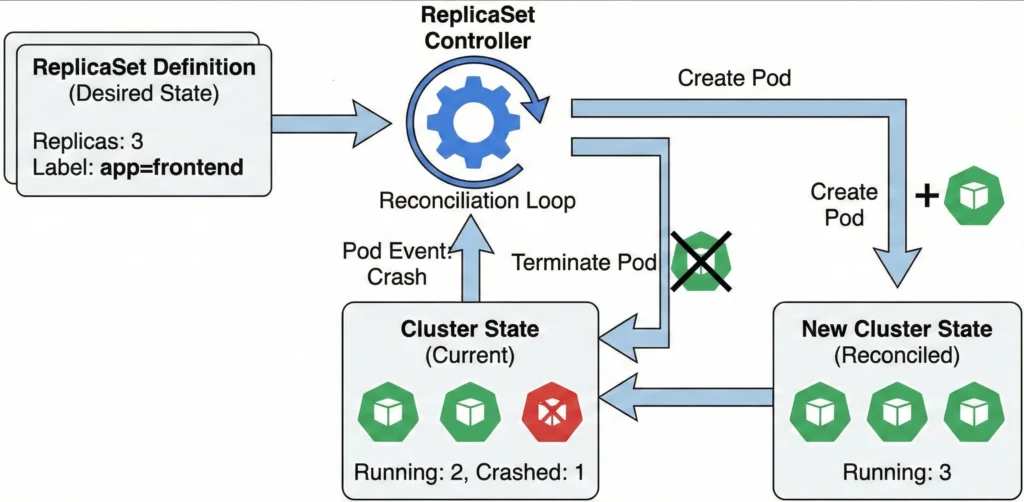
ReplicaSet Controller: replicaset
- Role: Ensures the defined number of replicas for pods are running.
- How it works: It watches the API server for Pod events. If the current number of running Pods falls below or exceeds the desired replicas count (due to a node crash or manual deletion), it creates or terminates Pods to match the exact desired state.
- ReplicationController (Legacy): replicationcontroller Provided for backward compatibility. While ReplicaSets have largely replaced them in modern Kubernetes, this loop still runs to support legacy configurations ensuring a specified number of pod replicas are running.
- Command:
kubectl logs -n kube-system -l component=kube-controller-manager | grep -i "replicaset"
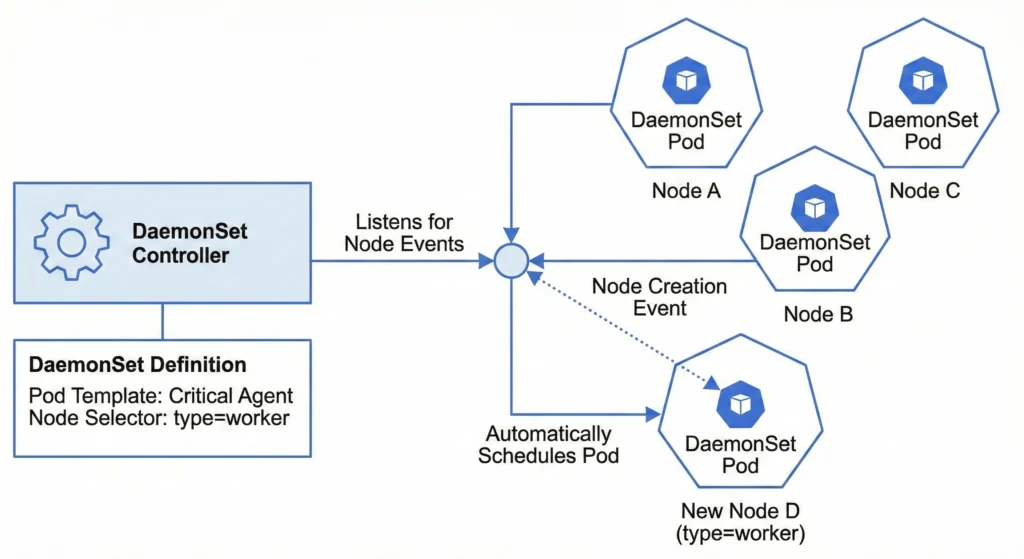
DaemonSet Controller: daemonset
- Role: Ensures critical pods run on all or selected nodes.
- How it works: It listens for node creation and deletion events. When a new valid node joins the cluster (and matches any defined node selectors), the controller automatically schedules the required DaemonSet Pod onto that specific node.
- Command:
kubectl logs -n kube-system -l component=kube-controller-manager | grep -i "daemonset"
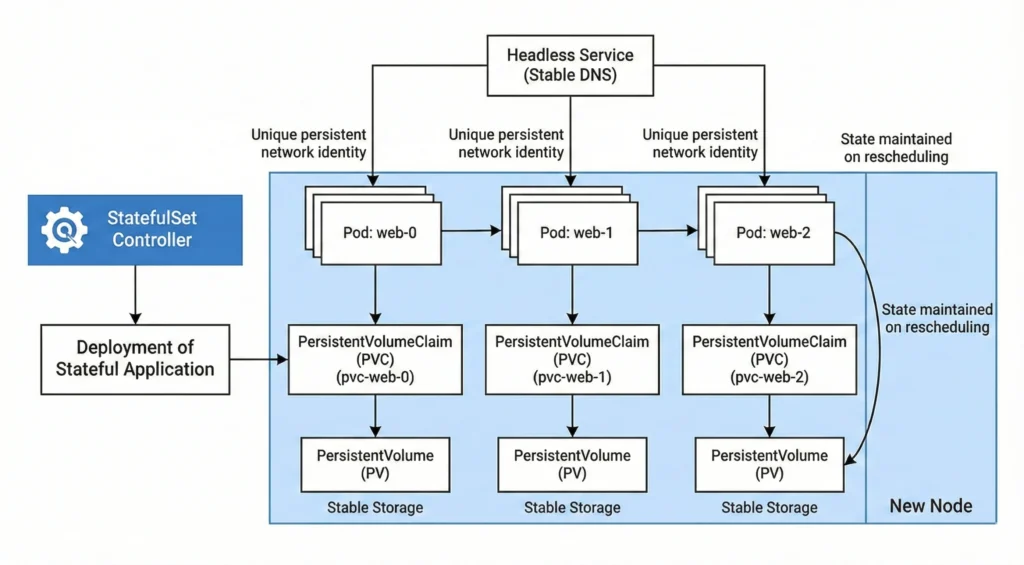
StatefulSet Controller: statefulset
- Role: Manages the deployment of stateful applications.
- How it works: It provides strict guarantees about the ordering and uniqueness of Pods. It assigns persistent, sequential network identities (e.g.,
web-0,web-1) and ensures stable storage bindings so that state is maintained even if pods are rescheduled to new nodes. - Command:
kubectl logs -n kube-system -l component=kube-controller-manager | grep -i "statefulset"
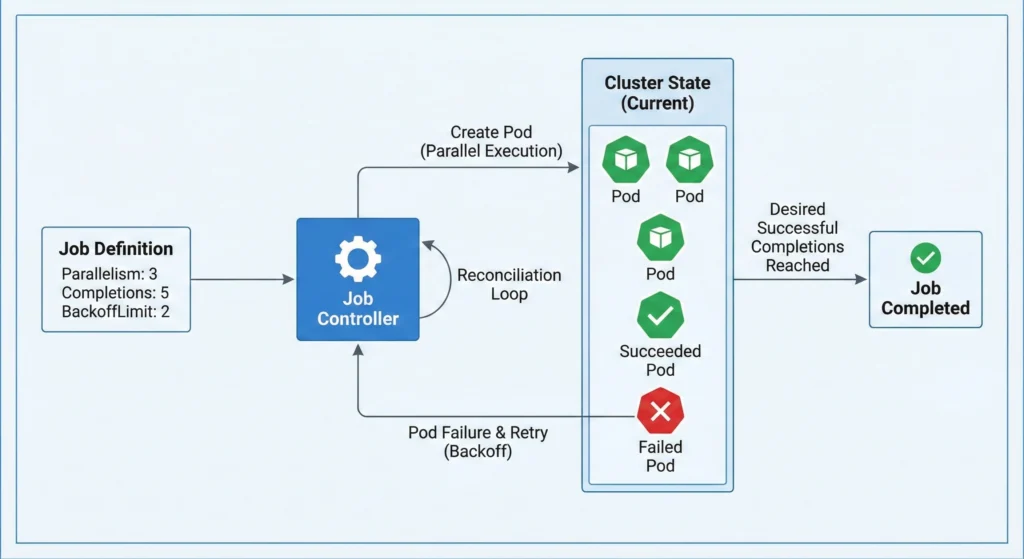
Job Controller: job
- Role: Manages one-off tasks and ensures successful termination.
- How it works: It spins up Pods to execute a batch task, tracks their successes and failures, respects retry limits (
backoffLimit), and handles parallel execution until the desired number of successful completions is reached. - Command:
kubectl logs -n kube-system -l component=kube-controller-manager | grep -i "job"
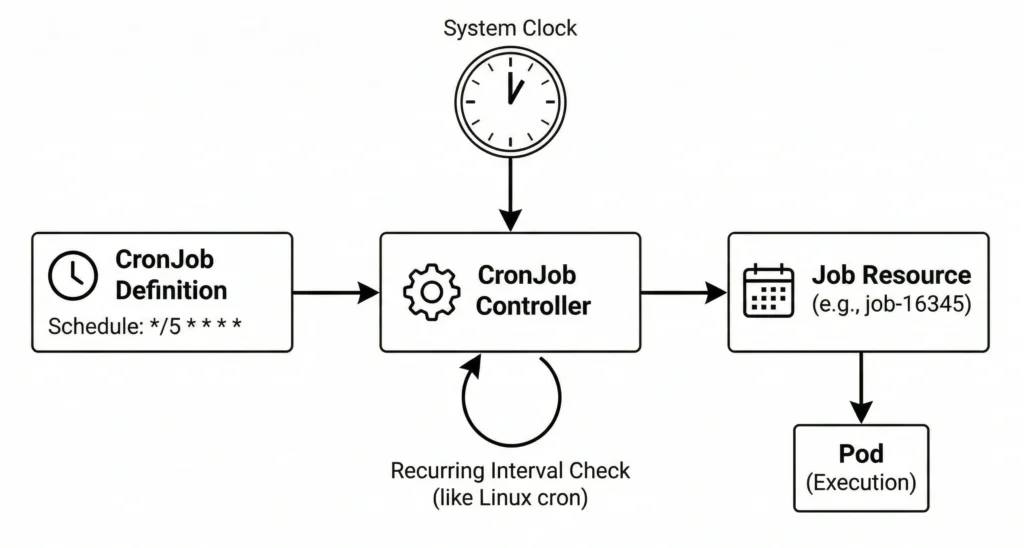
CronJob Controller: cronjob
- Role: Manages scheduled, recurring jobs.
- How it works: Operating similarly to the standard Linux cron utility, it watches the clock and generates a standard Job resource at the exact intervals specified in your schedule.
- Command:
kubectl logs -n kube-system -l component=kube-controller-manager | grep -i "cronjob"
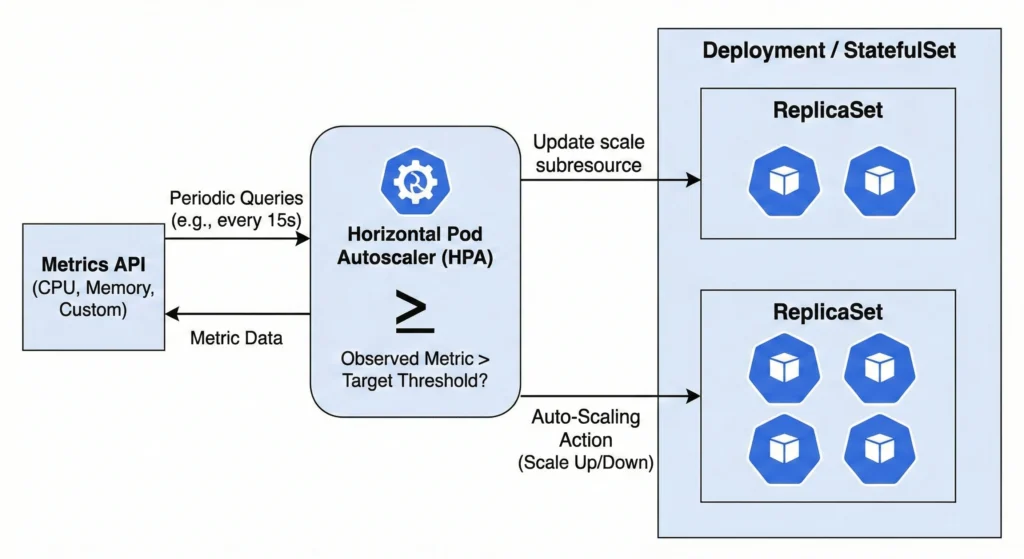
Horizontal Pod Autoscaler (HPA) Controller: horizontalpodautoscaling
- Role: Automatically adjusts pod replica counts.
- How it works: It periodically queries the metrics API for CPU, memory, or custom metrics. If the observed metric exceeds your target threshold, it automatically updates the scale subresource of the target Deployment or StatefulSet.
- Command:
kubectl logs -n kube-system -l component=kube-controller-manager | grep -i "horizontalpodautoscaling"
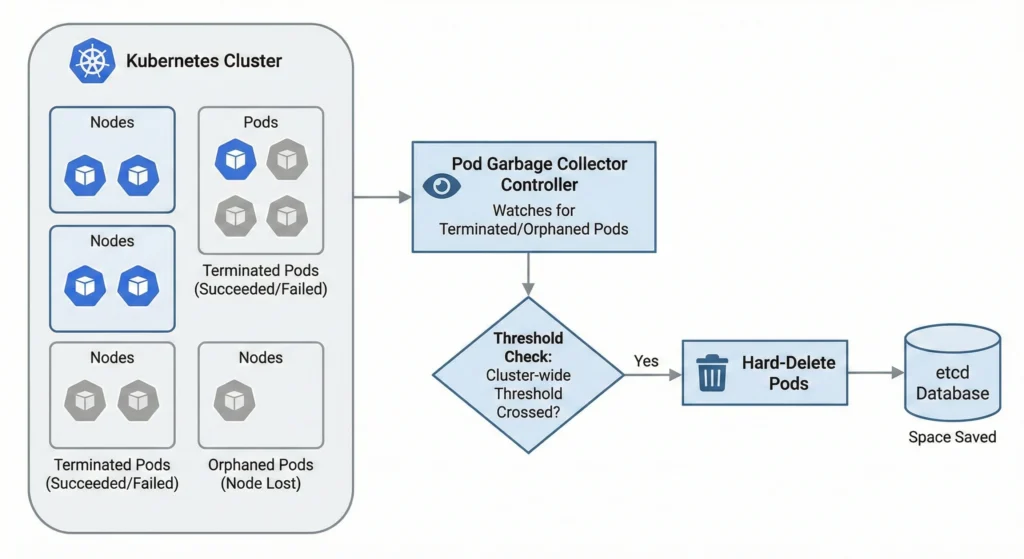
Pod Garbage Collector (PodGC) Controller: podgc
- Role: Removes terminated pods.
- How it works: It watches for orphaned pods (where the physical node no longer exists) or pods stuck in terminated states (Succeeded or Failed). Once the cluster-wide threshold is crossed, it hard-deletes them to save space in the etcd database.
- Command:
kubectl logs -n kube-system -l component=kube-controller-manager | grep -i "podgc"
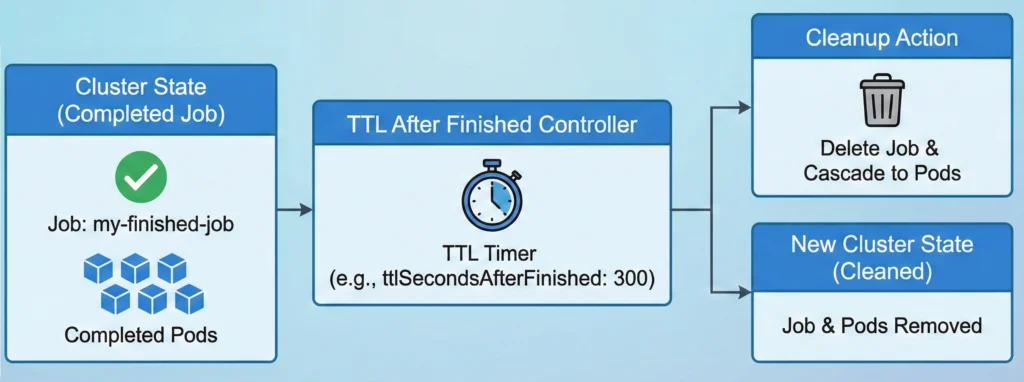
TTL After Finished Controller: ttlafterfinished
- Role: Cleans up finished Job resources.
- How it works: Once a Job completes, a timer starts based on a user-defined Time-To-Live (TTL) field. When the TTL expires, the controller deletes the Job and cascades the deletion to clear out its lingering Pods.
- Command:
kubectl logs -n kube-system -l component=kube-controller-manager | grep -i "ttlafterfinished"
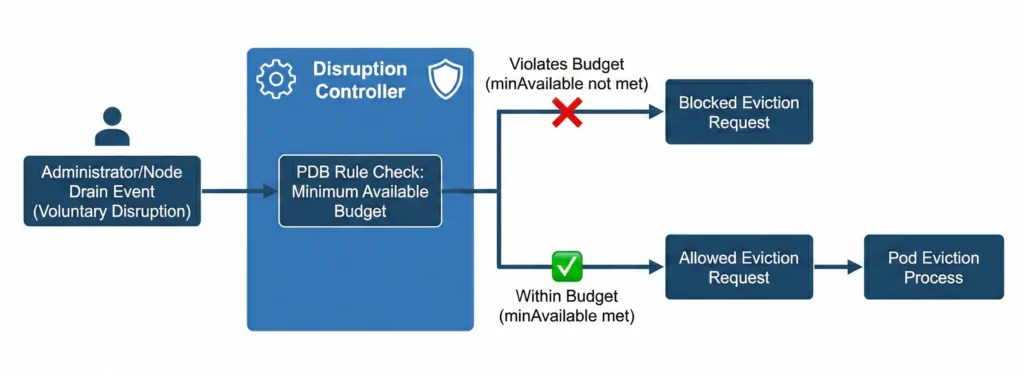
Disruption Controller: disruption
- Role: Enforces PodDisruptionBudget (PDB) rules.
- How it works: During voluntary disruptions (like an administrator draining a node), it calculates how many pods are allowed to be temporarily taken down. If deleting a pod violates the minimum available budget, it blocks the eviction request.
- Command:
kubectl logs -n kube-system -l component=kube-controller-manager | grep -i "disruption"
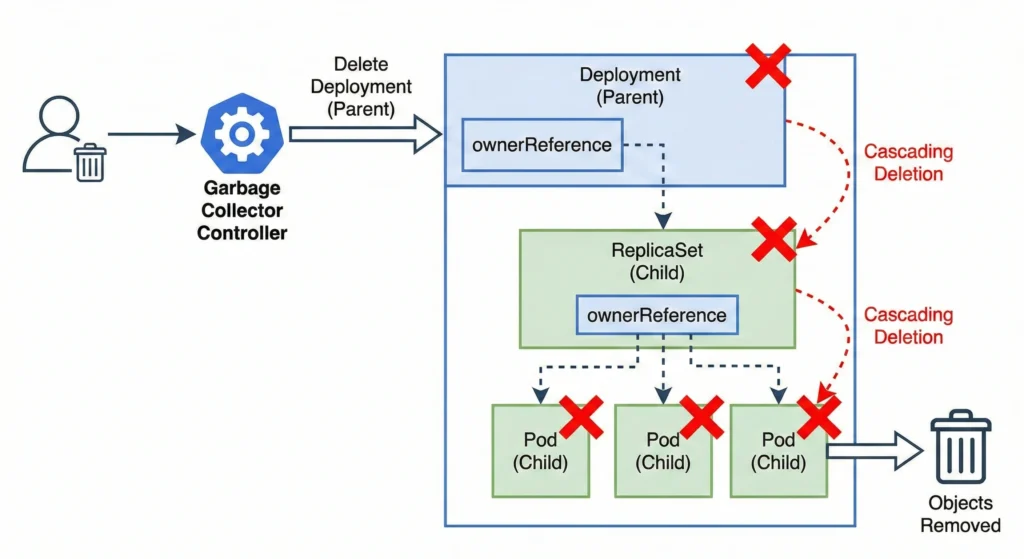
Garbage Collector Controller: garbagecollector
- Role: Removes unneeded objects.
- How it works: It relies on
ownerReferences. When a “parent” object (like a Deployment) is deleted, the garbage collector identifies all “child” objects (ReplicaSets, Pods) and safely cascades the deletion to them. - Command:
kubectl logs -n kube-system -l component=kube-controller-manager | grep -i "garbagecollector"
2. Node & Namespace Management
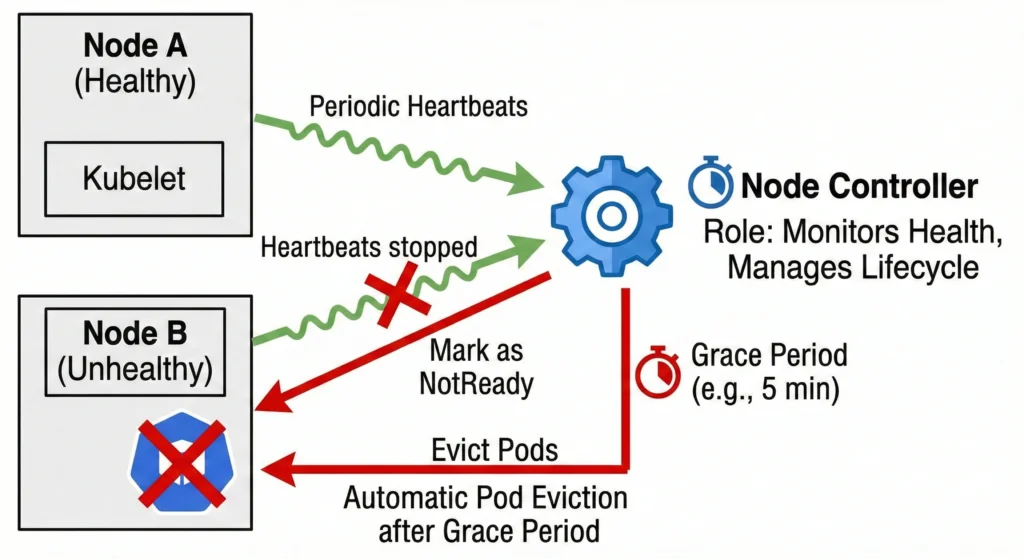
Node Controller: nodelifecycle
- Role: Monitors node health and manages node lifecycle.
- How it works: It receives periodic heartbeats from the kubelet on each node. If a node stops reporting, the controller marks the node as
NotReadyand, after a grace period (default 5 minutes), automatically evicts the Pods running on it. - Command:
kubectl logs -n kube-system -l component=kube-controller-manager | grep -i "nodelifecycle"
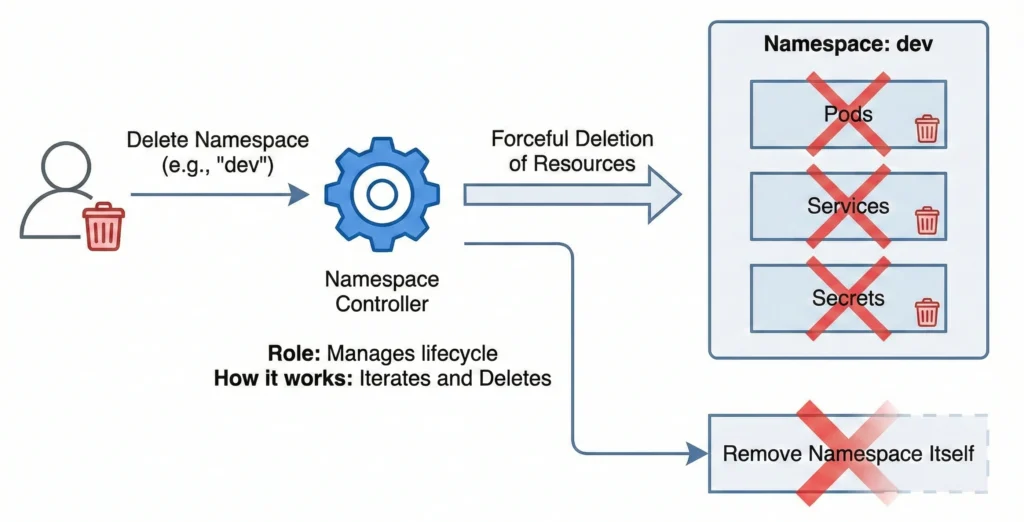
Namespace Controller: namespace
- Role: Manages the lifecycle of namespaces.
- How it works: When you delete a namespace, this controller takes over. It iterates through all API resources (Pods, Services, Secrets) in that namespace and forcefully deletes them before finally removing the namespace itself.
- Command:
kubectl logs -n kube-system -l component=kube-controller-manager | grep -i "namespace"
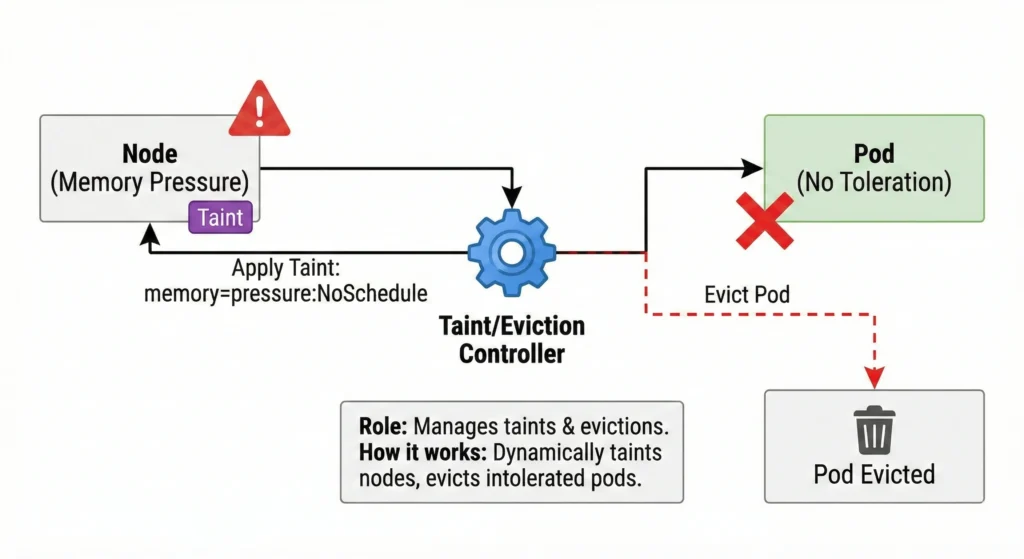
Taint/Eviction Controller: nodelifecycle
- Role: Manages node taints and handles pod evictions.
- How it works: It dynamically applies taints to nodes experiencing issues (e.g., memory pressure, disk pressure). It then automatically evicts Pods that do not possess the corresponding tolerations for those taints.
- Command:
kubectl logs -n kube-system -l component=kube-controller-manager | grep -i "taint"
3. Networking & Routing
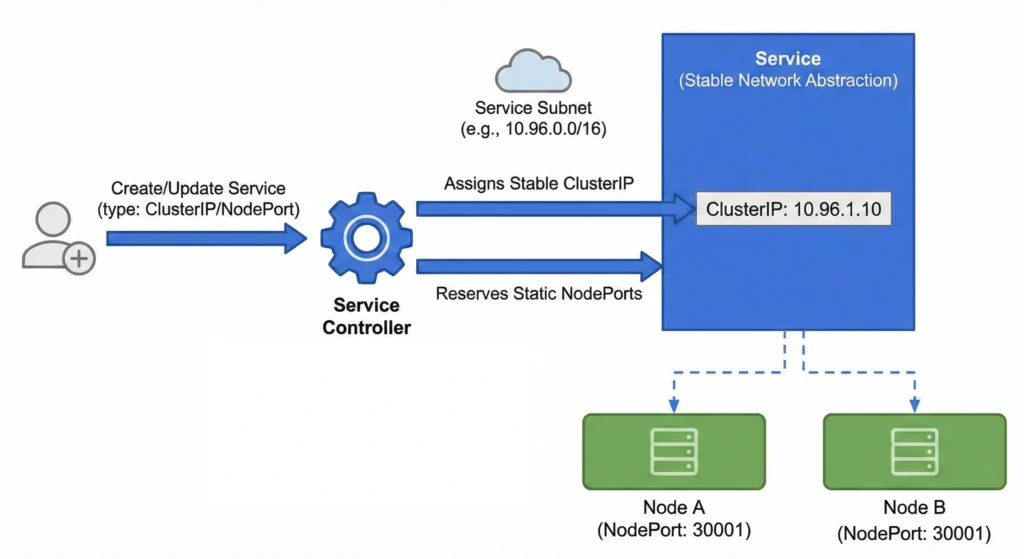
Service Controller: service
- Role: Manages the configuration and internal network allocation for Service resources.
- How it works: It watches for the creation, update, or deletion of Service objects. When a standard internal service is defined, it ensures that a unique, stable internal IP address (
ClusterIP) is assigned from the cluster’s available service subnet, and if requested, reserves specific static ports (NodePort) across all nodes. This establishes the stable network abstraction that internal routing components rely on. - Command:
kubectl logs -n kube-system -l component=kube-controller-manager | grep -i "service"
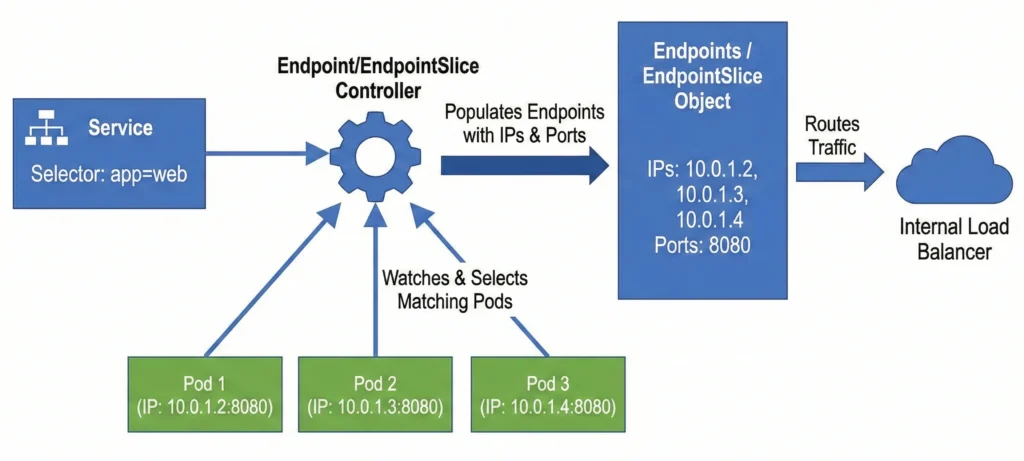
Endpoint: endpoint / EndpointSlice Controller: endpointslice
- Role: Links services to pods.
- How it works: It watches Services and Pods. When a Service defines a selector, this controller finds all matching Pods, extracts their IP addresses and ports, and populates the Endpoints object so internal load balancers know where to route traffic.
- Command:
kubectl logs -n kube-system -l component=kube-controller-manager | grep -E -i "endpoint|endpointslice"
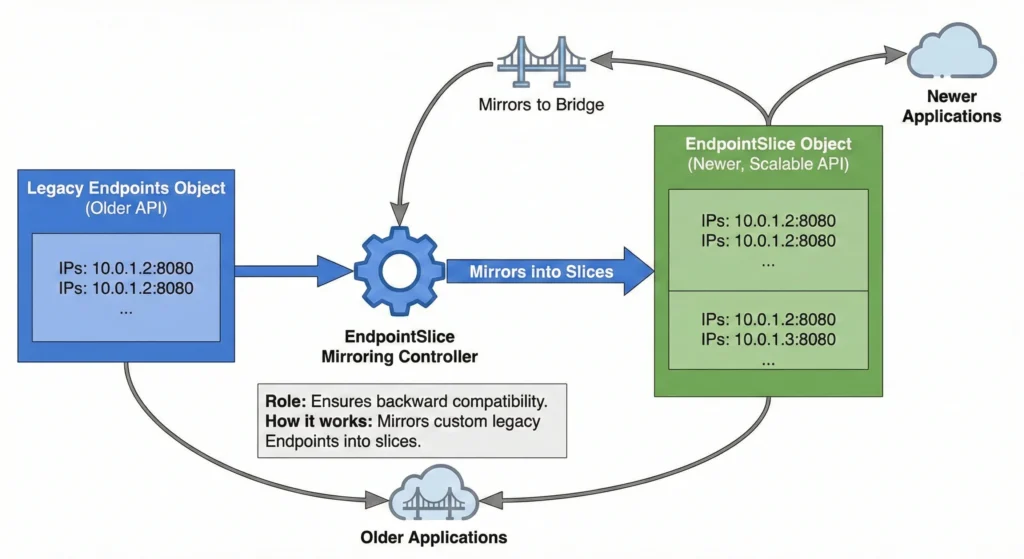
EndpointSlice Mirroring Controller: endpointslicemirroring
- Role: Ensures backward compatibility.
- How it works: Because EndpointSlices are a newer, more scalable replacement for the older Endpoints API, this controller automatically mirrors custom legacy Endpoints into slices so older applications don’t break.
- Command:
kubectl logs -n kube-system -l component=kube-controller-manager | grep -i "endpointslicemirroring"
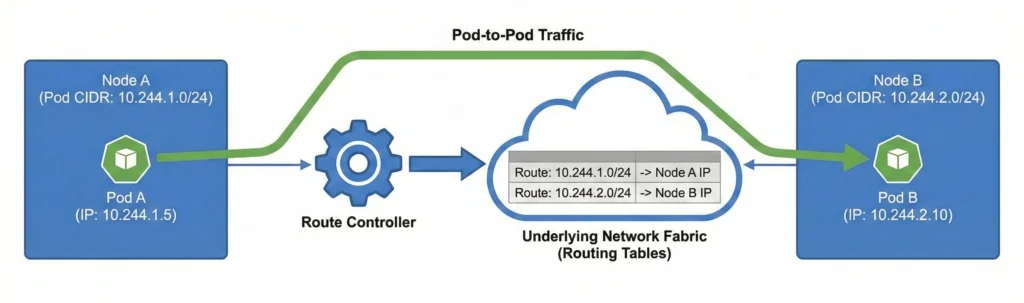
Route Controller: route
- Role: Configures the cluster’s network fabric for cross-node pod communication.
- How it works: It monitors the cluster for nodes joining or leaving. When a node is assigned a specific subnet (Pod CIDR) for its internal pods, this controller updates the underlying network routing tables. This ensures that network traffic destined for a specific pod’s IP address is correctly forwarded to the physical node hosting that pod, allowing seamless pod-to-pod communication across the entire cluster.
- Command:
kubectl logs -n kube-system -l component=kube-controller-manager | grep -i "route"
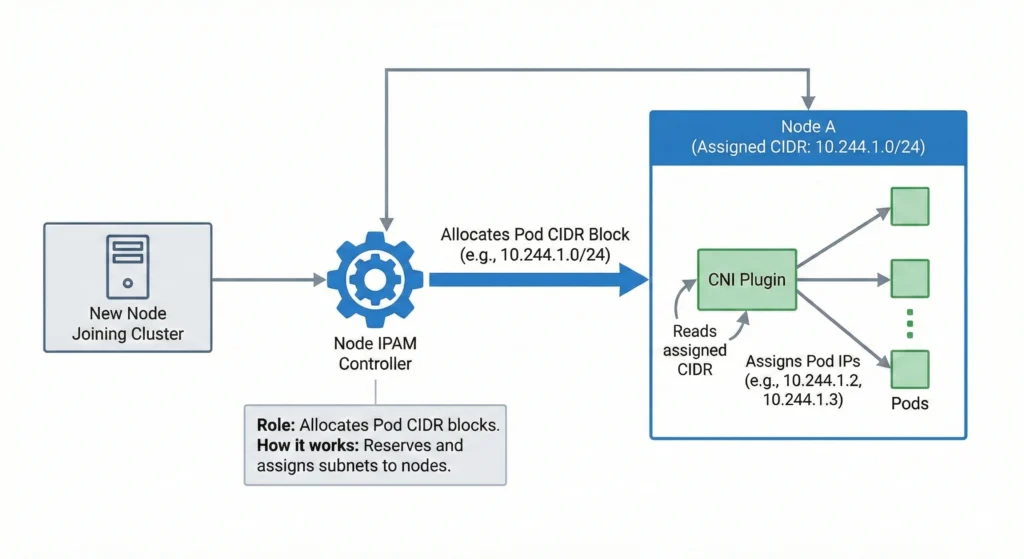
Node IPAM Controller: nodeipam
- Role: Allocates Pod CIDR blocks for nodes.
- How it works: In clusters relying on basic Kubernetes network configurations, it reserves and assigns a specific subnet (CIDR block) to each new node. Network plugins (CNIs) read this to know which IPs they are allowed to assign to pods on that node.
- Command:
kubectl logs -n kube-system -l component=kube-controller-manager | grep -i "nodeipam"
4. Storage & Volume Management
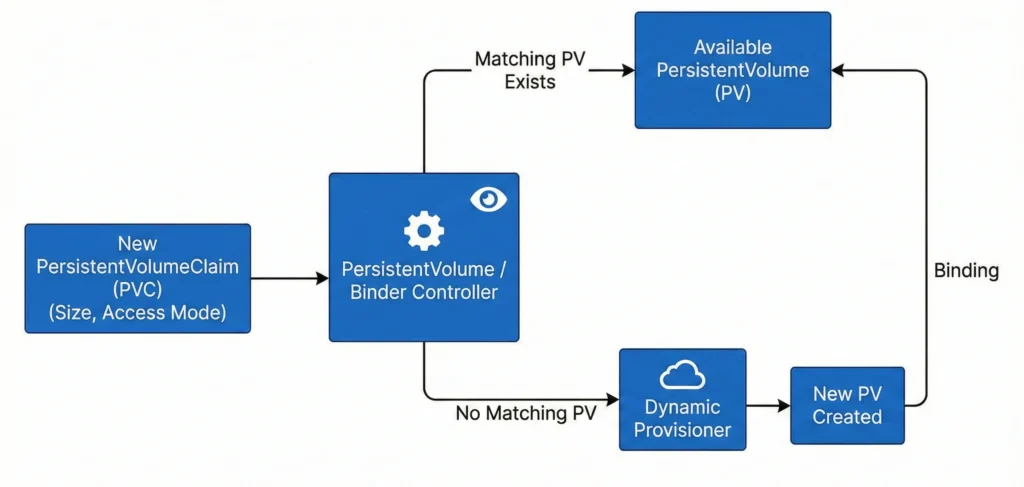
PersistentVolume / Binder Controller: persistentvolume-binder
- Role: Manages storage volume provisioning and binding.
- How it works: It constantly watches for new PersistentVolumeClaims (PVCs). It finds an available PersistentVolume (PV) that matches the size and access mode requested and binds them together. If no PV exists, it triggers dynamic provisioning.
- Command:
kubectl logs -n kube-system -l component=kube-controller-manager | grep -i "persistentvolume-binder"
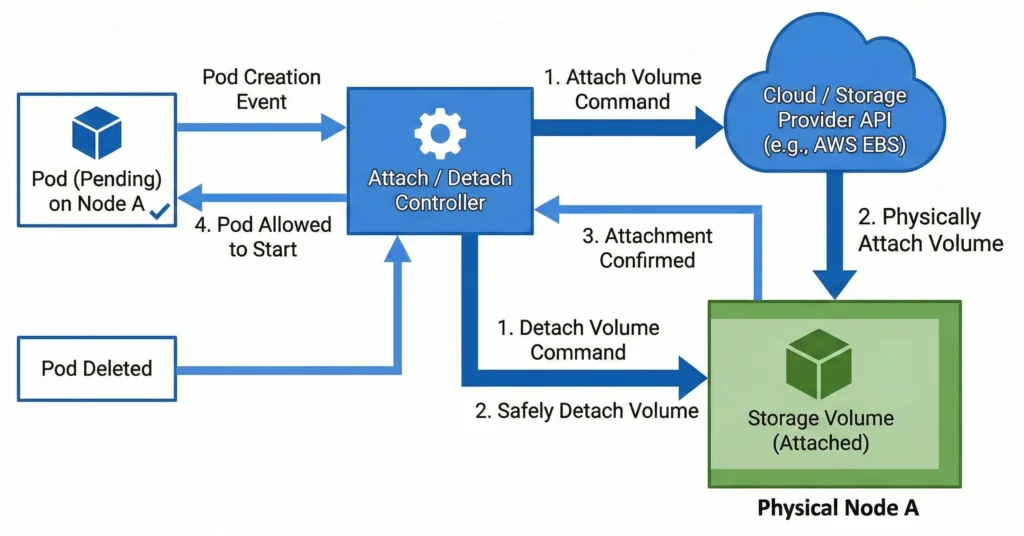
Attach / Detach Controller: attachdetach
- Role: Manages volume attachments.
- How it works: It communicates with the underlying cloud or storage provider to ensure a block storage volume is successfully attached to the correct physical node before a Pod is allowed to start, and safely detached when the Pod is deleted.
- Command:
kubectl logs -n kube-system -l component=kube-controller-manager | grep -i "attachdetach"
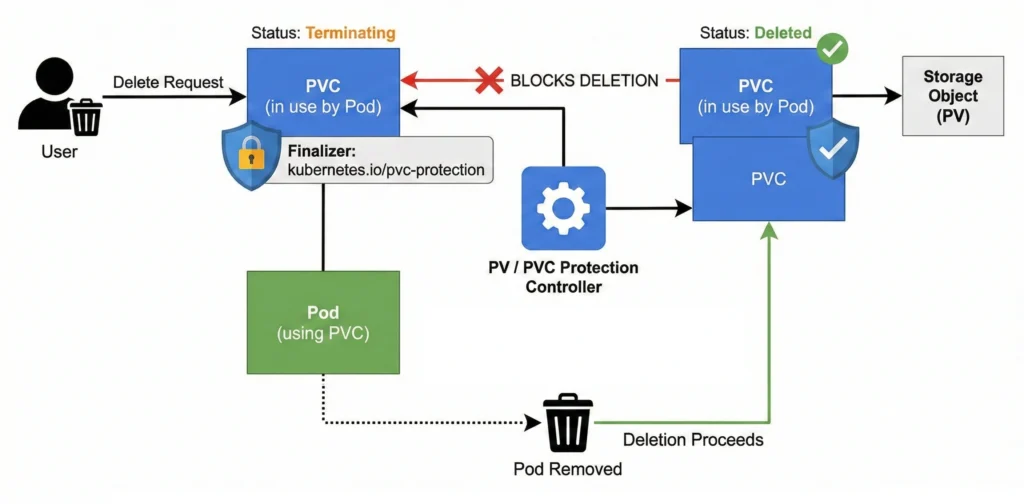
PV / PVC Protection Controllers: pv-protection / pvc-protection
- Role: Prevents accidental deletion of storage.
- How it works: They inject “finalizers” into storage objects. If a user tries to delete a PVC while a Pod is still actively using it, the controller blocks the deletion, putting the PVC in a “Terminating” state until the Pod is safely removed.
- Command:
kubectl logs -n kube-system -l component=kube-controller-manager | grep -E -i "pv-protection|pvc-protection"
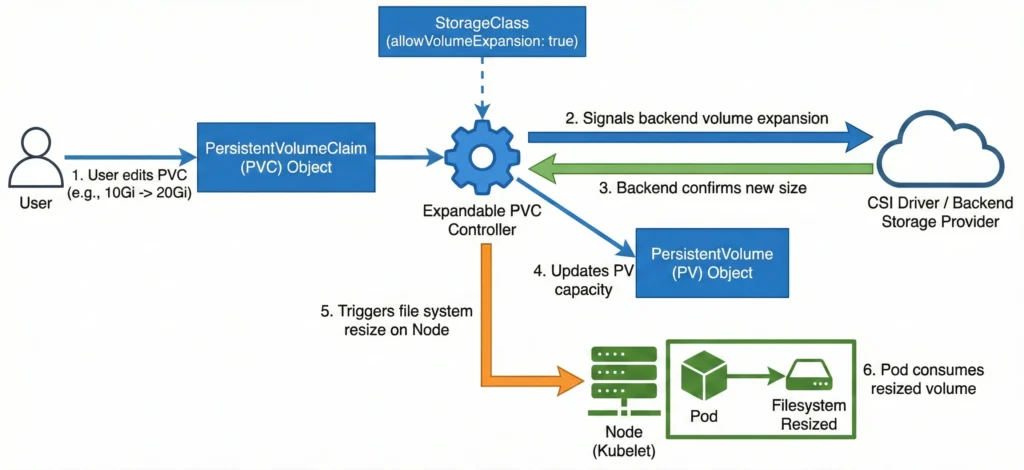
Expandable PVC Controller: expand-controller
- Role: Automates the resizing of existing persistent storage volumes (PVs) and their underlying physical storage when a user requests more space, without requiring manual data migration.
- How it works: It monitors PersistentVolumeClaim (PVC) objects for updates where the requested storage capacity is increased. If the associated StorageClass has
allowVolumeExpansionset totrue, this controller passes the expansion request to the underlying storage provider (like a CSI driver) to expand the backend physical volume. Once the backend confirms the new size, the controller updates the PersistentVolume (PV) API object’s status to reflect the new capacity. Finally, it signals the node’skubeletto resize the actual mounted file system so the Pod can safely consume the newly added space. - Command:
kubectl logs -n kube-system -l component=kube-controller-manager | grep -i "expand-controller"
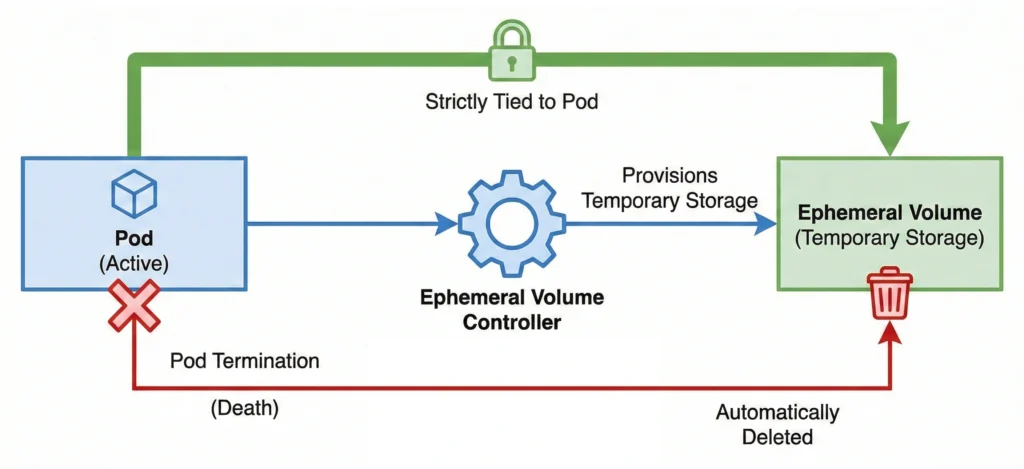
Ephemeral Volume Controller: ephemeral-volume
- Role: Manages generic ephemeral volumes.
- How it works: It provisions temporary storage volumes that are strictly tied to a specific Pod. When the Pod dies, the controller ensures the volume is automatically deleted.
- Command:
kubectl logs -n kube-system -l component=kube-controller-manager | grep -i "ephemeral-volume"
5. Security, Service Accounts, & Certificates
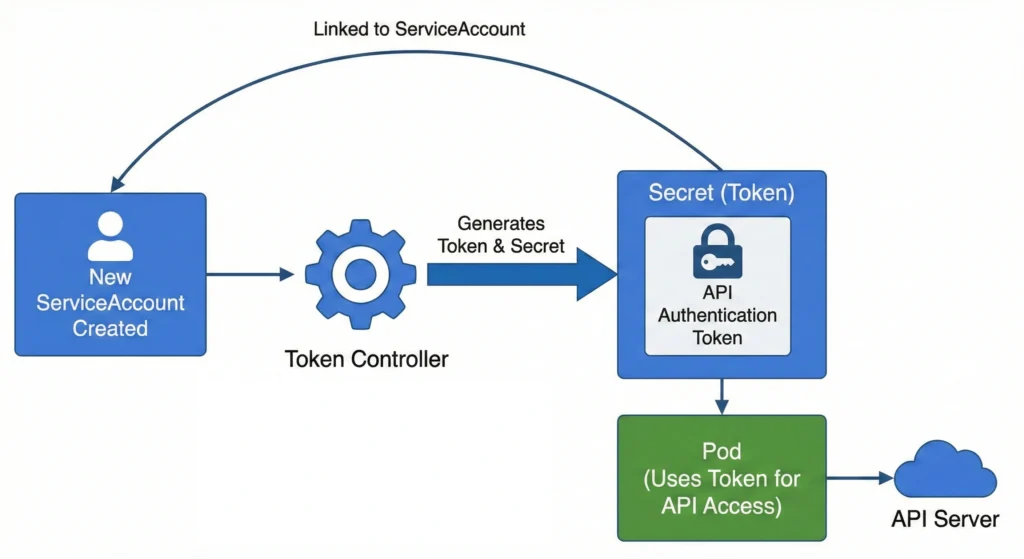
ServiceAccount Controller: serviceaccount
- Role: Creates default service accounts.
- How it works: Every time a new Namespace is created, this controller automatically injects a default ServiceAccount into it, ensuring pods have a baseline identity to interact with the API securely.
- Command:
kubectl logs -n kube-system -l component=kube-controller-manager | grep -i "serviceaccount"

Token Controller: serviceaccount-token
- Role: Generates tokens for service accounts.
- How it works: It watches for new ServiceAccounts and ensures the underlying secret tokens or projected volumes required for those accounts to authenticate to the API server are generated.
- Command:
kubectl logs -n kube-system -l component=kube-controller-manager | grep -i "serviceaccount-token"
Root CA Certificate Publisher: root-ca-cert-publisher
- Role: Publishes root CA certificates.
- How it works: It injects a generic
kube-root-ca.crtConfigMap into every namespace. This allows any Pod in the cluster to securely verify the TLS identity of the Kubernetes API server. - Command:
kubectl logs -n kube-system -l component=kube-controller-manager | grep -i "root-ca-cert-publisher"

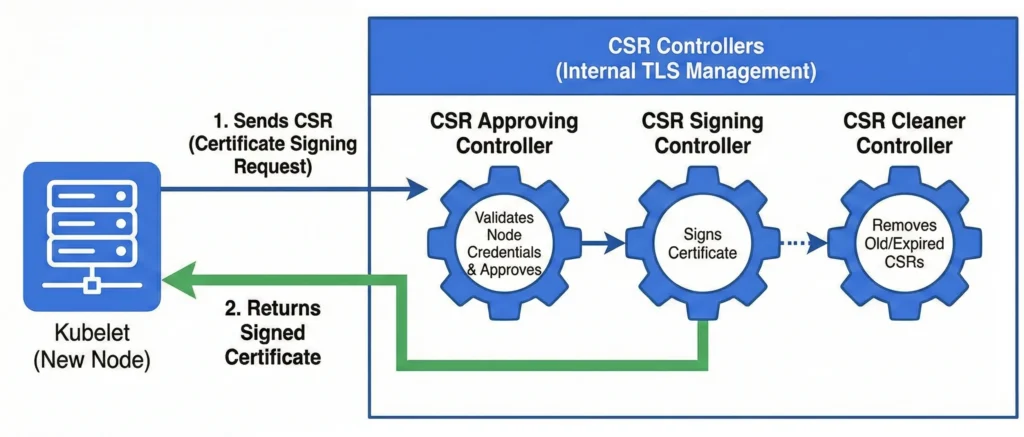
Certificate Signing Request (CSR) Controllers: csrapproving, csrcleaner, csrsigning
- Role: Manages internal TLS certificates.
- How it works: Broken into three sub-loops (
csrapproving,csrcleaner, andcsrsigning), this handles requests from kubelets joining the cluster. It validates the node’s credentials, approves the CSR, and signs the certificate to establish secure communication. - Command:
kubectl logs -n kube-system -l component=kube-controller-manager | grep -i "csr"
ClusterRole Aggregation Controller: clusterrole-aggregation
- Role: Combines rules into aggregated roles.
- How it works: It watches for specific labels on custom ClusterRoles and automatically injects their permissions into the default cluster-wide roles (like
admin,edit, andview). - Command:
kubectl logs -n kube-system -l component=kube-controller-manager | grep -i "clusterrole-aggregation"

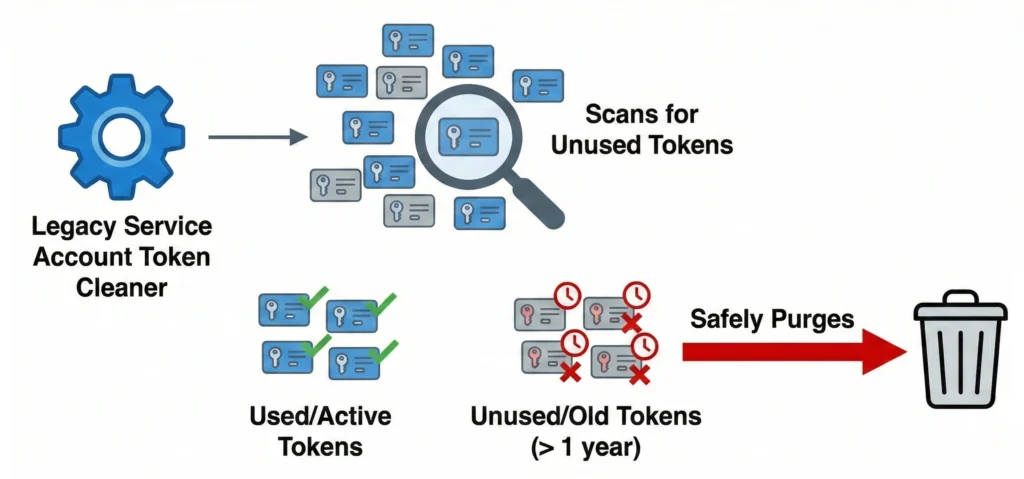
Legacy Service Account Token Cleaner: legacy-service-account-token-cleaner
- Role: Removes unused tokens.
- How it works: In modern clusters, it scans for auto-generated, secret-based service account tokens that haven’t been used in a long time and safely purges them to reduce security attack surfaces.
- Command:
kubectl logs -n kube-system -l component=kube-controller-manager | grep -i "legacy-service-account-token-cleaner"
6. Resource Limits & Advanced Features
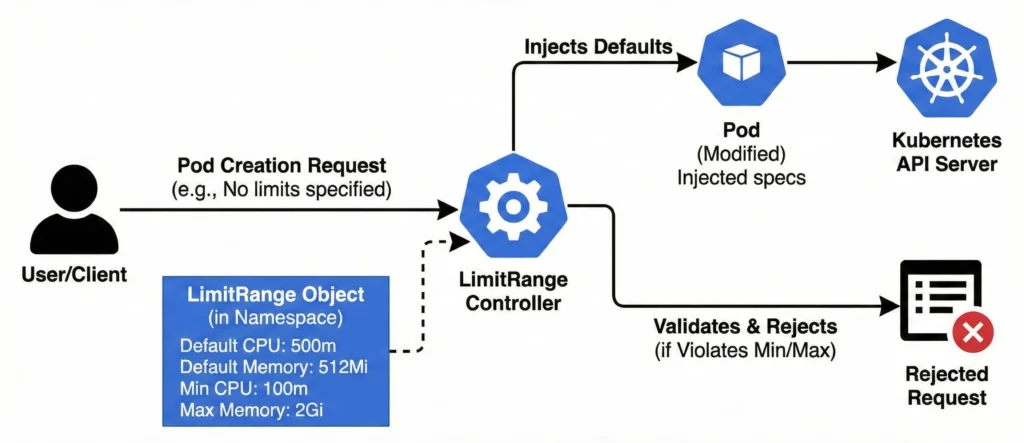
LimitRange Controller: LimitRanger (Admission Plugin)
- Role: Enforces minimum and maximum compute resource constraints on individual Pods and Containers within a Namespace.
- How it works: It intercepts Pod and Container creation or update requests. If an incoming Pod lacks specific CPU or memory configurations, this controller automatically injects the default requests and limits defined in the LimitRange object. If the Pod does specify its own resources, the controller validates them against the allowed minimums and maximums, outright rejecting the deployment if it violates the set boundaries.
- Command:
kube-apiserver -h | grep enable-admission-plugins(Note: Since this is an Admission Controller, it runs in thekube-apiserver, not the controller manager).
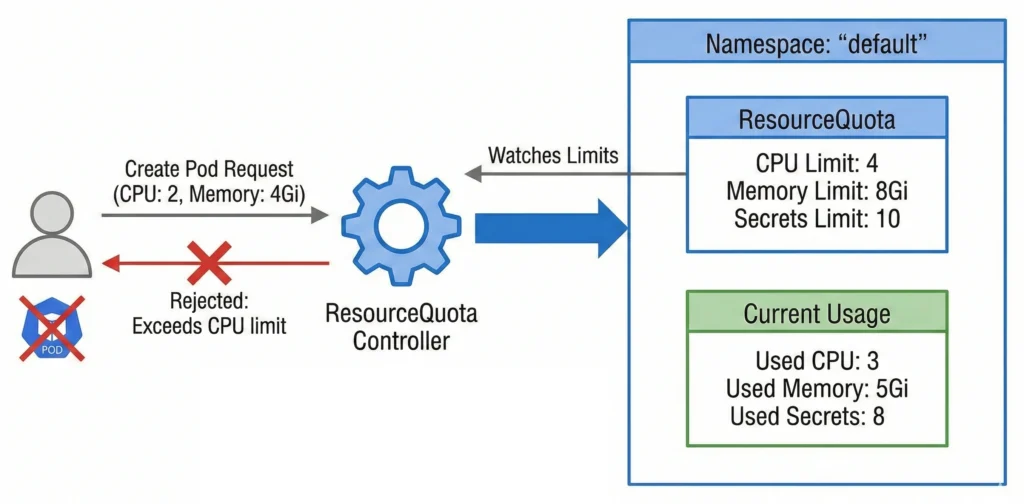
ResourceQuota Controller: resourcequota
- Role: Enforces resource usage limitations.
- How it works: It watches limits defined at the Namespace level. If a user tries to create a Pod that would exceed the allotted CPU, memory, or object limits (like maximum number of secrets), the controller rejects the request.
- Command:
kubectl logs -n kube-system -l component=kube-controller-manager | grep -i "resourcequota"
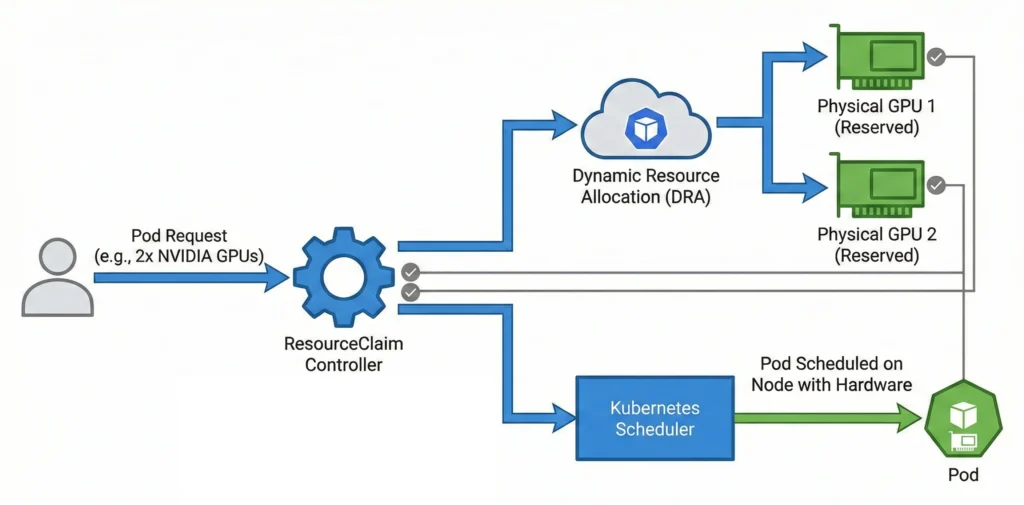
ResourceClaim Controller: resourceclaim
- Role: Manages Dynamic Resource Allocation (DRA).
- How it works: For advanced hardware (like GPUs or specialized network interfaces), it handles fine-grained requests, ensuring the physical hardware is reserved and allocated before the Pod is scheduled.
- Command:
kubectl logs -n kube-system -l component=kube-controller-manager | grep -i "resourceclaim"
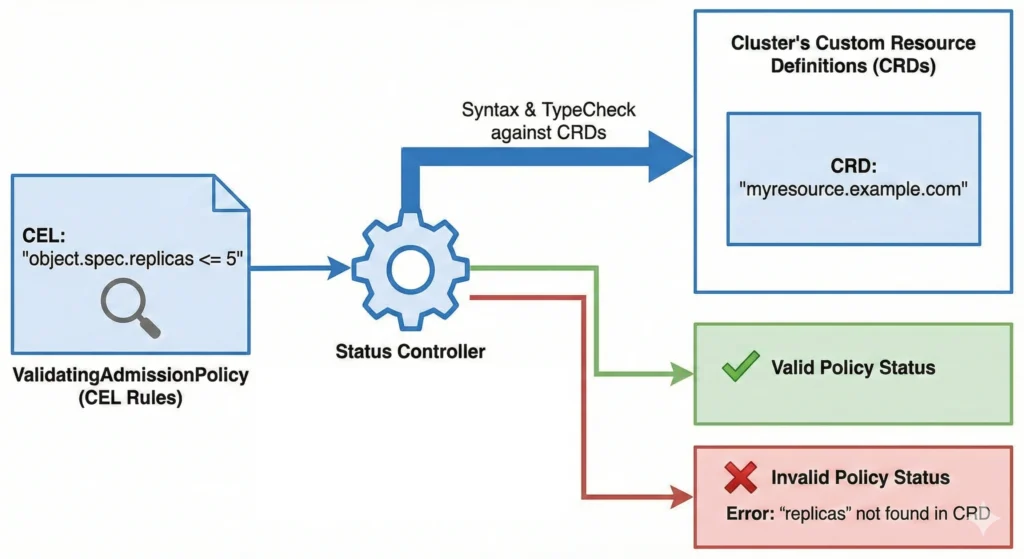
ValidatingAdmissionPolicy Status Controller: validatingadmissionpolicy-status
- Role: Tracks CEL-based policies.
- How it works: It monitors newer Common Expression Language (CEL) admission policies, checking syntax and type-checking the rules against the cluster’s Custom Resource Definitions (CRDs) to report if the policy is valid.
- Command:
kubectl logs -n kube-system -l component=kube-controller-manager | grep -i "validatingadmissionpolicy"
7. Disabled-by-Default / Specialized
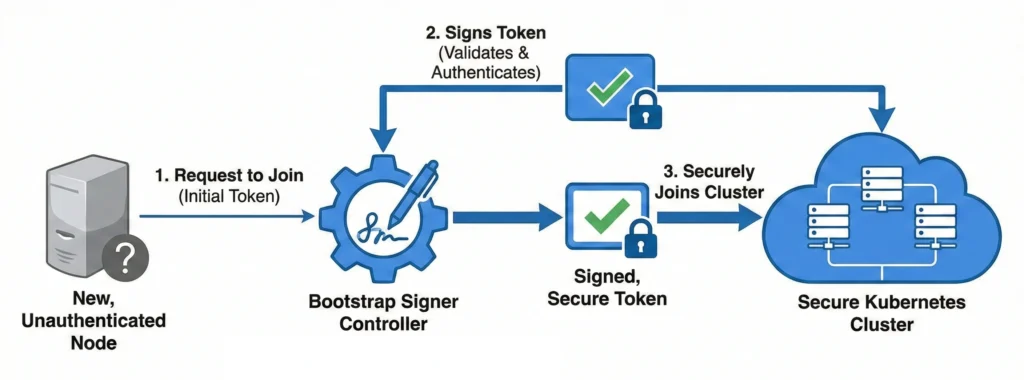
Bootstrap Signer: bootstrapsigner
- Role: Manages TLS bootstrapping.
- How it works: It automatically signs tokens for new, unauthenticated nodes attempting to join the cluster, facilitating a secure onboarding process without manual intervention.
- Command:
kubectl logs -n kube-system -l component=kube-controller-manager | grep -i "bootstrapsigner"
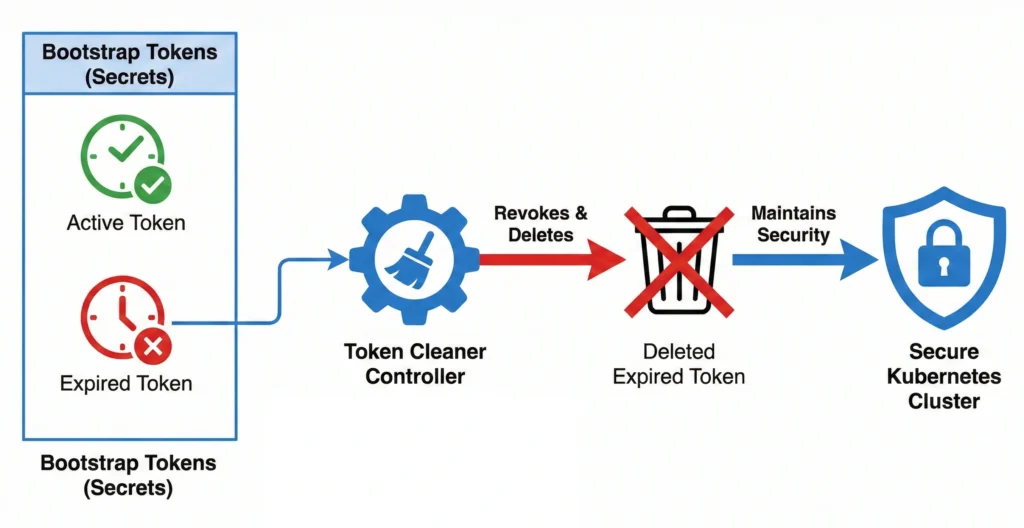
Token Cleaner: tokencleaner
- Role: Cleans up token secrets.
- How it works: Works alongside the Bootstrap Signer to automatically revoke and delete bootstrap tokens once they have expired to maintain cluster security.
- Command:
kubectl logs -n kube-system -l component=kube-controller-manager | grep -i "tokencleaner"
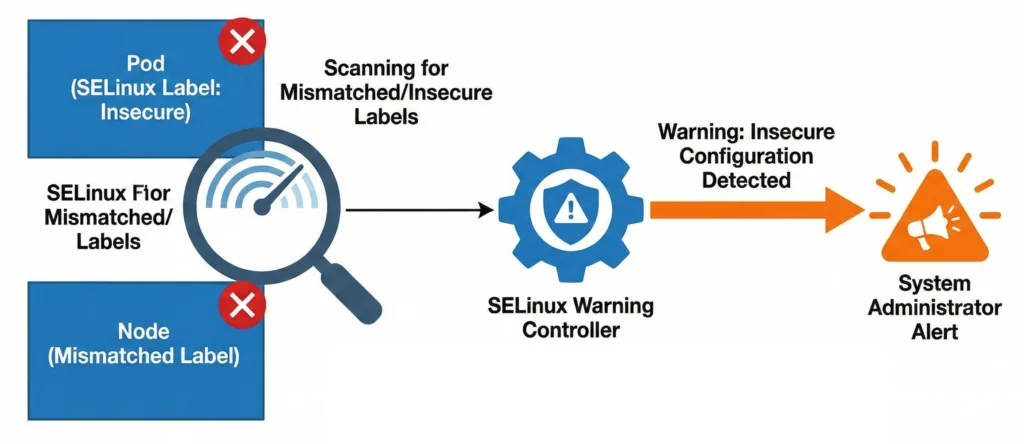
SELinux Warning Controller: selinuxwarning
- Role: Monitors SELinux configuration issues.
- How it works: It serves as an audit loop, scanning for and warning administrators about Pods or Nodes that have mismatched or potentially insecure SELinux labels applied to them.
- Command:
kubectl logs -n kube-system -l component=kube-controller-manager | grep -i "selinuxwarning"
Cloud-Specific Controllers: Not included in Kube Controller Manager
These loops do not run in the kube-controller-manager. Instead, they are decoupled into a separate binary called the cloud-controller-manager (CCM). This architectural split allows cloud providers (AWS, GCP, Azure) to release updates to their specific infrastructure integrations independently of the core Kubernetes release cycle.
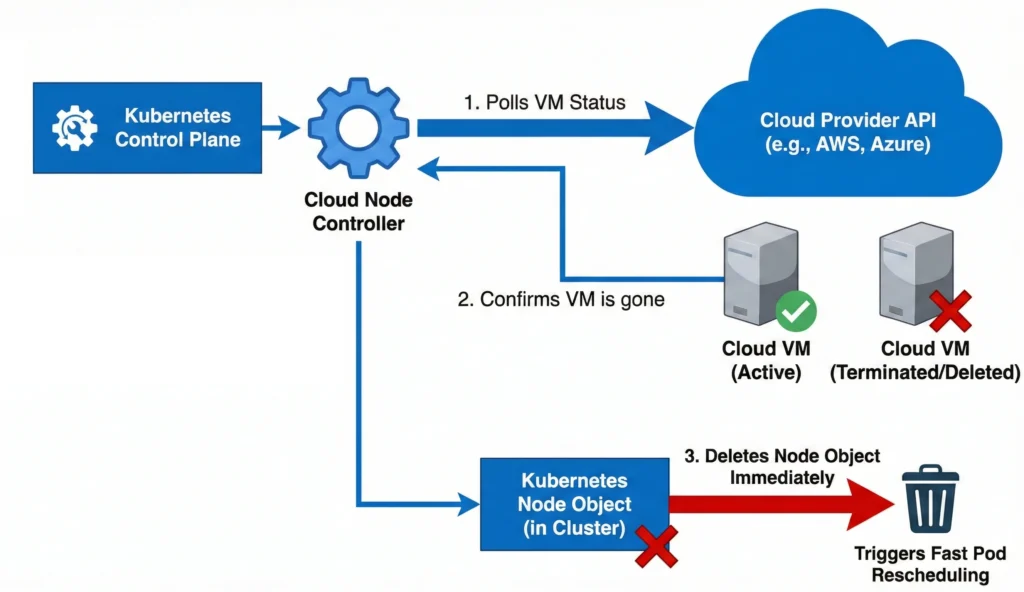
Cloud Node Controller: cloud-node
- Role: Syncs the state of Kubernetes Nodes with the cloud provider’s virtual machine instances.
- How it works: It continuously polls the cloud provider’s API to monitor the status of the underlying VMs. If a Kubernetes Node stops communicating with the control plane, this controller asks the cloud provider if the actual VM has been deleted, powered off, or terminated. If the VM no longer exists, it immediately deletes the Node object from the cluster to trigger fast pod rescheduling, rather than waiting for standard Kubernetes timeouts.
- Command:
kubectl logs -n kube-system -l component=cloud-controller-manager | grep -i "cloud-node"
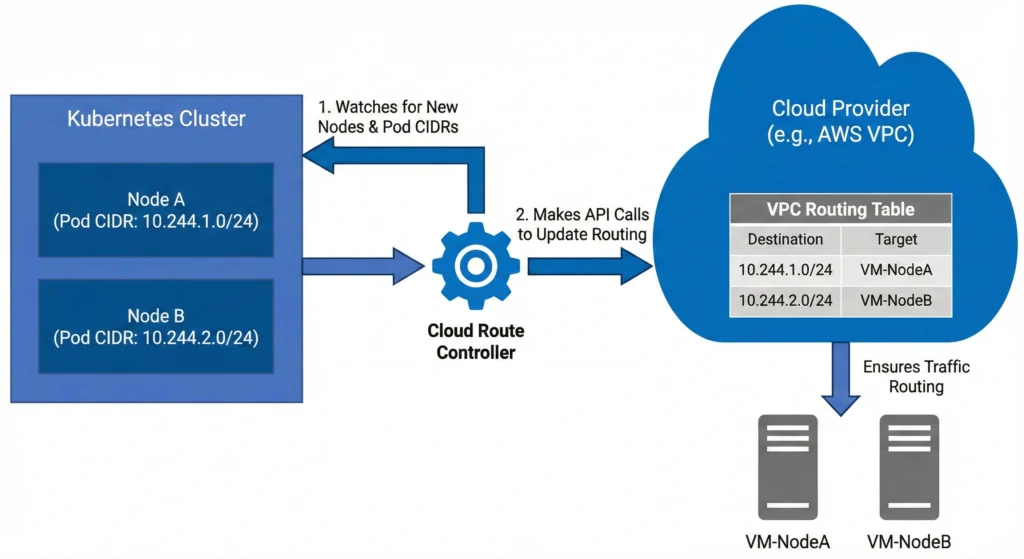
Cloud Route Controller: cloud-route
- Role: Configures the cloud provider’s network infrastructure to allow cross-node pod communication.
- How it works: It watches the cluster for new nodes and their assigned Pod CIDR blocks (the range of IP addresses given to pods on that node). It then makes API calls to the cloud provider to update the virtual private cloud (VPC) routing tables. This ensures the cloud network physically knows how to route traffic meant for a specific pod’s IP address to the correct virtual machine.
- Command:
kubectl logs -n kube-system -l component=cloud-controller-manager | grep -i "cloud-route"
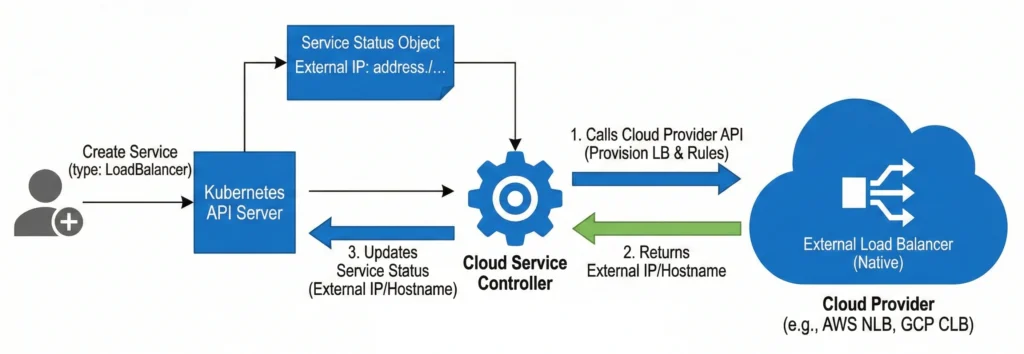
Cloud Service Controller: service (inside the CCM)
- Role: Manages the provisioning and lifecycle of external cloud load balancers.
- How it works: It listens specifically for Service objects created with
type: LoadBalancer. When one is created, updated, or deleted, this controller talks directly to the cloud provider’s API to spin up a native load balancer (like an AWS Network Load Balancer or GCP Cloud Load Balancer), configures the necessary firewall rules, and updates the Kubernetes Service status with the newly provisioned external IP address or hostname. - Command:
kubectl logs -n kube-system -l component=cloud-controller-manager | grep -i "service"
However, you can still list them! Depending on whether you want to see all possible controllers, the ones explicitly configured, or the ones actively running right now, here are the exact commands you can use.
1. The “Pro” Way: List Actively Running Controllers via Metrics
The most accurate way to see exactly which controllers are currently running and processing data in your cluster is to query the kube-controller-manager‘s internal metrics endpoint. Every active controller registers a “workqueue” metric.
You can use this command to dynamically fetch the control plane pod name, query its metrics via the API proxy, and extract the names of the running controllers:
kubectl get --raw /api/v1/namespaces/kube-system/pods/$(kubectl get pods -n kube-system -l component=kube-controller-manager -o jsonpath='{.items[0].metadata.name}'):10257/proxy/metrics | grep "workqueue_adds_total" | awk -F'name="' '{print $2}' | awk -F'"' '{print $1}' | sort -u
(Note: This requires you to have cluster-admin privileges to access the raw metrics API).
2. The Configuration Way: Check What is Explicitly Enabled
If you want to see if your cluster administrators have manually enabled or disabled specific controllers, you can check the arguments passed to the binary.
Run this command on your control plane node to check the static pod manifest:
cat /etc/kubernetes/manifests/kube-controller-manager.yaml | grep "\-\-controllers"
- If the command returns nothing (or
--controllers=*): Your cluster is running the default set of controllers. - If it returns a comma-separated list: You will see exactly which ones are turned on (e.g.,
bootstrapsigner) or off (e.g.,-cronjob).
3. The Documentation Way: See the Full Master List
If you want to see the master list of every single controller that the binary is capable of running (including disabled-by-default ones), you can ask the binary for its help menu.
You can execute the help command directly inside the running kube-controller-manager pod and filter for the --controllers flag description:
kubectl exec -it -n kube-system $(kubectl get pods -n kube-system -l component=kube-controller-manager -o jsonpath='{.items[0].metadata.name}') -- kube-controller-manager -h | grep -A 10 "\-\-controllers"
This will print out the raw help text from the binary itself, showing you the exact string names (like deployment, replicaset, nodeipam, etc.) that you can use to enable or disable them.